Nissan Juke Service and Repair Manual : Air cleaner and air duct
Exploded View
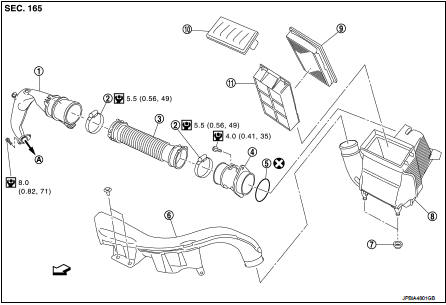
1. Turbocharger air inlet pipe
2. Clamp
3. Air duct (suction)
4. Air mass flow sensor
5. O-ring
6. Air duct (inlet)
7. Grommet
8. Air cleaner case
9. Air cleaner filter
10. Cover
11. Holder
A. : To turbocharger
 : Vehicle front
 : N·m (kg-m, in-lb)
 : Always replace after every
disassembly.
Removal and Installation
REMOVAL
1. Remove resonator.
2. Remove air duct (inlet).
3. Remove battery. Refer to PG-124, "Exploded View".
4. Remove air duct (suction).
5. Disconnect mass air flow sensor harness connector.
6. Remove air cleaner case by sliding the air cleaner case frontward.
CAUTION:
Slide the air cleaner case carefully so as not to damage it on the air cleaner
case and harness
bracket.
INSTALLATION
• Install in the reverse order of removal.

 Charge air cooler
Exploded View
1. Air inlet hose
2. Clamp
3. Air inlet tube
4. Air inlet hose
5. Charge air cooler
6. Air inlet hose
7. Air inlet tube
8. Turbocharger
9. Air inlet tube assembly
A. 1 ...
Other materials:
Commercial Service Tools
HFC-134a (R-134a) Service Tool and Equipment
• Never mix HFC-134a (R-134a) refrigerant and/or its specified lubricant with
CFC-12 (R-12) refrigerant and/
or its lubricant.
• Separate and non-interchangeable service equipment must be used for handling
each type of refrigerant/
lubricant.
...
Radiator : Inspection
Check radiator for mud or clogging. If necessary, clean radiator as follows.
CAUTION:
• Be careful not to bend or damage radiator fins.
• When radiator is cleaned without removal, remove all surrounding parts such as
radiator cooling fan
assembly and horns. Then tape harness and harness ...
NISSAN customer care program
NISSAN CARES ...
Both NISSAN and your NISSAN dealer are dedicated to serving all your automotive
needs. Your satisfaction with your vehicle and your NISSAN dealer are our primary
concerns. Your NISSAN dealer is always available to assist you with all your automobile
sales and service needs.
...
