Nissan Juke Owners Manual : Remote keyless entry system (if so equipped)
It is possible to lock/unlock all doors (including the lift gate), and activate the panic alarm by using the keyfob from outside the vehicle.
Before locking the doors, make sure the key is not left in the vehicle.
The keyfob can operate at a distance of approximately 33 ft (10 m) from the vehicle.
(The effective distance depends upon the conditions around the vehicle.) As many as 5 keyfobs can be used with one vehicle. For information concerning the purchase and use of additional keyfobs, contact a NISSAN dealer.
The keyfob will not function in the following situations.
• When the keyfob is not within the operational range.
• When the doors are open or not closed securely.
• When the ignition switch is in the “ON” position.
• When the battery is discharged.
WARNING
The remote keyless entry keyfob transmits radio waves when the buttons are pushed. The FAA advises that the radio waves may affect aircraft navigation and communication systems. Do not operate the keyfob while on an airplane.
Make sure the buttons are not operated unintentionally when the unit is stored during a flight.
CAUTION
The following conditions or occurrences will damage the keyfob.
• Do not allow the keyfob to become wet.
• Do not drop the keyfob.
• Do not strike the keyfob sharply against another object.
• If the outside temperature is below 148F (−108C), the battery of the Intelligent Key may not function properly.
• Do not place the keyfob for an extended period in an area where temperatures exceed 1408F (608C).
If a keyfob is lost or stolen, NISSAN recommends erasing the ID code of that keyfob. This will prevent the keyfob from unauthorized use to unlock the vehicle. For information regarding the erasing procedure, please contact a NISSAN dealer.
If the indicator light on the keyfob does not illuminate when pushing the buttons, the keyfob battery may be discharged.
For information regarding the replacement of a battery, see “Key battery replacement” .
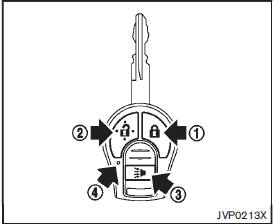
1 LOCK button 
2 UNLOCK button 
3 PANIC button 
4 Battery indicator light
HOW TO USE REMOTE KEYLESS ENTRY SYSTEM
Locking doors
1. Remove the key from the ignition switch.
2. Close all the doors.
3. Push the LOCK button 1 on the keyfob.
4. All the doors will lock.
All of the doors will lock when the LOCK
button is pushed even though a door
remains open.
5. The hazard indicator flashes twice and the horn chirps once.
• When the LOCK button is pushed
with all doors locked, the hazard indicator flashes twice and the horn chirps once
as a reminder that the doors are already locked.
• Operate the door handles to confirm that the doors have been securely locked.
Unlocking doors
1. Push the UNLOCK button 2 on the
keyfob.
• The driver’s door unlocks.
• The hazard indicator flashes once if all doors are completely closed.
2. Push the UNLOCK button again
within 5 seconds.
• All the doors and the lift gate unlock.
• The hazard indicator flashes once if all doors are completely closed.
All doors will be locked automatically unless one of the following operations
is performed within 1 minute of pushing the UNLOCK
button.
• Opening any door (including the lift gate).
• Placing the ignition switch in the ON position.
Using panic alarm
If you are near your vehicle and feel threatened, you may activate the alarm
to call attention as follows: 1. Push the PANIC
button 3 on the keyfob for more than
1 second.
2. The theft warning alarm and headlights will stay on for 25 seconds.
3. The panic alarm stops when: • It has run for 25 seconds, or • Any of the buttons on the keyfob is pushed. (Note: the PANIC button must be pushed for more than 1 second.) Battery indicator light
The battery indicator light 4 illuminates when you push any button. If the light does not illuminate, the battery is weak or needs replacement.
For information regarding replacement of a battery, see “Key battery replacement” (P.8- 22).
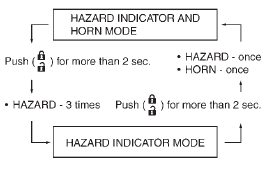
Setting hazard indicator and horn mode
This vehicle is set in hazard indicator and horn mode when you first receive the vehicle.
In hazard indicator and horn mode, when the LOCK
button 1 is pushed, the hazard indicator
flashes twice and the horn chirps once.
When the UNLOCK button2 is pushed,
the hazard indicator flashes once.
If the horn chirp is not necessary, you can switch to hazard indicator only mode by following the switching procedure.
In hazard indicator only mode, when the LOCK
button is pushed, the hazard indicator
flashes twice. When the UNLOCK button
is pushed, neither the hazard indicator nor the horn operates.

Switching procedure:
To switch the hazard indicator and horn operation, push the LOCK
1 and UNLOCK
2 buttons on the keyfob simultaneously
for more than 2 seconds.
• When the hazard indicator mode is set, the hazard indicator flashes 3 times.
• When the hazard indicator and horn mode is set, the hazard indicator flashes once and the horn chirps once.
 Child safety rear door lock
Child safety rear door locks help prevent the rear doors from being opened accidentally,
especially when small children are in the vehicle.
When the levers are in the lock position 1 , the rear d ...
 Intelligent Key system (if so equipped)
WARNING
• Radio waves could adversely affect electric medical equipment. Those who
use a pacemaker should contact the electric medical equipment manufacturer for the
possible influences before ...
Other materials:
Vehicle identification
Vehicle Identification Number (VIN) plate
The Vehicle Identification Number (VIN) plate is securely attached to your Nissan Leaf at the position indicated in the illustration. This unique 17-character identifier serves as the official fingerprint for your vehicle and is a ...
B2099 ignition relay off stuck
Description
The ignition relay integrated in IPDM E/R is operated with ignition switch ON
signal from the ignition switch.
DTC Logic
DTC DETECTION LOGIC
NOTE:
When IPDM E/R power supply voltage is low (Approx. 7 - 8 V for about 1 second),
the “DTC: B2099” may be detected.
1.PERFORM ...
Three-way catalyst
The three-way catalyst is an emission control device installed in the exhaust
system. Exhaust gases in the three-way catalyst are burned at high temperatures
to help reduce pollutants.
WARNING
• The exhaust gas and the exhaust system are very hot. Keep people, animals
or flammable material ...
