
Nissan Leaf 2018-2025 (ZE1) Owner's Manual : NISSAN Intelligent Key battery replacement
CAUTION
- Be extremely vigilant to ensure that children or pets cannot access, play with, or potentially swallow the small lithium battery and any of the disassembled plastic components of your Nissan Leaf key fob.
- An improperly disposed lithium battery can cause significant harm to the local ecosystem and groundwater. Always confirm and strictly follow your municipal regulations regarding the safe recycling and disposal of electronic batteries.
- When actively changing the batteries, maintain a clean workspace and do not let any microscopic dust particles, moisture, or natural skin oils contaminate the sensitive internal microchip components.
- There is a severe danger of chemical explosion or device rupture if the lithium battery is incorrectly replaced or seated backward.
Replace the depleted cell only with the exact same CR2025 specification or a strictly equivalent type to ensure the safety and reliability of your Nissan Leaf.
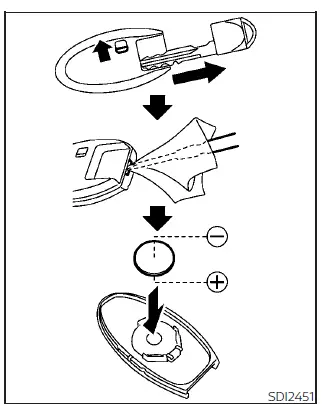
Follow these detailed steps to successfully replace the battery in your Nissan Leaf Intelligent Key:
1. First, locate the small release catch on the back of the fob and firmly pull to remove the emergency mechanical key from the bottom of the Intelligent Key assembly.
2. Carefully insert a small, flat-blade screwdriver into the dedicated slit located at the corner of the key housing. Gently twist the screwdriver to separate the upper plastic housing from the lower part. To prevent any unsightly scratches or cosmetic damage to your Nissan Leaf key casing, we highly recommend wrapping the tip of the screwdriver in a thin, soft cloth during this step.
3. Carefully extract the depleted battery from its mount and replace it with a fresh, new one.
Recommended replacement battery:
CR2025 or an exact equivalent coin cell.
- Do not touch the delicate printed internal circuit board or the exposed electric contact terminals, as static electricity or physical transfer of oils could cause a permanent malfunction of your remote.
- Always hold the new battery by its outer edges. Pinching or holding the battery flat across its top and bottom contact points will inadvertently discharge the cell and seriously deplete its operational storage capacity before you even install it.
- Make absolutely sure that the
 side
faces downward toward the bottom of the lower plastic case.
side
faces downward toward the bottom of the lower plastic case.
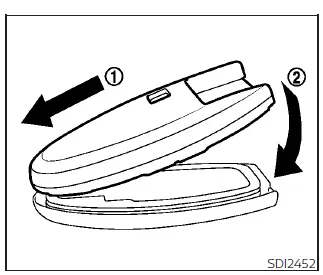
4. Once the battery is seated properly, precisely align the locking tips of the upper and lower plastic parts (1), and then firmly push them together (2) until you hear a distinct click and the casing is securely and evenly closed all the way around.
5. Finally, stand near your Nissan Leaf and operate the lock and unlock buttons to thoroughly check that the remote is communicating and functioning properly.
If you encounter any difficulties during this procedure or if the key remains unresponsive after a new battery is installed, it is recommended that you visit a NISSAN certified LEAF dealer for professional diagnostic and replacement services.
FCC Notice:
For USA:
This wireless device complies with Part 15 of the FCC Rules governing radio frequency emissions. Its daily operation is subject to the following two stringent conditions: (1) This device may not cause any harmful electromagnetic interference to other electronics, and (2) this device must safely accept any ambient interference it receives, including random interference that may cause an undesired operation or temporary delay in signal processing.
NOTE:
Changes, unauthorized tampering, or modifications to the fob's internal antenna not expressly approved by the official party responsible for regulatory compliance could permanently void the user's legal authority to operate this specific electronic equipment.
For Canada:
This particular device contains licence-exempt radio transmitter(s) and receiver(s) that fully comply with Innovation, Science and Economic Development Canada's specialized licence-exempt RSS standard(s). Continuous operation is subject to the following two specific conditions: (1) This device may not cause disruptive radio interference in the vicinity. (2) This device must safely accept any local interference, including electromagnetic interference that may cause an unexpected or undesired operation of the locking device.
 Fuses
Fuses
Motor compartment
WARNING
Under no circumstances should you touch, disassemble, remove, or replace any high-voltage components, cables, or their associated co ...
 Lights
Headlight assembly
Map light
Room light
High-mounted stop light
Rear combination light
Door mirror turn signal light (if so ...
Other materials:
Vehicle security alarm does not activate
Description
Alarm does not operate when alarm operating condition is satisfied.
NOTE:
Check that vehicle is under the condition shown in “CONDITIONS OF VEHICLE
(OPERATING CONDITIONS)�
before starting diagnosis, and check each symptom.
CONDITION OF VEHICLE (OPERATING CONDITIONS)
“SE ...
P1614 chain of IMMU-KEY
DTC Logic
DTC DETECTION LOGIC
DTC CONFIRMATION PROCEDURE
1.PERFORM DTC CONFIRMATION PROCEDURE 1
1. Contact Intelligent Key backside to push-button ignition switch.
2. Check DTC in “Self Diagnostic Result� mode of “ENGINE� using CONSULT-III.
Is DTC detected?
YES >> Go to SEC- ...
P1574 ASCD vehicle speed sensor
Description
The ECM receives two vehicle speed sensor signals via CAN communication line.
One is sent from combination
meter, and the other is from TCM (Transmission control module). The ECM uses
these signals for ASCD
control. Refer to EC-64, "AUTOMATIC SPEED CONTROL DEVICE (ASCD) : Sys ...
