Nissan Juke Service and Repair Manual : Front door glass
Exploded View
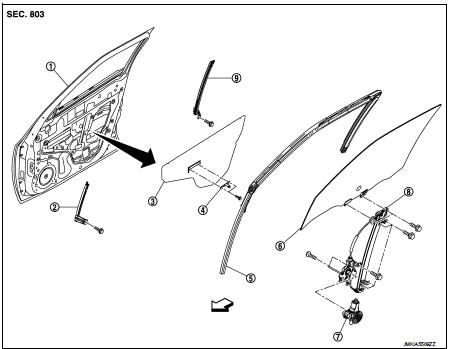
1. Front door panel
2. Lower sash (front)
3. Sealing screen
4. Pull handle bracket
5. Front door glass run
6. Front door glass
7. Power window motor
8. Front door regulator assembly
9. Lower sash (rear)
 : Vehicle front
Removal and Installation
REMOVAL
1. Fully open front door glass.
2. Remove front door finisher. Refer to INT-13, "Removal and Installation".
3. Remove pull handle bracket.
4. Disconnect front door speaker harness connector and remove front door sealing screen.
NOTE
:
Cut the butyl-tape so that some parts of the butyl-tape do not remain on the
sealing screen, if the sealing
screen is reused.
5. Operate the power window main switch or regulator handle to raise or lower the door window until the glass mounting bolts can be seen.
6. Remove the glass mounting bolts.
7. Remove lower sash (rear).
1. Remove front door glass from front door regulator and place it on the bottom of front door panel.
CAUTION:
Wrap the tip of front door glass bottom side with a cloth to protect it from
damage.
2. Remove front door glass run.
3. Remove lower sash (rear) mounting bolts and remove lower sash (rear).
CAUTION:
Avoid contact between lower sash (rear) and front door glass when removing.
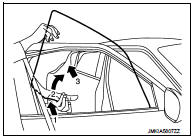
8. Hold securely the front door glass and pull it out of the sash to remove the door glass as shown in the figure.
9. Remove lower sash (front).
1. Remove lower sash (front) mounting bolt.
2. Reach the bottom part of lower sash (front) and then pull it toward rear of vehicle.
3. Hold the upper part of lower sash (front) and then pull it up to remove.
INSTALLATION
Install in the reverse order of removal.
Inspection and Adjustment
SYSTEM INITIALIZATION
Initialize the system if any of the following work is complete. Refer to PWC-14, "Description".
FITTING INSPECTION
• Check that the glass is fit securely into the sash groove.
• Lower the glass slightly [approximately 10 to 20 mm (0.394 to 0.787 in)], and check that the clearance to the sash is parallel. Loosen the regulator mounting bolts, guide rail mounting bolts, and glass and guide rail mounting bolts to correct the glass position if the clearance between the glass and sash is not parallel.
 Back door window glass
Exploded View
1. Back door window glass
2. Spacer
3. Back door window glass holder
4. Back door window glass molding
5. Pivot seal
6. Adhesive
7. Primer
8. Back door outer
9. Back doo ...
 Front regulator
Exploded View
1. Front door panel
2. Lower sash (front)
3. Sealing screen
4. Pull handle bracket
5. Front door glass run
6. Front door glass
7. Power window motor
8. Front door regulato ...
Other materials:
B2628 outside antenna
DTC Logic
DTC DETECTION LOGIC
DTC CONFIRMATION PROCEDURE
1.PERFORM DTC CONFIRMATION PROCEDURE
1. Disconnect outside key antenna (rear bumper) connector.
2. Perform “INTELLIGENT KEY” Self Diagnostic Result.
Is outside key antenna DTC detected?
YES >> Refer to DLK-240, "Diagn ...
Booster seats
Precautions on booster seats
WARNING
If a booster seat and seat belt are not used properly, the risk of a child
being injured in a sudden stop or collision greatly increases:
• Make sure the shoulder portion of the belt is away from the child’s face
and neck and the lap portion of the bel ...
No or very little acceleration, increase in engine speed
Description
CHART 8: NO OR VERY LITTLE ACCELERATION, INCREASE IN ENGINE SPEED
Diagnosis Procedure
1.CHECK FUEL
Check that the fuel reservoir is correctly filled and with the right fuel.
>> GO TO 2.
2.CHECK ECM POWER SUPPLY AND GROUND CIRCUIT
Check ECM power supply and ground circuit ...
