Nissan Juke Service and Repair Manual : Fender protector
Exploded View
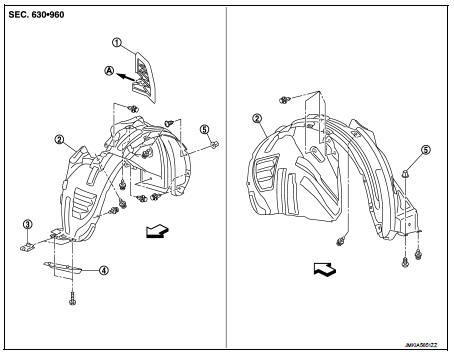
1. Hoodledge insurator
2. Fender protector
3. U nut
4. Air guide
5. Screw grommet
A. To hoodledge panel
 : Vehicle front
Removal and Installation
REMOVAL
1. Remove front fillet molding. Refer to EXT-26, "FRONT FILLET MOLDING : Removal and Installation".
2. Remove air guide fixing bolts, and then remove air guide.
3. Remove front fender protector mounting screws and clips.
4. Remove front fender protector from wheel house.
INSTALLATION
Install in the reverse order of removal.
 Cowl top
Exploded View
LHD models
1. Front fender cover RH
2. Cowl top cover seal
3. Blind plug RH
4. Cowl top cover
5. Cowl top cover cap
6. Cowl top extension
7. EPT seal [t: 3.0 mm (0.118 in)] ...
 Sill cover
Exploded View
1. Screw grommet
2. Screw grommet
3. Sill cover
4. Wind defle
Removal and Installation
REMOVAL
1. Remove sill cover front end fixing screw (A).
2. Remove sill cover rear en ...
Other materials:
B2622 inside antenna
DTC Logic
DTC DETECTION LOGIC
DTC CONFIRMATION PROCEDURE
1.PERFORM DTC CONFIRMATION PROCEDURE
1. Select “INTELLIGENT KEY” of “BCM” using CONSULT-III.
2. Select “INSIDE ANT DIAGNOSIS” in “WORK SUPPORT” mode.
3. Perform inside key antenna (“INSIDE ANT DIAGNOSIS”) on “WORK ...
Precaution for Supplemental Restraint System (SRS) "AIR BAG" and "SEAT BELT
PRE-TENSIONER"
The Supplemental Restraint System such as “AIR BAG” and “SEAT BELT PRE-TENSIONER”,
used along
with a front seat belt, helps to reduce the risk or severity of injury to the
driver and front passenger for certain
types of collision. Information necessary to service the system safely is
...
Brake fluid level switch
Component Function Check
1.CHECK BRAKE FLUID LEVEL SWITCH OPERATION
When the brake fluid is full or empty. Then check that the brake warning lamp
in the combination meter turns
ON/OFF correctly.
Is the inspection result normal?
YES >> INSPECTION END
NO >> Proceed to BRC-72, &qu ...
