
Nissan Leaf 2018-2025 (ZE1) Owner's Manual : Charging timer
Optimize your energy management and utility costs by utilizing the charging timer feature of the Nissan Leaf. This function allows you to create custom schedules for your vehicle's Li-ion battery charging cycles. Once you have established your preferred schedule, the Nissan Leaf will automatically commence the charging sequence at the designated times whenever the charge connector is plugged in. Because these profiles are saved within the vehicle's memory, you do not need to manually reset the timers every time you need to charge.
The system provides the flexibility to store two independent timer configurations, each encompassing a specific start and end time. For models equipped with a Navigation System, these timers can be further customized to operate on specific days of the week, ensuring your vehicle is ready exactly when you need it.
To configure your charging schedules, follow these steps using the vehicle information display controls:
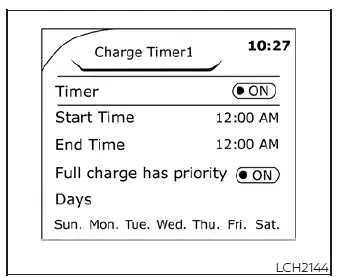
1. Press the  button to navigate to the "EV settings" menu, then confirm your selection by pressing the OK button.
2. Use the  button to toggle between "Charge Timer1" or "Charge Timer2," then press OK to access the chosen profile.
3. Use the  button to highlight "Timer," and press OK to toggle the status. The indicator light will illuminate when the specific timer setting is active.
4. Select "Start time" using the  button and press OK.
5. Use the  button to set your desired "Hour" for the start time and confirm with OK.
6. Use the  button to set the "Minute" for the start time and confirm with OK.
7. Select "End time" using the  button and press OK.
8. Set the "Hour" for your end time using the  button and confirm with OK.
9. Set the "Minute" for your end time using the  button and confirm with OK.
10. For models with a Navigation System: Press the  button to highlight the specific days of the week you wish the charging timer to be active, and press OK to finalize. Use the Back button to exit to the previous screen.
11. Once all parameters are correctly entered, place the vehicle power switch in the OFF position and connect the charge connector to your Nissan Leaf.
NOTE:
- Always ensure the power switch is in the OFF position after setting your timers; the Li-ion battery will not initiate a scheduled charge if the vehicle is in the ON position.
- If you are using a public or home charging station that also features its own internal timer, be aware that conflicting schedules may prevent the Nissan Leaf from reaching the desired charge level. Ensure both your vehicle timer and the charging station timer are synchronized or that one is disabled.
- In colder environments, the Nissan Leaf Li-ion battery warmer (if equipped) may draw energy, which can slightly affect the total charge reached during a timed session.
- The charging timer relies entirely on the internal clock displayed on your vehicle information screen. Before setting your schedules, please verify that the current time is set accurately.
To disable the timer function, simply navigate to the "Timer" setting using the
 button and press OK to turn off the indicator light. Please note that turning the timer function off will not delete your saved start and end time settings, allowing you to reactivate them quickly in the future.
 - On models with a Navigation System, if you have not selected any specific days of the week on the timer screen, the system will remain in standby mode and will not perform a scheduled charge until a day is assigned.
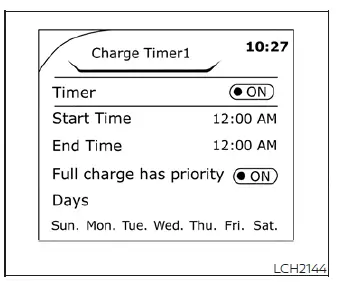
Timer Charge setting screen
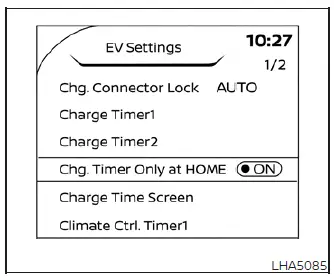
Chg. Timer Only at HOME (models with Navigation System)
By registering your residence in the navigation system, you can enable the "Chg. Timer Only at HOME" feature. This ensures that your pre-set timer charging schedule is applied exclusively when you are performing a normal or trickle charge at your home location. For instructions on registering your home location, please consult the NissanConnect Manual. When you connect the Nissan Leaf to a charger at any other location, the vehicle will bypass the timer and begin charging immediately upon connection.
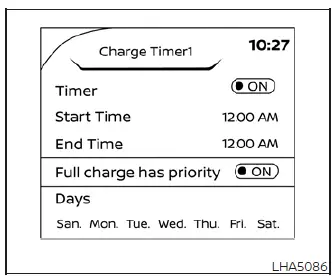
Full charge has priority
If you enable "Full charge has priority," the system gains the intelligence to automatically advance the charging start time if it calculates that the battery cannot reach a full charge within your defined start-to-end interval. If necessary, the charging session will persist beyond your set end time until the Li-ion battery reaches its maximum capacity.
NOTE:
When "Full charge has priority" is active, please be aware that the vehicle may extend the charging session past your desired end time if energy consumption from other systems—such as the Climate Ctrl. Timer—or standard charging tolerances require additional time to ensure the Nissan Leaf battery is fully charged.
 Charging methods
...
 Timer Display
To provide you with immediate visibility into your vehicle's energy status, the timer display automatically activates for approximately 30 seconds as soon as you place the power switch of your Nissan ...
Other materials:
High pressure fuel pump
Component Function Check
1.CHECK HIGH PRESSURE FUEL PUMP FUNCTION
With CONSULT-III
1. Start engine.
2. Check “FUEL PRES SEN V� in “DATA MONITOR� mode of “ENGINE� using CONSULT-III.
Without CONSULT-III
1. Start engine.
2. Check the voltage between ECM harness connector terminals ...
Side curtain air bag module
Exploded View
1. Side curtain air bag module
: Metal clip
: N·m (kg-m, ft-lb)
Removal and Installation
WARNING:
• Before servicing, turn ignition switch OFF, disconnect battery negative
terminal and wait 3 minutes
or more.
• Always work from the side of curtain air bag module. Never ...
B2198 nats antenna AMP.
DTC Logic
DTC DETECTION LOGIC
DTC CONFIRMATION PROCEDURE
1.PERFORM DTC CONFIRMATION PROCEDURE 1
1. Contact Intelligent Key backside to push-button ignition switch.
2. Check DTC in “Self Diagnostic Result� mode of “BCM� using CONSULT-III.
Is DTC detected?
YES >> Go to SEC-65, ...
