
Nissan Juke Service and Repair Manual : Blower motor
Diagnosis Procedure
1.CHECK SYMPTOM
Check symptom (A or B).
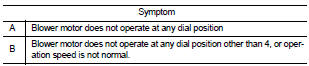
Which symptom is detected? A >> GO TO 2.
B >> GO TO 7.
2.CHECK FUSE
1. Turn ignition switch OFF.
2. Check 15A fuses (Nos. 14 and 16, located in fuse block (J/B)].
NOTE
:
Refer to PG-22, "Fuse, Connector and Terminal Arrangement".
Is the inspection result normal? YES >> GO TO 3.
NO >> Replace the blown fuse after repairing the affected circuit if a fuse is blown.
3.CHECK BLOWER MOTOR POWER SUPPLY
1. Disconnect blower motor connector.
2. Turn ignition switch ON.
3. Check voltage between blower motor harness connector and ground.

Is the inspection result normal? YES >> GO TO 5.
NO >> GO TO 4.
4.CHECK BLOWER RELAY
1. Turn ignition switch OFF.
2. Check blower relay. Refer to HAC-291, "Component Inspection (Blower Relay)".
Is the inspection result normal? YES >> Repair harness or connector between blower motor and fuse.
NO >> Replace blower relay.
5.CHECK FAN SWITCH GROUND CIRCUIT FOR OPEN
1. Turn ignition switch OFF.
2. Disconnect A/C control connector.
3. Check continuity between A/C control harness connector and ground.

Is the inspection result normal?
YES >> GO TO 6.
NO >> Repair harness or connector.
6.CHECK FAN SWITCH 4 POSITION CIRCUIT FOR OPEN
Check continuity between A/C control harness connector and blower motor harness connector.

Is the inspection result normal? YES >> GO TO 10.
NO >> Repair the harness or connector.
7.CHECK BLOWER FAN RESISTOR POWER SUPPLY
1. Turn ignition switch OFF.
2. Disconnect blower fan resistor connector.
3. Turn ignition switch ON.
4. Check voltage between blower fan resistor harness connector and ground.

Is the inspection result normal? YES >> GO TO 8.
NO >> Repair harness or connector between blower fan resistor and blower motor.
8.CHECK BLOWER FAN RESISTOR
1. Turn the ignition switch OFF.
2. Check blower fan resistor. Refer to HAC-291, "Component Inspection (Blower Fan Resistor)".
Is the inspection result normal? YES >> GO TO 9.
NO >> Replace blower fan resistor. Refer to HAC-307, "Removal and Installation".
9.CHECK FAN SWITCH 1, 2, 3 POSITION CIRCUIT FOR OPEN
Check continuity between A/C control harness connector and blower fan resistor.

Is the inspection result normal? YES >> GO TO 10.
NO >> Repair harness or connector.
10.CHECK FAN SWITCH
Check fan switch. Refer to HAC-292, "Component Inspection (Fan Switch)".
Is the inspection result normal? YES >> Replace blower motor. Refer to VTL-15, "Removal and Installation (LHD models)" or VTL-16, "Removal and Installation (RHD models)".
NO >> Replace A/C control. Refer to HAC-304, "Removal and Installation".
Component Inspection (Blower Motor)
1.CHECK BLOWER MOTOR
1. Remove blower motor. Refer to VTL-15, "Removal and Installation (LHD models)" or VTL-16, "Removal and Installation (RHD models)".
2. Check that there is not any mixing foreign object in the blower motor.
Is the inspection result normal? YES >> GO TO 2.
NO >> Replace blower motor. Refer to VTL-15, "Removal and Installation (LHD models)" or VTL-16, "Removal and Installation (RHD models)".
2.CHECK BLOWER MOTOR
Check that there is not breakage or damage in the blower motor.
Is the inspection result normal? YES >> GO TO 3.
NO >> Replace blower motor. Refer to VTL-15, "Removal and Installation (LHD models)" or VTL-16, "Removal and Installation (RHD models)".
3.CHECK BLOWER MOTOR
Check that blower motor turns smoothly.
Is the inspection result normal? YES >> INSPECTION END
NO >> Replace blower motor. Refer to VTL-15, "Removal and Installation (LHD models)" or VTL-16, "Removal and Installation (RHD models)".
Component Inspection (Blower Relay)
1.CHECK BLOWER RELAY
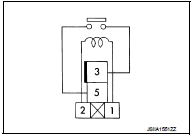
1. Remove blower relay. Refer to PG-22, "Fuse, Connector and Terminal Arrangement".
2. Check continuity between blower relay terminal 3 and 5 when the voltage is supplied between terminal 1 and 2.

Is the inspection result normal? YES >> INSPECTION END
NO >> Replace blower relay.
Component Inspection (Blower Fan Resistor)
1.CHECK BLOWER FAN RESISTOR
1. Disconnect blower fan resistor connector.
2. Check resistance between blower fan resistor terminals. Refer to applicable table for the normal value.
Is the inspection result normal? YES >> INSPECTION END
NO >> Replace blower fan resistor. Refer to HAC-307, "Removal and Installation".
Component Inspection (Fan Switch)
1.CHECK FAN SWITCH
Check continuity between A/C control terminals.
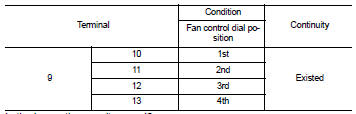
Is the inspection result normal? YES >> INSPECTION END
NO >> Replace A/C control. Refer to HAC-304, "Removal and Installation".
 A/C indicator
Diagnosis Procedure
1.CHECK SYMPTOM
Check symptom.
A/C indicator dose not turn ON>>GO TO 2.
A/C indicator dose not turn OFF>>GO TO 6.
2.CHECK FUSE
1. Turn ignition switch OFF.
...
 Magnet clutch
Component Function Check
1.CHECK MAGNET CLUTCH OPERATION
Perform auto active test of IPDM E/R. Refer to PCS-12, "Diagnosis
Description" (with Intelligent Key) or PCS-
43, "Diagnosi ...
Other materials:
Precaution Necessary for Steering Wheel Rotation after Battery Disconnect
NOTE:
• Before removing and installing any control units, first turn the ignition
switch to the LOCK position, then disconnect
both battery cables.
• After finishing work, confirm that all control unit connectors are connected
properly, then re-connect both
battery cables.
• Always us ...
Precaution
Precaution for Supplemental Restraint System (SRS) "AIR BAG" and "SEAT
BELT
PRE-TENSIONER"
The Supplemental Restraint System such as “AIR BAG� and “SEAT BELT
PRE-TENSIONER�, used along
with a front seat belt, helps to reduce the risk or severity of injury to the
...
Valve oil seal
VALVE OIL SEAL : Removal and Installation
REMOVAL
1. Remove camshafts. Refer to EM-78, "Exploded View".
2. Remove valve lifters. Refer to EM-78, "Exploded View".
3. Rotate crankshaft, and set piston whose valve oil seal is to be removed to
TDC. This will prevent valve
from ...
