Nissan Juke Service and Repair Manual : Basic inspection
DIAGNOSIS AND REPAIR WORK FLOW
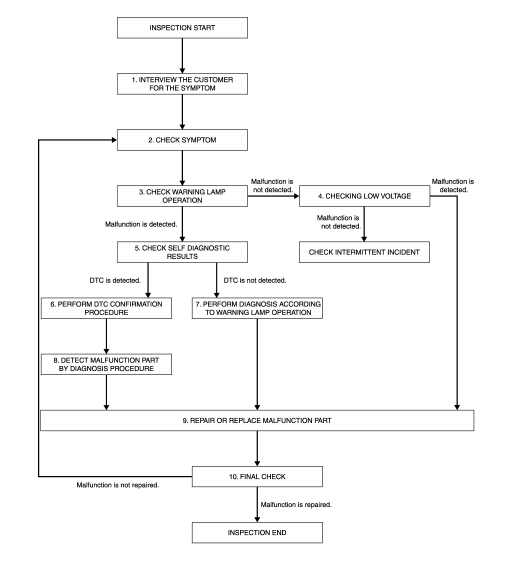
Work Flow
OVERALL SEQUENCE
DETAILED FLOW
1.INTERVIEW THE CUSTOMER FOR THE SYMPTOM
Interview the customer for the symptom (the condition and the environment when the incident/malfunction occurs).
>> GO TO 2.
2.CHECK SYMPTOM
Check the symptom from the customer information.
>> GO TO 3.
3.CHECK WARNING LAMP OPERATION
Check air bag warning lamp operation in the user mode. Refer to SRC-12, "On Board Diagnosis Function".
Are any malfunction detected? YES >> GO TO 5.
NO >> GO TO 4.
4.CHECK LOW VOLTAGE
Check low voltage with CONSULT-III (Special function). Refer to SRC-16, "CONSULT-III Function".
Are any malfunction detected? YES >> GO TO 9.
NO >> Check intermittent incident. Refer to GI-42, "Intermittent Incident".
5.CHECK SELF DIAGNOSTIC RESULTS
Check self diagnostic result with CONSULT-III or diagnosis mode.
If it is impossible to switch to diagnosis mode, follow the same procedure that DTC is not detected.
NOTE
:
Perform the following procedure if DTC is detected.
ŌĆó Record DTC (Print them out with CONSULT-III.) ŌĆó Erase self diagnostic result.
ŌĆó Study the relationship between the malfunction that DTC or air bag warning lamp indicates and the symptom that the customer describes.
ŌĆó Check related service bulletins for information.
Is DTC detected? YES >> GO TO 6.
NO >> GO TO 7.
6.PERFORM DTC CONFIRMATION PROCEDURE
Perform DTC CONFIRMATION PROCEDURE for the DTC.
>> GO TO 8.
7.PERFORM DIAGNOSIS ACCORDING TO WARNING LAMP OPERATION
1. Check air bag warning lamp operation in the user mode. Refer to SRC-12, "On Board Diagnosis Function".
2. Perform Diagnosis Procedure for the air bag warning lamp operation. Refer to SRC-12, "On Board Diagnosis Function" (USER MODE).
>> GO TO 9.
8.DETECT MALFUNCTIONING PART BY DIAGNOSTIC PROCEDURE
Inspect according to Diagnostic Procedure of the DTC.
>> GO TO 9.
9.REPAIR OR REPLACE THE MALFUNCTION PART
Repair or replace the malfunctioning part.
>> GO TO 10.
10.FINAL CHECK
Check self diagnostic result and air bag warning lamp operation in the user mode.
Is the malfunction repaired? YES >> INSPECTION END
NO >> GO TO 2.
 Wiring diagram
SRS AIR BAG SYSTEM
Wiring Diagram
For connector terminal arrangements, harness layouts, and alphabets in a
(option abbreviation; if not
described in wiring diagram), refer to GI-12, "Connect ...

Other materials:
Illumination
Wiring Diagram
For connector terminal arrangements, harness layouts, and alphabets in a
(option abbreviation: if not
described in wiring diagram), refer to GI-12, "Connector Information/Explanation
of Option Abbreviation".
...
Precautions for Drive Shaft
ŌĆó Observe the following precautions when disassembling and assembling drive
shaft.
- Never disassemble joint sub-assembly because it is non-overhaul parts.
- Perform work in a location which is as dust-free as possible.
- Clean the parts, before disassembling and assembling.
- Prevent the en ...
Wiring diagram
MANUAL AIR CONDITIONING SYSTEM
Wiring Diagram
For connector terminal arrangements, harness layouts, and alphabets in a
(option abbreviation; if not
described in wiring diagram), refer to GI-12, "Connector Information/Explanation
of Option Abbreviation".
...
