
Nissan Juke Owners Manual : Vehicle load capacity
Do not exceed the load limit of your vehicle shown as “The combined weight of occupants and cargo� on the Tire and Loading Information label. Do not exceed the number of occupants shown as “Seating Capacity� on the Tire and Loading Information label.
To get “the combined weight of occupants and cargo�, add the weight of all occupants, then add the total luggage weight.
Examples are shown in the following illustration.
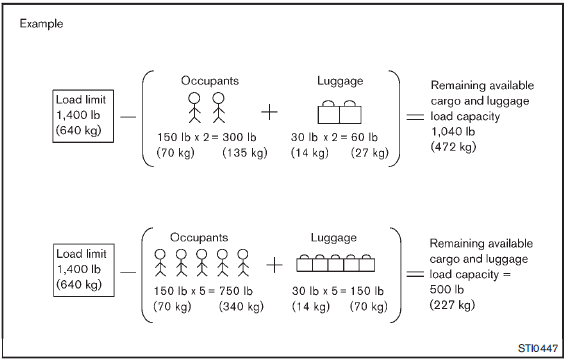
Steps for determining correct load limit
1. Locate the statement “The combined weight of occupants and cargo should never exceed XXX kg or XXX lbs� on your vehicle’s placard.
2. Determine the combined weight of the driver and passengers that will be riding in your vehicle.
3. Subtract the combined weight of the driver and passengers from XXX kg or XXX lbs.
4. The resulting figure equals the available amount of cargo and luggage load capacity. For example, if the XXX amount equals 1400 lbs. and there will be five 150 lb. passengers in your vehicle, the amount of available cargo and luggage load capacity is 650 lbs.
(1400 − 750 (5 x 150) = 650 lbs) or (640 − 340 (5 x 70) = 300 kg.) 5. Determine the combined weight of luggage and cargo being loaded on the vehicle. That weight may not safely exceed the available cargo and luggage load capacity calculated in Step 4.
Before driving a loaded vehicle, confirm that you do not exceed the Gross Vehicle Weight Rating (GVWR) or the Gross Axle Weight Rating (GAWR) for your vehicle.
(See “Measurement of weights� .) Also check tires for proper inflation pressures.
See the Tire and Loading Information label.
 Terms
Terms
It is important to familiarize yourself with the following terms before loading
your vehicle: • Curb Weight (actual weight of your vehicle) - vehicle weight
including: standard and optiona ...
 Loading tips
• The GVW must not exceed GVWR or GAWR as specified on the F.M.V.S.S./
C.M.V.S.S. certification label.
• Do not load the front and rear axle to the GAWR. Doing so will exceed the GVWR.
W ...
Other materials:
Precaution Necessary for Steering Wheel Rotation after Battery Dis
NOTE:
• Before removing and installing any control units, first turn the ignition
switch to the LOCK position, then disconnect
both battery cables.
• After finishing work, confirm that all control unit connectors are connected
properly, then re-connect both
battery cables.
• Always us ...
Push-button ignition switch (models with Intelligent Key system)
WARNING
Do not operate the push-button ignition switch while driving the vehicle except
in an emergency. (The engine will stop when the ignition switch is pushed 3 consecutive
times or the ignition switch is pushed and held for more than 2 seconds.) If the
engine stops while the vehicle is be ...
Camshaft
Exploded View
1. Camshaft bracket (No. 2 to 5)
2. Camshaft bracket (No. 1)
3. Camshaft sprocket (EXH)
4.Exhaust valve timing control solenoid
valve
5. O-ring
6.Camshaft sprocket (INT)
7. Plug (EXH)
8. Washer (EXH)
9.Oil filter (for exhaust valve timing control
solenoid valve)
10. ...
