
Nissan Leaf 2018-2025 (ZE1) Owner's Manual : Mirrors
Manual anti-glare rearview mirror
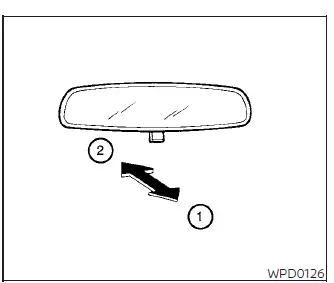
Flip the lower adjustment tab forward into the designated night position 1 to significantly dim the harsh reflection and reduce glare caused by the high-beam headlights of trailing vehicles behind you at night.
Push the tab back into the standard day position 2 when operating during normal daylight hours to restore full brightness.
WARNING
Only utilize the angled night position when glare actively interferes with your vision, because this setting naturally reduces overall rearward viewing clarity and depth perception.
Automatic anti-glare rearview mirror
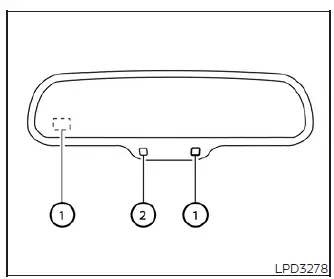
The premium inside rearview mirror is engineered with light sensors that allow it to automatically tint and dim during nighttime driving conditions, adapting fluidly according to the exact intensity of the blinding headlights from the vehicle trailing you. This automatic anti-glare function remains enabled by default whenever the vehicle is powered up.
The dedicated green LED indicator light 2 will glow steadily on the mirror frame to verify that the automatic anti-glare system is currently powered and operating correctly.
NOTE:
Never hang any decorative objects, parking passes, or toll transponders over the ambient light sensors 1, and avoid spraying chemical glass cleaners directly onto the sensor openings.
Obstructing or contaminating these optical ports will drastically lower the sensitivity of the internal photo-sensors, resulting in improper dimming operation or system lag inside your Nissan Leaf cabin.
Outside mirrors
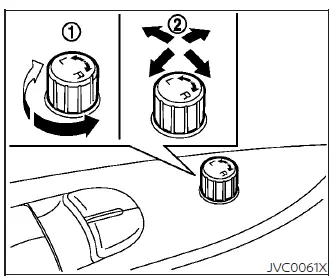
The electronic outside mirror remote control pads will receive power and operate only when the ignition or power switch of the Nissan Leaf is rotated into the active ACC or ON position.
Slide the selection switch 1 to the left (L) or right (R) position to choose the respective side view mirror, then press the multi-directional control pad 2 to tilt the glass to your preferred driving angle.
Always return the small selection switch 1 back to its dead-center (neutral) position once finished to prevent accidentally bumping the pad and altering your customized mirror angles during a trip.
WARNING
- Please remember that objects and traffic viewed in the convex outside mirror on the passenger side are physically much closer than they appear on the glass surface. Exercise extreme caution before executing a lane change to the right. Relying solely on this wide-angle mirror could lead to an accident; always cross-reference your path using the flat inside rearview mirror and glance directly over your shoulder to accurately judge true distances.
- Do not attempt to fiddle with or adjust the side view mirrors while actively steering or driving. Taking your eyes off the road to adjust the mirrors can cause you to lose situational awareness, lose control of your vehicle, and cause an accident.
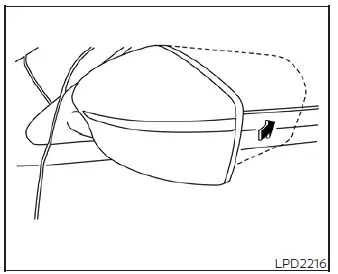
Foldable outside mirrors
To safeguard the vehicle components when parking in tight spaces or narrow garages, manually pull the entire outside mirror housing firmly backward toward the side door glass to fold it into its compact profile.
Heated mirrors (if so equipped)
Depending on your trim package, certain outside mirrors are equipped with internal heating elements tied to the rear defroster circuit to quickly melt frost, clear thick fog, or dissolve stubborn ice from the glass surfaces for enhanced driving visibility.
 Sun visors
1. To effectively block blinding sunlight or glare originating from directly ahead, simply swing down 1 the primary sun visor assembly toward the windshield.
2. To ...

Other materials:
Normal operating condition
INFORMATION DISPLAY
INFORMATION DISPLAY : Description
AMBIENT TEMPERATURE
The displayed ambient temperature on the information display may differ from
the actual temperature because
it is a corrected value calculated from the ambient sensor signal by the
combination meter. Refer to MWI-16,
...
Washer tank
Exploded View
1. Front washer nozzle LH
2. Front washer nozzle RH
3. Front washer tube LH
4. Front washer tube RH
5. Check valve
6. Front washer tube
7. Joint
8. Washer tank inlet cap
9. Washer tank inlet
10. Washer tank
11. Headlamp washer pump
12. Washer pump
13. Packing
1 ...
Removal and Installation Procedure for CVT Unit Connector
REMOVAL
Rotate bayonet ring (1) counterclockwise, pull out CVT unit harness
connector (2) upward and remove it.
INSTALLATION
1. Align Δ marking on CVT unit harness connector terminal body
with marking on bayonet ring, insert CVT unit harness connector,
and then rotate bayonet ...
