
Nissan Juke Owners Manual : Installing front license plate
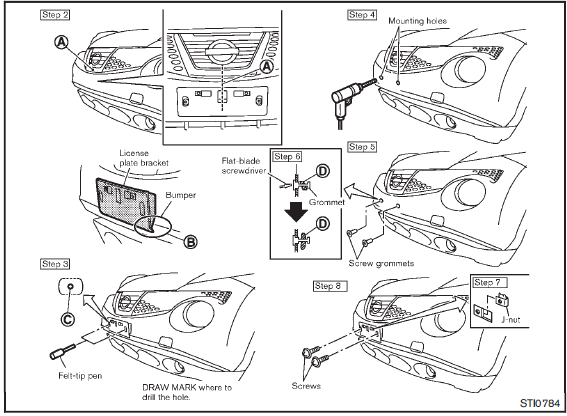
Use the following steps to mount the license plate:
Before mounting the license plate, confirm that the following parts are enclosed in the plastic bag.
• License plate bracket
• J-nut  2
2
• Screw  2
2
• Screw grommet  2
2
1. Park the vehicle on flat, level ground.
2. Locate the center positionA as illustrated.
Make sure the side end surface of the license plate bracket is aligned with the bumperB .
3. Mark the center of the holesC with a felttip pen.
4. Carefully drill the two pilot holes using a 0.39 in (10 mm) drill bit at the marked locations. (Be sure that the drill only goes through the bumper fascia.) 5. Insert grommets into the hole on the fascia.
6. Insert a flat-blade screwdriver into the grommet hole to add a 908 turn onto the partD .
7. Insert a J-nut into the license plate bracket before placing the license plate bracket on the fascia.
8. Install the license plate bracket with the screws.
9. Install the license plate with bolts that are not longer than 0.55 in (14 mm).
 Air conditioner specification label
The air conditioner specification label is attached to the engine compartment
as shown. ...
 Vehicle loading information
WARNING
• It is extremely dangerous to ride in a cargo area inside the vehicle.
In a collision, people riding in these areas are more likely to be seriously
injured or killed.
• Do not allow ...
Other materials:
System
POWER DISTRIBUTION SYSTEM
POWER DISTRIBUTION SYSTEM : System Description
SYSTEM DESCRIPTION
• PDS (POWER DISTRIBUTION SYSTEM) is the system that BCM controls with the
operation of the pushbutton
ignition switch and performs the power distribution to each power circuit. This
system is used ...
Liquid Gasket
REMOVAL OF LIQUID GASKET SEALING
• After removing mounting nuts and bolts, separate the mating surface
using the seal cutter [SST: KV10111100] (A) and remove old
liquid gasket sealing.
CAUTION:
Be careful not to damage the mating surfaces.
• Tap the seal cutter [SST: KV10111100] to inser ...
B2578, B2579 In-vehicle sensor
DTC Logic
DTC DETECTION LOGIC
NOTE:
• If DTC is displayed along with DTC U1000, first perform the trouble diagnosis
for DTC U1000. Refer to HAC-
51, "DTC Logic".
• If DTC is displayed along with DTC U1010, first perform the trouble diagnosis
for DTC U1010. HAC-52,
"DTC L ...
