Nissan Juke Service and Repair Manual : Heated seat switch
Exploded View
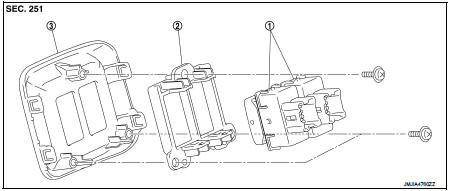
1. Heated seat swich
2. Switch bracket
3. Console switch finisher
Removal and Installation
REMOVAL
CAUTION:
When removing and installing, use shop cloths to protect from damage.
1. Remove the console switch finisher. Refer to IP-23, "Removal and Installation".
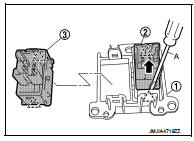
2. Remove mounting screws and remove switch bracket (1) from console switch finisher.
3. Remove heated seat switch RH (2) and heated seat switch LH (3) from switch bracket (1) using flat-bladed screwdriver (A).
 : Pawl
INSTALLATION
Install in the reverse order of removal.
 Rear seat (4WD)
Exploded View
1. Seatback board RH
2. Headrest
3. Headrest holder (locked)
4. Headrest holder (free)
5. Seatback trim RH
6. Seatback pad RH
7. Seatback lock knob
8. Seatback lock knob f ...

Other materials:
Hood
Exploded View
1. Hood assembly
2. Hood bumper rubber
3. Radiator core seal
4. Hood bumper rubber
5. Clamp
6. Hood hinge
7. Grommet
8. Hood support rod
: Clip
: Pawl
: Body grease
Hood assembly
HOOD ASSEMBLY : Removal and Installation
CAUTION:
• Operate with two workers, becau ...
Back door opener actuator
Component Function Check
1.CHECK FUNCTION
1. Select “INTELLIGENT KEY” of “BCM” using CONSULT-III.
2. Select “TRUNK/BACK DOOR” in “ACTIVE TEST” mode.
3. Check that the function operates normally according to the following
conditions.
Is the inspection result normal?
YES > ...
Blower fan on signal
Component Function Check
1.CHECK BLOWER FAN ON SIGNAL
With CONSULT-III
1. Turn ignition switch ON.
2. Select “AIR CONDITIONER” of “BCM” using CONSULT-III.
3. Select “FAN ON SIG” in “DATA MONITOR” mode, and check status under the
following condition.
Is the inspection result ...
