
Nissan Leaf 2018-2025 (ZE1) Owner's Manual : Head restraints/headrests
WARNING
Head restraints and headrests are vital components of your vehicle's safety architecture, designed to work in concert with other safety systems. They provide essential support that can significantly reduce the risk of neck and spinal injuries during certain rear-end collisions.
It is imperative that all adjustable head restraints and headrests in your Nissan Leaf are positioned correctly according to the guidelines in this section. Always verify that these settings are optimized for your personal comfort and safety, especially after another driver has utilized the vehicle. To maintain their structural integrity, never attach external items to the stalks, and do not attempt to remove these safety devices.
Never operate the vehicle or occupy a seat if the head restraint or headrest has been removed.
If a head restraint or headrest must be removed for cleaning or maintenance, it must be reinstalled and securely locked into the appropriate position before any passenger uses that seat.
Failure to strictly adhere to these instructions may compromise the safety function of the head restraint or headrest, thereby increasing the risk of severe injury or fatality in the event of a collision.
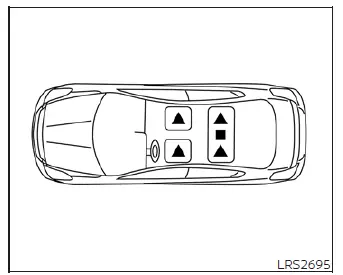
The following illustration provides an overview of the seating positions within the Nissan Leaf that are equipped with head restraints or headrests.
 Indicates the seating position is equipped with a head restraint.
 Indicates the seating position is equipped with a headrest.
+ Indicates the seating position is not equipped with a head restraint or headrest (if applicable).
- Your Nissan Leaf features a combination of head restraints and headrests, which may be integrated into the seat, adjustable for height, or non-adjustable, depending on the specific seating location.
- Adjustable head restraints and headrests are designed with multiple locking notches along their support stalks, allowing you to secure them at the height that best matches your stature.
- Non-adjustable head restraints and headrests feature a single locking notch intended to secure them firmly to the seat frame.
- Proper Adjustment:
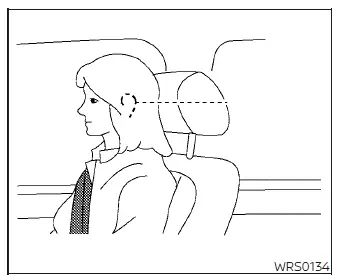
- For adjustable models, configure the head restraint or headrest so that the center of the cushion aligns as closely as possible with the center of your ear. This positioning provides the most effective support for your head and neck.
- If your ear position remains higher than the center of the head restraint even when adjusted, position the head restraint at its highest setting to ensure maximum coverage.
- If a head restraint or headrest has been removed for any reason, confirm that it is correctly reinstalled and fully locked into the seat back before anyone occupies that seat.
Adjustable head restraint/headrest components
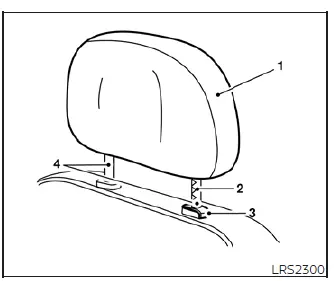
- Removable head restraint/headrest
- Multiple height-adjustment notches
- Lock knob for release and securing
- Support stalks
Non-adjustable head restraint/headrest components
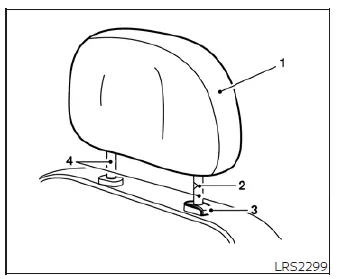
- Removable head restraint/headrest
- Single locking notch
- Lock knob for release and securing
- Support stalks
Remove
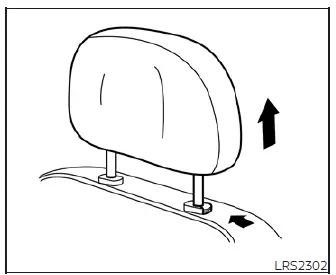
To properly remove the head restraint or headrest from your Nissan Leaf, please follow this systematic procedure:
1. Grasp the head restraint or headrest firmly and pull it upward until it reaches its highest extended position.
2. Locate the lock knob on the seat frame, push it in, and hold it firmly in the depressed position to release the locking mechanism.
3. While continuing to hold the lock knob, carefully remove the head restraint or headrest by pulling it straight up and out of the seat.
4. Always store the removed head restraint or headrest in a secure, designated location within your vehicle; never leave it loose in the cabin, as it could become a projectile during sudden braking or a collision.
5. It is essential to reinstall and properly adjust the head restraint or headrest before anyone sits in that specific seating position.
Install
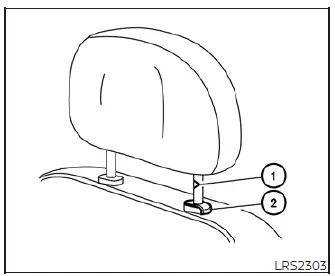
1. Carefully align the stalks of the head restraint or headrest with the guide holes in the seat back. Ensure the unit is facing the correct forward-pointing direction. The stalk featuring the locking notch (or notches) 1 must be inserted into the hole that contains the lock knob 2.
2. Push and hold the lock knob while simultaneously pushing the head restraint or headrest firmly down into the seat back.
3. Before allowing an occupant to use the seat, ensure the head restraint or headrest is adjusted to a safe and comfortable position.
Adjust
For adjustable head restraint/headrest systems:
Adjust the height of the head restraint or headrest in your Nissan Leaf so that the center of the cushion aligns perfectly with the center of your ears. This provides the most effective protection for your neck.
If your physical stature results in an ear position that is still higher than the center of the head restraint, slide the restraint to its highest possible position to maximize support.
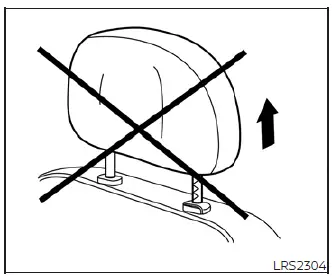
For non-adjustable head restraint/headrest systems:
Before occupying the seat, verify that the head restraint or headrest is fully seated and that the lock knob is securely engaged in the notch, ensuring the unit is locked firmly in place.
Raise
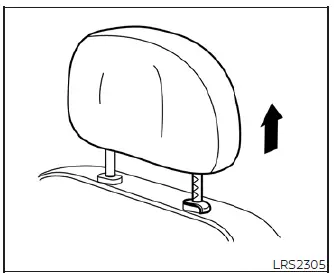
To raise the head restraint or headrest, simply pull it straight up until you reach the desired height.
Always verify that the head restraint or headrest is locked and that the lock knob has clicked into a notch before anyone rides in that seating position.
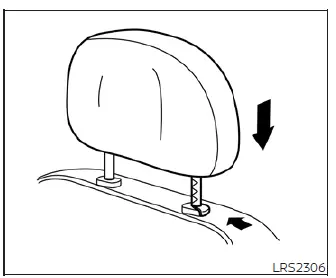
Lower
To lower the unit, push and hold the lock knob, then exert downward pressure on the head restraint or headrest until it reaches the preferred height.
Once you have lowered the device, confirm that the lock knob has fully engaged in a notch, ensuring it is secure for any occupant of your Nissan Leaf.
 Front power seat adjustment (if so equipped for driver's seat)
Operating tips
The power seat motor in your Nissan Leaf is engineered with an auto-reset overload protection circuit. If the motor ceases operation during an adjus ...
 Seat belts
...
Other materials:
Main line between DLC and A-bag circuit
Diagnosis Procedure
1.CHECK HARNESS CONTINUITY (OPEN CIRCUIT)
1. Turn the ignition switch OFF.
2. Disconnect the battery cable from the negative terminal.
3. Disconnect the BCM harness connector.
4. Check the continuity between the data link connector and the BCM harness
connector.
- With In ...
Precaution for Diesel Equipment
CLEANLINESS
CLEANLINESS INSTRUCTIONS WHICH MUST BE FOLLOWED WHEN WORKING ON THE HIGH
PRESSURE
DIRECT INJECTION SYSTEM
Risks relating to contamination
The system is very sensitive to contamination. The risks caused by the
introduction of contamination are:
• Damage or destruction of the hi ...
Power meter
This dynamic gauge provides a clear visual representation of your Nissan Leaf's energy flow. It specifically monitors the actual traction motor power consumption (A) and tracks the regenerative braking energy that is being fed back into the Li-ion battery (B).
When the veh ...
