Nissan Juke Service and Repair Manual : Final drive
Exploded View
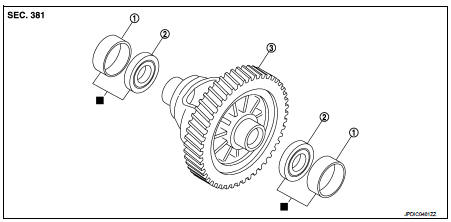
1. Differential side bearing outer race 2. Differential side bearing 3. Final drive
 : Replace the parts as a set.
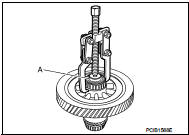
Disassembly
1. Remove differential side bearings, using the drift (A) [SST: ST33052000] and a puller [Commercial service tool].
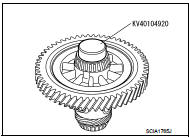
Assembly
1. Install differential side bearings, using the drift [SST].
CAUTION:
Replace differential side bearing outer race and differential
side bearing as a set.
Inspection
INSPECTION AFTER DISASSEMBLY
Case
Check differential case. Replace if necessary.
Bearing
Check bearing for damage and unsmooth rotation. Replace if necessary.
 Mainshaft and gear
Exploded View
1. Mainshaft front bearing outer
race
2. Mainshaft front bearing inner race
3. Mainshaft
4. 1st main gear
5. 1st inner baulk ring
6. 1st synchronizer cone
7. 1st outer baulk ...
 Service data and specifications (SDS)
General Specifications
...
Other materials:
Precaution for Supplemental Restraint System
(SRS) "AIR BAG" and "SEAT BELT PRE-TENSIONER"
The Supplemental Restraint System such as “AIR BAG” and “SEAT BELT PRE-TENSIONER”,
used along
with a front seat belt, helps to reduce the risk or severity of injury to the
driver and front passenger for certain
types of collision. This system includes seat belt switch inputs and dual s ...
Light & rain sensor
Exploded View
CAUTION:
When the light & rain sensor is removed from windshield, the light & rain sensor
cannot be re-used.
REMOVAL
1. Light & rain sensor bracket
2. Mirror base
3. Light & rain sensor
4. Inside mirror assembly
: Pawl
: Do not reuse
Removal and Installa ...
IPDM-E branch line circuit
Diagnosis Procedure
1.CHECK CONNECTOR
1. Turn the ignition switch OFF.
2. Disconnect the battery cable from the negative terminal.
3. Check the terminals and connectors of the IPDM E/R for damage, bend and loose
connection (unit side
and connector side).
Is the inspection result normal?
Y ...
