Nissan Juke Owners Manual : Cockpit
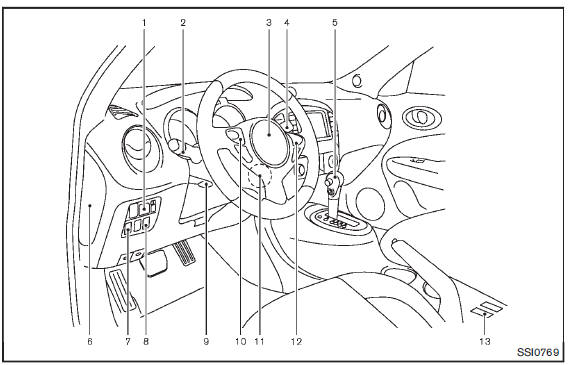
1. Outside mirror remote control switch
2. Headlight, fog light and turn signal switch
— Headlight
— Turn signal light
— Fog light
3. Steering wheel
— Electric power steering system
— Horn
— Driver’s supplemental air bag
4. Wiper and washer switch
5. Shift lever
— Continuously Variable Transmission (CVT)
— Manual Transmission (MT)
6. Fuse box cover
7. Vehicle Dynamic Control (VDC) OFF switch
8. All-Wheel Drive (AWD) switch
9. Tilting steering wheel lever
10. Steering-wheel-mounted controls (left side)
— Audio control
— Bluetooth® Hands-Free Phone System control
11. Ignition switch (models without Intelligent Key system)
12. Steering-wheel-mounted controls (right side)
— Cruise control switches
13. Heated seat switch
: if so equipped
 Passenger compartment
1. Cargo area
— Cargo cover
— Cargo light (, )
2. Coat hook
3. Sun visors
4. Microphone
5. Moonroof switch
6. Room light and map lights
7. Inside rearview mirror
8. Door armrest
...
 Instrument panel
1. Meters and gauges
2. Center ventilator
3. Audio system or Navigation system
— Clock
4. Hazard warning flasher switch
5. Integrated Control System
— Drive mode
— Heater and air ...
Other materials:
BSW system limitations
WARNING
The following points detail the operational boundaries and inherent limitations of the Blind Spot Warning (BSW) system. Failure to operate your Nissan Leaf with a full understanding of these system limitations could result in an improper response to traffic conditions, leading to seriou ...
P0102, P0103 MAF SENSOR
DTC Logic
DTC DETECTION LOGIC
DTC CONFIRMATION PROCEDURE
1.PRECONDITIONING
If DTC Confirmation Procedure has been previously conducted, always turn
ignition switch OFF and wait at
least 10 seconds before conducting the next test.
Which DTC is detected?
P0102 >> GO TO 2.
P0103 & ...
Opening charge port lid
Instrument panel switch
When opening the charge port lid to plug in a charging connector, perform one of the following official interface actions:
Push the physical charge port lid switch located on the lower instrument panel to the left of the steering ...
