Nissan Juke Owners Manual : Brake and clutch (if so equipped) fluid
For additional brake and clutch fluid information, see “Capacities and recommended fuel/lubricants” of this manual.
WARNING
• Use only new fluid from a sealed container. Old, inferior or contaminated fluid may damage the brake and clutch systems. The use of improper fluids can damage the brake and clutch systems, and affect the vehicle’s stopping ability.
• Clean the filler cap before removing.
• Brake and clutch fluid is poisonous and should be stored carefully in marked containers out of the reach of children.
CAUTION
Do not spill the fluid on any painted surfaces. This will damage the paint. If fluid is spilled, immediately wash the surface with water.
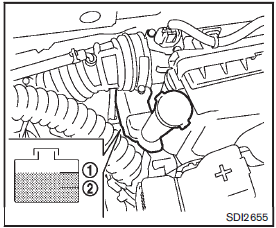
Check the fluid level in the reservoir. If the fluid is below the MIN line 2 or the brake warning light comes on, add Genuine NISSAN Super Heavy Duty Brake Fluid or equivalent DOT 3 fluid up to the MAX line 1 . If fluid must be added frequently, the system should be checked by a NISSAN dealer.
 Continuously Variable Transmission (CVT) fluid
When checking or replacement is required, we recommend a NISSAN dealer for servicing.
CAUTION
• Use only Genuine NISSAN CVT Fluid NS-2. Do not mix with other fluids.
• Using transmission fluid ...
 Window washer fluid
To fill the window washer fluid reservoir, lift the cap and pour the window washer
fluid into the reservoir opening.
Add a washer solvent to the washer for better cleaning. In the winter season, ...
Other materials:
Oil pan (upper)
Exploded View
1. O-ring
2. Oil pan (upper)
3. Oil level gauge guide
4. O-ring
5. Oil level gauge
6. Oil pump drive chain
7. Crankshaft sprocket
8. Oil pump sprocket
9. Oil pump chain tensioner
10. Oil pump
11. Drain plug
12. Drain plug washer
13. Oil pan (lower)
14. Oil filt ...
Door does not lock/unlock with door lock and unlock
switch
All door
ALL DOOR : Description
All doors do not lock/unlock using door lock and unlock switch.
ALL DOOR : Diagnosis Procedure
1.CHECK DOOR LOCK AND UNLOCK SWITCH
Check door lock and unlock switch.
Refer to DLK-79, "DRIVER SIDE : Component Function Check".
Is the inspection resu ...
Basic inspection
Work Procedure
1.INSPECTION START
1. Check service records for any recent repairs that may indicate a related
malfunction, or a current need for
scheduled maintenance.
2. Open engine hood and check the following:
- Harness connectors for improper connections
- Wiring harness for improper con ...
