Nissan Juke Service and Repair Manual : Back door lock
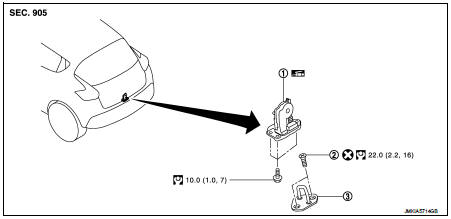
Exploded View

1. Back door lock assembly
2. TORX bolt
3. Back door striker
 : Do not reuse
 : N·m (kg-m, ft-lb)
 : Body grease
Door lock
DOOR LOCK : Removal and Installation
REMOVAL
1. Remove the back door lower finisher. Refer to INT-35, "BACK DOOR LOWER FINISHER : Removal and Installation".
2. Remove back door lock assembly mounting bolts.
3. Disconnect back door lock connector, and then remove back door lock assembly.
INSTALLATION
Note the following item, and install in the reverse order of removal.
CAUTION:
After installation, check back door open/close, and lock/unlock operation.
Emergency lever
EMERGENCY LEVER : Unlock procedures
UNLOCK PROCEDURES
NOTE
:
If back door lock cannot be unlocked due to a malfunction or battery discharge,
follow the procedures to
unlock back door.
1. Remove emergency lid. Refer to INT-36, "EMERGENCY LID : Removal and Installation".
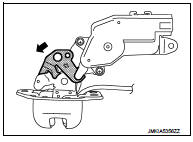
2. From inside the vehicle, rotate emergency lever toward lower direction and unlock.

 Rear door lock
Exploded View
1. Outside handle assembly
2. Rear door sealing screen
3. Door lock assembly
4. TORX bolt
5. Inside handle
: Clip
: Pawl
: Vehicle front
: Do not reuse
: N·m (kg-m, in-lb) ...
 Fuel filler lid opener
Exploded View
1. Fuel filler lid opener cable
2. Cable protector
3. Fuel filler lid lock assembly
4. Fuel filler lid assembly
5. Spring
6. Bumper rubber
: Clip
: Do not reuse
Fuel filler ...
Other materials:
P047B exhaust gas pressure sensor 2
DTC Logic
DTC DETECTION LOGIC
Diagnosis Proce
1.CHECK GROUND CONNECTIONS
1. Turn ignition switch OFF and wait at least 20 seconds.
2. Check ground connection E38. Refer to Ground inspection in GI-44, "Circuit
Inspection".
Is the inspection result normal?
YES >> GO TO 2.
...
B210F shift position/clutch interlock switch
DTC Logic
DTC DETECTION LOGIC
NOTE:
If DTC B210F is displayed with DTC U1000, first perform the trouble diagnosis
for DTC U1000. Refer to PCS-
30, "DTC Logic".
DTC CONFIRMATION PROCEDURE
1.PERFORM DTC CONFIRMATION PROCEDURE
1. Shift selector lever to the P position.
2. Turn ign ...
B1178 lap Pre-tensioner RH
DTC Logic
DTC CONFIRMATION PROCEDURE
1.CHECK SELF-DIAGNOSTIC RESULT
With CONSULT-III
1. Turn ignition switch ON.
2. Perform “Self Diagnostic Result” mode of “AIR BAG” using CONSULT-III.
Without CONSULT-III
1. Turn ignition switch ON.
2. Check the air bag warning lamp status. Refer to SRC ...
