Nissan Juke Service and Repair Manual : Back door finisher
Exploded View
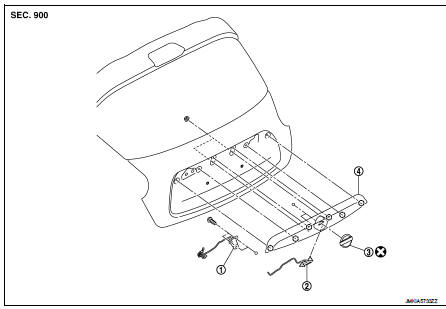
1. Rear view camera
2. Back door opener request switch
3. Emblem
4. Back door finisher
 : Clip
 : Pawl
 : Do not reuse
Removal and Installation
REMOVAL
1. Remove back door trim. Refer to INT-35, "BACK DOOR LOWER FINISHER : Removal and Installation".
2. Remove back door finisher mounting nuts.
3. Disconnect license lamp, back door opener request switch and rear view camera harness connectors.
4. Remove harness grommet.
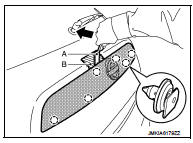
5. Disengage back door finisher fixing clips using a remover tool (A), and then remove back door finisher.
6. Disengage fixing clips at both ends of back door finisher from inside of back door.
 : Clip
CAUTION:
• Apply protect tape (B) on back door panel to protect the
painted surface from damage.
• Never pull back door finisher strongly.
INSTALLATION
Note the following item, and then install in the reverse order of removal.
CAUTION:
When installing back door finisher, check that clip are securely in body panel
holes, and press them in.
 Rear fender cover
Exploded View
1. Rear fender cover
2. Rear fender
Removal and Installation
REMOVAL
Disengage rear fender cover fixing clips using remover tool (A), and
then remove rear fender cover.
CAUTI ...
 Mirrors
...
Other materials:
Does not operate
Description
ABS function and EBD function does not operate.
Diagnosis Procedure
CAUTION:
ABS function and EBD function never operate when the vehicle speed is 10 km/h
(6.2 MPH) or less.
1.CHECK ABS WARNING LAMP
Check that ABS warning lamp and brake warning lamp turn ON and turn OFF
appro ...
P0197, P0198 EOT sensor
DTC Logic
DTC DETECTION LOGIC
DTC CONFIRMATION PROCEDURE
1.PRECONDITIONING
If DTC Confirmation Procedure has been previously conducted, always perform
the following procedure
before conducting the next test.
1. Turn ignition switch OFF and wait at least 10 seconds.
2. Turn ignition swit ...
P0863 TCM communication
DTC Logic
DTC DETECTION LOGIC
DTC CONFIRMATION PROCEDURE
1.PREPARATION BEFORE WORK
If another "DTC CONFIRMATION PROCEDURE" occurs just before, turn ignition
switch OFF and wait for at
least 10 seconds, then perform the next test.
>> GO TO 2.
2.CHECK DTC DETECTION
With ...
