Nissan Juke Owners Manual : Outside mirrors
WARNING
Objects viewed in the outside mirror on the passenger side are closer than they appear. Be careful when moving to the right. Using only this mirror could cause an accident. Use the inside mirror or glance over your shoulder to properly judge distances to other objects.
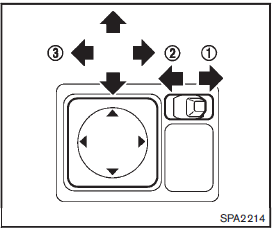
Adjusting outside mirrors
The outside mirror control switch is located at the lower part of the instrument panel.
The outside mirror will operate only when the ignition switch is in the ACC or ON position.
Move the switch right 1 or left 2 to select the right or left side mirror, then adjust3 using the control switch.
Defrosting outside mirrors (if so equipped)
The outside mirrors will be heated when the rear window defroster switch is operated. (See “Rear window and outside mirror defroster switch” .)
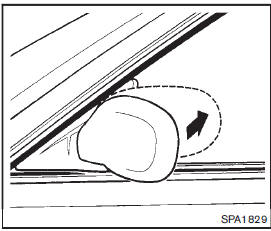
Foldable outside mirrors
Fold the outside mirror by pushing it toward the rear of the vehicle.
 Inside mirror
Adjust the angle of the inside mirror to the desired position.
The night position1 will reduce glare from the headlights of vehicles behind
you at night.
Use the day position2 when driving in ...
 Vanity mirror
To use the front vanity mirror, pull down the sun visor and pull up the cover. ...
Other materials:
P0171 fuel injection system function
DTC Logic
DTC DETECTION LOGIC
With the Air/Fuel Mixture Ratio Self-Learning Control, the actual mixture
ratio can be brought closely to the
theoretical mixture ratio based on the mixture ratio feedback signal from the
A/F sensor 1. The ECM calculates
the necessary compensation to correct the ...
Precautions on supplemental restraint system
This Supplemental Restraint System (SRS) section contains important information
concerning the following systems:
• Driver and passenger supplemental frontimpact air bag (NISSAN Advanced Air Bag
System)
• Front seat-mounted side-impact supplemental air bag
• Roof-mounted curtain side-im ...
Sun visors
1. To effectively block blinding sunlight or glare originating from directly ahead, simply swing down 1 the primary sun visor assembly toward the windshield.
2. To block harsh rays penetrating from the side glass, unclip the main sun visor from its central plasti ...
