Nissan Juke Service and Repair Manual : Back door trim
Exploded View
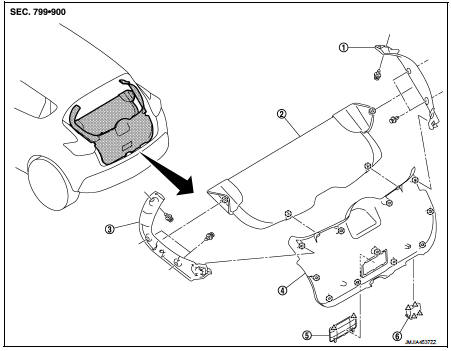
1. Back door side finisher RH
2. Rear parcel shelf finisher
3. Back door side finisher LH
4. Back door lower finisher
5. Emergency lid
6. Back door pull handle
 : Clip
 : Pawl
Back door pull handle : Removal and Installation
REMOVAL
CAUTION:
• When removing, always use a remover tool that is made of plastic.
• Never damage the back door panel.
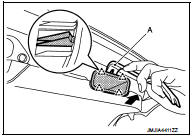
1. Fully open back door.
2. Disengage back door pull handle fixing pawls with a remover tool (A), and then remove back door pull handle.
 : Pawl
INSTALATION
Install in the reverse order of removal.
Back door lower finisher : Removal and Installation
REMOVAL
CAUTION:
• When removing, always use a remover tool that is made of plastic.
• Never damage the back door panel.
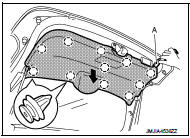
1. Fully open back door.
2. Remove rear parcel shelf finisher. (Models with rear parcel shelf finisher) 3. Disengage back door lower finisher fixing clips with a remover tool (A), and then remove back door lower finisher
 : Clip
INATALLATION
Note the following item, and install in the reverse order of removal.
CAUTION:
When installing back door lower finisher, check that clips are securely in back
door panel holes, and
press them in.
Back door side finisher : Removal and Installation
REMOVAL
CAUTION:
• When removing, always use a remover tool that is made of plastic.
• Never damage the back door panel.
1. Fully open back door.
2. Remove back door lower finisher. Refer to INT-35, "BACK DOOR LOWER FINISHER : Removal and Installation".
3. Disengage back door side finisher fixing clips (A), and then remove back door side finisher.
INSTALATION
Note the following item, and install in the reverse order of removal.
CAUTION:
When installing back door side finisher, check that clips are securely in back
door panel holes, and
press them in
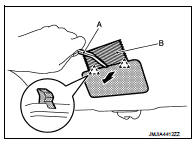
EMERGENCY LID : Removal and Installation
REMOVAL
CAUTION:
When removing, always use a remover tool that is made of plastic.
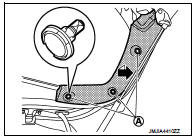
1. Fully open back door.
2. Disengage emergency lid fixing pawls with a remover tool (A), and then remove emergency lid.
 : Pawl
CAUTION:
Apply protective tape (B) on the parts to protect it from
damage.
INSTALLATION
Install in the reverse order of removal.
 Luggage floor trim
Exploded View
2WD models
1. Rear pillar cap RH
2. Luggage side upper finisher RH
3. Luggage side lower finisher RH
4. Luggage floor board
5. Luggage side upper finisher LH
6. Rear pillar c ...
 Instrument Panel
...
Other materials:
Brake fluid
Inspection
BRAKE FLUID LEVEL
• Check that the fluid level in the reservoir tank is within the specified
range (MAX – MIN lines).
• Visually check for any brake fluid leakage around the reservoir
tank.
• Check the brake system for any leakage if the fluid level is
extremely low (lower ...
Buzzer (combination meter)
Component Function Check
1.CHECK FUNCTION
1. Select “INTELLIGENT KEY” of “BCM” using CONSULT-III.
2. Select “INSIDE BUZZER” in “ACTIVE TEST” mode.
3. Check that the function operates normally according to the following
conditions.
Is the inspection result normal?
Yes >&g ...
B210D starter relay
DTC Logic
DTC DETECTION LOGIC
NOTE:
• If DTC B210D is displayed with DTC U1000, first perform the trouble diagnosis
for DTC U1000. Refer to
PCS-59, "DTC Logic".
• If DTC B210D is displayed with DTC B209F, first perform the trouble diagnosis
for DTC B209F. Refer to
SEC-209, &q ...
