Nissan Juke Service and Repair Manual : Diagnosis and repair work flow
Work Flow
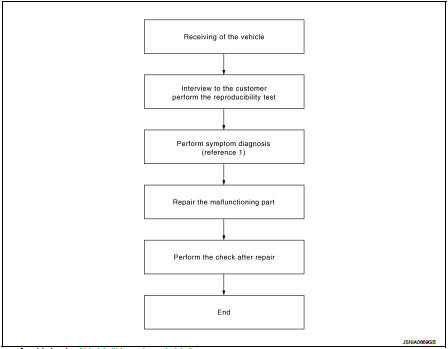
OVERALL SEQUENCE
Reference 1··· Refer to AV-77, "Symptom Table".
DETAILED FLOW
1.CHECK SYMPTOM
Check the malfunction symptoms by performing the following items.
• Interview the customer to obtain the malfunction information (conditions and environment when the malfunction occurred).
• Check the symptom.
>> GO TO 2.
2.PERFORM DIAGNOSIS BY SYMPTOM
Perform the relevant diagnosis referring to the diagnosis chart by symptom. Refer to AV-77, "Symptom Table".
>> GO TO 3.
3.REPAIR OR REPLACE MALFUNCTIONING PARTS
Repair or replace the malfunctioning parts.
>> GO TO 4.
4.FINAL CHECK
Perform the operation to check that the malfunction symptom is solved or any other symptoms are present.
Is there any symptom? YES >> GO TO 2.
NO >> INSPECTION END
 Basic inspection
...
 Additional service when removing battery negative terminal
Description
• The NAVI control unit is equipped with the anti-theft system.
• The NAVI control unit operates after authenticating a fixed four-digit
anti-theft code.
• After removing the battery ...
Other materials:
Precaution for Brake System
WARNING:
Clean any dust from the front brake and rear brake using a vacuum dust
collector. Never blow by compressed
air.
• Brake fluid use refer to MA-13, "Fluids and Lubricants".
• Never reuse drained brake fluid.
• Never spill or splash brake fluid on painted surfaces. Brake fluid ...
B26F1 ignition relay
DTC Logic
DTC DETECTION LOGIC
DTC CONFIRMATION PROCEDURE
1.PERFORM DTC CONFIRMATION PROCEDURE
1. Turn ignition switch ON under the following conditions, and wait for 2
seconds or more.
CVT models
- Selector lever is in the P or N position
- Do not depress brake pedal
M/T models
- Do n ...
Drive belt idler pulley
Removal and Installation
REMOVAL
1. Remove drive belt. Refer to EM-155, "Removal and Installation".
2. Remove the lock nut, and then remove the plate (7), idler pulley
(6), and washer (5).
1 : Alternator bracket
3. Remove the center shaft (2) together with the spacer (3) with
insert ...
