Nissan Juke Service and Repair Manual : Washer tank
Exploded View
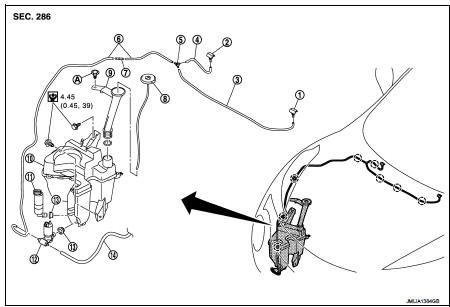
1. Front washer nozzle LH
2. Front washer nozzle RH
3. Front washer tube LH
4. Front washer tube RH
5. Check valve
6. Front washer tube
7. Joint
8. Washer tank inlet cap
9. Washer tank inlet
10. Washer tank
11. Headlamp washer pump
12. Washer pump
13. Packing
14. Rear washer tube
A : Clip
 : Clip
 : N·m (kg·m, in-lb)
Removal and Installation
REMOVAL
1. Fully open hood.
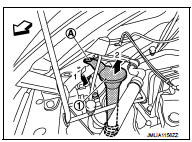
2. Remove washer tank inlet fixing clip (A).
3. Pull out washer tank inlet (1) from washer tank.
 : Vehicle front
4. Remove fender protector RH (front). Refer to EXT-22, "Removal and Installation".
5. Disconnect washer pump connector.
6. Disconnect headlamp washer pump connector.
7. Disconnect washer level switch connector.
8. Disconnect front washer tube and rear washer tube.
9. Disconnect headlamp washer tube joint.
10. Remove washer tank mounting bolts.
INSTALLATION
Note the following item, and then install in the reverse order of removal.
CAUTION:
Add water up to the top of washer tank inlet after installing and check that
there is no leakage.
 Headlamp washer nozzle and tube
Exploded View
1. Washer tank
2. Headlamp washer tube (tank side)
3. Headlamp washer tube RH
4. Headlamp washer nozzle connector
RH
5. Headlamp washer nozzle bracket RH
6. Headlamp washer n ...
 Washer pump
Exploded View
1. Front washer nozzle LH
2. Front washer nozzle RH
3. Front washer tube LH
4. Front washer tube RH
5. Check valve
6. Front washer tube
7. Joint
8. Washer tank inlet cap
...
Other materials:
Drive pinion
Exploded View
1. Filler plug
2. Gasket
3. Drain plug
4. Breather tube
5. Clip
6. Breather hose
7. Breather
8. sub-harness clip
9. sub-harness
10. Rear cover
11. Center stem
12. Side bearing (right)
13. Side bearing adjusting shim (right)
14. Side oil seal (right)
15. Conne ...
Coil spring
Exploded View
1. Upper rubber seat
2. Coil spring
3. Lower rubber seat
4. Suspension arm
: Vehicle front
Removal and Installation
REMOVAL
1. Remove tires. Refer to WT-7, "Removal and Installation".
2. Remove wheel sensor and sensor harness. Refer to BRC-86, "REAR WHEEL SE ...
Service data and specifications (SDS)
SERVICE DATA AND SPECIFICATIONS (SDS)
Idle Speed
*: Under the following conditions
• A/C switch: OFF
• Electric load: OFF (Lights, heater fan & rear window defogger)
• Steering wheel: Kept in straight-ahead position
Ignition Timing
*: Under the following conditions
• A/C switch: OFF
...
