Nissan Juke Service and Repair Manual : Turn signal lamp circuit
Component Function Check
1.CHECK TURN SIGNAL LAMP
 CONSULT-III ACTIVE TEST
1. Select “FLASHER” of BCM (FLASHER) active test item.
2. With operating the test items, check that the turn signal lamps is turned ON.
LH : Turn signal lamps (LH) ON RH : Turn signal lamps (RH) ON Off : Turn signal lamps OFF
Is the inspection result normal? YES >> Turn signal lamp circuit is normal.
NO >> Refer to EXL-69, "Diagnosis Procedure".
Diagnosis Procedure
1.CHECK TURN SIGNAL LAMP BULB
Check the applicable lamp bulb.
Is the inspection result normal? YES >> GO TO 2.
NO >> Replace bulb.
2.CHECK TURN SIGNAL LAMP OUTPUT VOLTAGE
1. Turn ignition switch OFF.
2. Disconnect front turn signal lamp connector, side turn signal lamp connector and rear combination lamp connector.
3. Turn ignition switch ON.
4. With operating the turn signal switch, check voltage between BCM harness connector and ground.
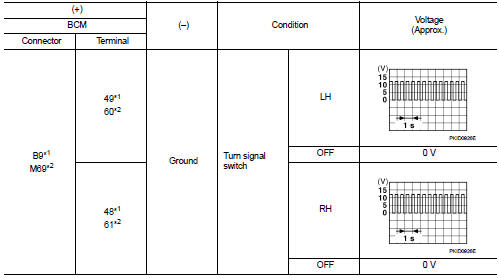
*1: Without Intelligent Key *2: With Intelligent Key
Is the inspection result normal? YES >> GO TO 3.
NO >> GO TO 4.
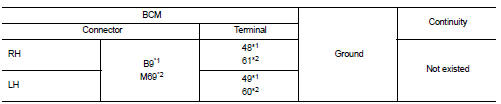
3.CHECK TURN SIGNAL LAMP OPEN CIRCUIT
1. Turn ignition switch OFF.
2. Disconnect BCM connector.
3. Check continuity between BCM harness connector and front turn signal lamp, side turn signal lamp or rear combination lamp harness connector.
Front turn signal lamp

Side turn signal lamp

Rear turn signal lamp

*1: Without Intelligent Key *2: With Intelligent Key
Is the inspection result normal? YES >> GO TO 5.
NO >> Repair or replace harness.
4.CHECK TURN SIGNAL LAMP SHORT CIRCUIT
Check continuity between BCM harness connector and ground.
*1: Without Intelligent Key *2: With Intelligent Key
Is the inspection result normal?
YES >> Check each bulb socket for internal short circuit, and if check result is normal, replace BCM. Refer to BCS-93, "Removal and Installation" (with Intelligent Key), BCS-161, "Removal and Installation" (without Intelligent Key).
NO >> Repair or replace harness.
5.CHECK TURN SIGNAL LAMP GROUND OPEN CIRCUIT
Check continuity between BCM harness connector and front turn signal lamp, side turn signal lamp or rear combination lamp and ground.
Front turn signal lamp

Side turn signal lamp

Rear turn signal lamp

Is the inspection result normal? YES >> Check corresponding bulb socket and harness. Repair or replace if necessary.
NO >> Repair or replace harness.
 Light & rain sensor
Component Function Check
1.CHECK LIGHT & RAIN SENSOR
1. Clean light & rain sensor detection area of windshield fully.
2. Turn ignition switch ON.
3. Turn lighting switch AUTO.
4. With the ...
 Hazard switch
Component Function Check
1.CHECK HAZARD SWITCH SIGNAL BY CONSULT-III
CONSULT-III DATA MONITOR
1. Turn the ignition switch ON.
2. Select “HAZARD SW” of BCM (FLASHER) data monitor item.
3. With ope ...
Other materials:
B1067, B1072 passenger air bag module
DTC Logic
DTC DETECTION LOGIC
DTC CONFIRMATION PROCEDURE
1.CHECK SELF-DIAG RESULT
With CONSULT-III
1. Turn ignition switch ON.
2. Perform “Self Diagnostic Result” mode of “AIR BAG” using CONSULT-III.
Without CONSULT-III
1. Turn ignition switch ON.
2. Check the air bag warning lamp statu ...
Power supply and ground circuit
A/C auto AMP. : Diagnosis Procedure
1.CHECK SYMPTOM
Check symptom (A or B).
Which symptom is detected?
A >> GO TO 2.
B >> GO TO 5.
2.CHECK FUSE
1. Turn ignition switch OFF.
2. Check 10A fuse (No. 3).
NOTE:
Refer to PG-23, "Fuse and Fusible Link Arrangement".
...
Front door
Exploded View
1. Front door panel
2. Grommet
3. Door hinge (upper)
4. Door hinge (lower)
5. Door check link
6. Bumper rubber
7. Door pad
8. Door striker
9. TORX bolt
10. Grommet
: Do not reuse
: N·m (kg-m, in-lb)
: N·m (kg-m, ft-lb)
: Body grease
Door assembly
DOOR ASSEMBLY : ...
