Nissan Juke Service and Repair Manual : Sill cover
Exploded View
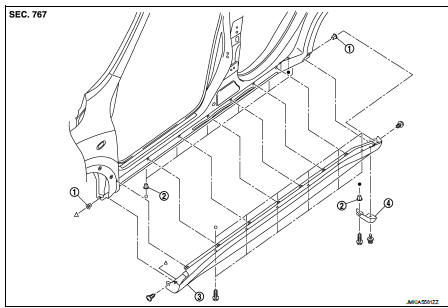
1. Screw grommet
2. Screw grommet
3. Sill cover
4. Wind defle
Removal and Installation
REMOVAL
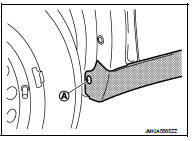
1. Remove sill cover front end fixing screw (A).
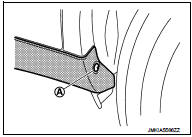
2. Remove sill cover rear end fixing screw (A).
3. Remove sill cover lower side fixing screws.
4. Fully open front door and rear door.
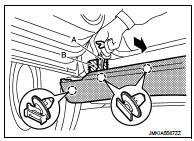
5. Remove clips from sill cover back side with a remover tool (A).
 : Clip
CAUTION:
Apply protective tape (B) on the body to protect the painted
surface from damage.
6. Remove sill cover form body side.
INSTALLATION
Note the following item, and then install in the reverse order of removal.
CAUTION:
When installing sill cover, check that clips are securely fitted in body panel
holes, and then press clips
in.
 Fender protector
Exploded View
1. Hoodledge insurator
2. Fender protector
3. U nut
4. Air guide
5. Screw grommet
A. To hoodledge panel
: Vehicle front
Removal and Installation
REMOVAL
1. Remove front fi ...
 Floor side fairing
Exploded View
1. Push spring nut
2. Floor under cover RH
3. Floor under cover LH
Removal and Installation
REMOVAL
FLOOR UNDER COVER
Remove floor under cover mounting nut and push spring nut ...
Other materials:
Control linkage
Exploded View
1. Bracket
2. Shifter cable
3. Selector lever
4. Shifter lever A
5. Tapping bolt
6. Cable mounting bracket
7. Selector cable
8. Grommet
9. M/T shift selector assembly
10. Shifter lever
11. Shifter lever knob
: Always replace after every
disassembly.
: N·m (kg-m, ...
Back door does not opened
Diagnosis Procedure
1.CHECK BACK DOOR OPENER SWITCH
Check back door opener switch.
Refer to DLK-69, "Component Function Check".
Is the inspection result normal?
YES >> GO TO 2.
NO >> Repair or replace the malfunctioning parts.
2.CHECK BACK DOOR OPENER ACTUATOR
C ...
B2196 dongle unit
Description
BCM performs ID verification between BCM and dongle unit.
When verification result is OK, BCM permits cranking.
DTC Logic
DTC DETECTION LOGIC
DTC CONFIRMATION PROCEDURE
1.PERFORM DTC CONFIRMATION PROCEDURE
1. Turn ignition switch ON.
2. Turn ignition switch OFF.
3. Turn igni ...
