Nissan Juke Service and Repair Manual : Side oil seal
Exploded View

1. Rear final drive assembly
2. Side oil seal (right)
3. Electric controlled coupling (right)
4. Reamer bolt
5. Side oil seal (left)
6. Electric controlled coupling (left)
A. Oil seal lip B. Gear carrier mouting face
 : Vehicle front
 : N·m (kg-m, ft-lb)
 : Always replace after every
disassembly.
 : Apply multi purpose grease
 : Apply gear oil.
 : Apply Genuine Liquid Gasket 1217
or equivalent.
Removal and Installation
REMOVAL
1. Remove electric controlled couplings. Refer to DLN-139, "Removal and Installation".
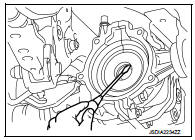
2. Remove side oil seals with a suitable tool.
CAUTION:
Never damage gear carrier and rear cover.
INSTALLATION
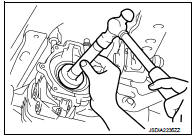
1. Install side oil seal (right side) until it becomes flush with the carrier end, using the drift (A) (SST: KV38100200).
CAUTION:
• Never reuse oil seals.
• When installing, never incline oil seals.
• Apply multi-purpose grease onto oil seal lips, and gear oil onto the circumference of oil seal
.
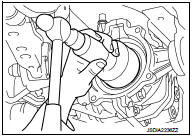
2. Install side oil seal (left side) until it becomes flush with the carrier end, using the drift (A) (SST: KV38100500).
CAUTION:
• Never reuse oil seals.
• When installing, never incline oil seals.
• Apply multi-purpose grease onto oil seal lips, and gear oil onto the circumference of oil seal.
3. Install electric controlled couplings. Refer to DLN-139, "Removal and Installation".
4. When oil leaks while removing, check oil level after the installation.
Refer to DLN-132, "Inspection".
 Front oil seal
Exploded View
1. Rear final drive assembly
2. Front oil seal
3. Companion flange
4. Companion flange lock nut
A. Oil seal lip
: Vehicle front
: N·m (kg-m, ft-lb)
: Never reuse parts
: App ...
 Electric controlled coupling
Exploded View
1. Sub-harness
2. Rear final drive assembly
3. Electric controlled coupling (right)
4. Reamer bolt
5. Electric controlled coupling (left)
A. Gear carrier mouting face
: Vehic ...
Other materials:
Locking with key
The power door lock system allows you to lock or unlock all doors simultaneously.
• Turning the driver’s door key cylinder to the front of the vehicle1 will
lock all doors and the lift gate.
• Turning the driver’s door key cylinder once to the rear of the vehicle2 will unlock
the drive ...
P1715 input speed sensor
Description
ECM receives input speed sensor signal from TCM via the CAN communication
line. ECM uses this signal for
engine control.
DTC Logic
DTC DETECTION LOGIC
NOTE:
• If DTC P1715 is displayed with DTC UXXXX, first perform the trouble diagnosis
for DTC UXXXX.
• If DTC P1715 is display ...
Seats
WARNING
• Do not ride in a moving vehicle when the seatback is reclined. This can
be dangerous. The shoulder belt will not be against your body. In an accident, you
could be thrown into it and receive neck or other serious injuries. You could also
slide under the lap belt and receive seriou ...
