Nissan Juke Service and Repair Manual : Removal and Installation
REMOVAL
1. Remove engine assembly. Refer to EM-55, "2WD : Exploded View" (2WD) , EM-59, "4WD : Exploded View" (4WD).
2. Remove oil pan (lower). Refer to EM-41, "Removal and Installation".
3. Remove front cover, and other related parts. Refer to EM-67, "Exploded View".
4. Remove oil pump sprocket with the following procedure: • Add matching mark if necessary for easier installation.
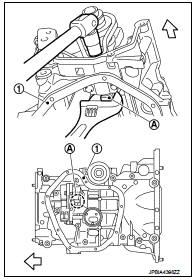
a. Push oil pump drive chain tensioner (1) in the direction show in the figure (A).
b. Insert a stopper pin (A) into the body hole (B).
c. Remove oil pump chain tensioner.
• When the holes on lever and tensioner body cannot be aligned, align these holes by slightly moving the oil pump chain tensioner slack guide.
![d. Hold the WAF part of oil pump shaft [WAF: 10 mm (0.39 in)] (A),](images/books/335/8/index.46.jpg)
d. Hold the WAF part of oil pump shaft [WAF: 10 mm (0.39 in)] (A), and then loosen the oil pump sprocket bolt and remove it.
1 : Oil pan (upper)
 : Engine front
CAUTION:
• Secure the oil pump shaft with the WAF part.
• Never loosen the oil pump sprocket bolt by tightening the oil pump drive chain.
e. Remove oil pump sprocket.
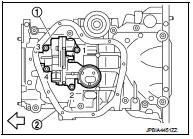
5. Remove oil pump.
• Loosen bolts in reverse order as shown in the figure.
1 : Oil pump
2 : Oil pan (upper)
: Engine front
INSTALLATION
Note the following, and install in the reverse order of removal.
Oil Pump
• Tighten bolts in numerical order as shown in the figure.
1 : Oil pump
2 : Oil pan (upper)
: Engine front

 Exploded View
1. O-ring
2. Oil pan (upper)
3. Oil level gauge guide
4. O-ring
5. Oil level gauge
6. Oil pump drive chain
7. Crankshaft sprocket
8. Oil pump sprocket
9. Oil pump chain tensioner
10. ...
 Inspection
INSPECTION AFTER INSTALLATION
1. Check the engine oil level. Refer to LU-8, "Inspection".
2. Start the engine, and check that there is no leakage of engine oil.
3. Stop the engine and wai ...
Other materials:
Inspection
OIL LEAKAGE
Check transfer surrounding area (oil seal, drain plug, filler plug, and
transfer case etc.) for oil leakage.
OIL LEVEL
1. Remove filler plug (1) and gasket. Then check that oil is filled up
from mounting hole for the filler plug.
Vehicle front
CAUTION:
Never start engine while ...
Basic inspection
Description
NOTE:
Only consult the tests after following the diagnostic procedure chart.
Some specific checks are grouped under the ???tests??? heading and are used as
required in different diagnostic
charts.
Work Procedure (TEST 1: Low Pressure Fuel Supply System Check)
NOTE:
• CAUSE
...
Basic inspection
DIAGNOSIS AND REPAIR WORKFLOW
Work Flow
OVERALL SEQUENCE
DETAILED FLOW
1.INTERVIEW FOR MALFUNCTION
Interview the symptom to the customer.
>> GO TO 2.
2.SYMPTOM CHECK
Check the symptom from the customer's information.
>> GO TO 3.
3.BASIC INSPECTION
Check the operation o ...
