Nissan Juke Service and Repair Manual : Rear stabilizer
Exploded View
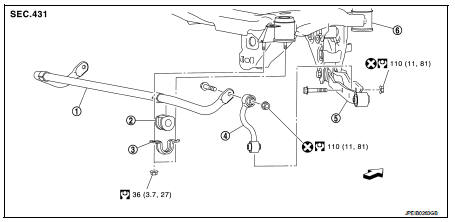
1. Stabilizer bar
2. Bushing
3. Stabilizer clamp
4. Stabilizer link
5. Lower link
6. Rear suspension member
 : Vehicle front
 : Always replace after every
disassembly.
 : N·m (kg-m, ft-lb)
Removal and Installation
REMOVAL
1. Remove stabilizer link.
2. Remove center pipe. Refer to EX-6, "Removal and Installation".
3. Remove mounting nuts on stabilizer clamp, bushing, and stabilizer bar from suspension member.
4. Perform inspection after removal. Refer to RSU-34, "Inspection".
INSTALLATION
Note the following, and install in the reverse order of removal.
• Perform final tightening of rear suspension member and axle installation position (rubber bushing), under unladen conditions with tires on level ground.
• Never reuse stabilizer link mounting nut.
Inspection
INSPECTION AFTER REMOVAL
Check stabilizer bar, stabilizer link, stabilizer bushing and stabilizer clamp for deformation, cracks or damage.
Replace it if necessary.
 Upper link
Exploded View
1. Rear suspension member
2. Adjusting bolt
3. Upper link
4. Eccentric disk
5. Lower link
6. Suspension arm bracket
7. Suspension arm
: Vehicle front
: Always replace afte ...
 Rear suspension assembly
Exploded View
1. Rear suspension member
2. Rebound stopper
3. Washer
: Vehicle front
N·m (kg-m, ft-lb)
Removal and Installation
REMOVAL
1. Remove tires. Refer to WT-7, "Removal and I ...
Other materials:
Timing chain
Exploded View
1. Timing chain slack guide
2. Timing chain tensioner
3. Timing chain
4. Oil pump drive chain
5. Crankshaft sprocket
6. Crankshaft key
7. Oil pump sprocket
8. Front cover
9. O-ring
10. O-ring
11. Oil control valve cover
12. O-ring
13. Oil control valve (EXH)
14 ...
P17B5 low brake solenoid
DTC Logic
DTC DETECTION LOGIC
DTC CONFIRMATION PROCEDURE
1.PREPARATION BEFORE WORK
If another "DTC CONFIRMATION PROCEDURE" occurs just before, turn ignition
switch OFF and wait for at
least 10 seconds, then perform the next test.
>> GO TO 2.
2.CHECK DTC DETECTION
1. S ...
Headlamp aiming adjustment
LHD
LHD : Description
PREPARATION BEFORE ADJUSTING
NOTE:
• For details, refer to the regulations in your own country.
• Perform aiming if the vehicle front body has been repaired and/or the headlamp
assembly has been
replaced.
Before performing aiming adjustment, check the following.
• ...
