Nissan Juke Service and Repair Manual : Rear door finisher
Exploded View
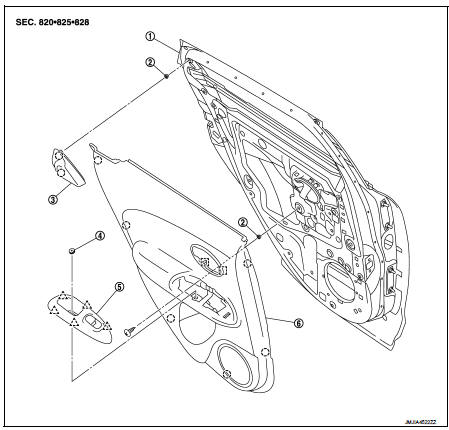
1. Rear door panel
2. Grommet
3. Rear door corner cover inner
4. Cap
5. Power window switch finisher
6. Rear door finisher
 : Clip
 : Pawl
 : Metal clip
Removal and Installation
REMOVAL
CAUTION:
• When removing, always use a remover tool that is made of plastic.
• Never damage the door panel.
1. Fully open door window.
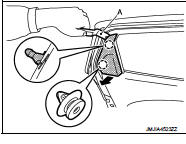
2. Remove rear corner cover inner.
Disengage rear corner cover inner fixing clips with a remover tool.
 : Clip
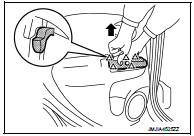
3. Remove power window switch finisher and power window switch as a unit.
1. Pull up power window switch finisher and power window switch as a unit to disengage the fixing pawls.
 : Pawl
2. Disconnect harness connector, and then remove power window switch finisher and power window switch as a unit.
4. Remove rear door finisher fixing screw.
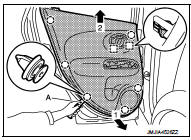
5. Remove rear door finisher.
1. Disengage rear door finisher fixing clips and metal clips with a remover tool (A).
 : Clip
 : Metal clip
2. Pull toward the direction of the arrows as shown in the figure to remove.
CAUTION:
Insert a remover tool between body side panel and clip and
disengage pawl
NOTE
:
Remove power window switch. Refer to PWC-44, "Removal and Installation".
INSTALLATION
Note the following item, and install in the reverse order of removal.
CAUTION:
When installing rear door finisher, check that clips, and metal clips are
securely in body panel holes,
and press them in.
 Front door finisher
Exploded View
LHD models
1. Front door panel
2. Front door finisher
3. Cap
4. Pull handle
5. Power window switch finisher
6. Pull handle bracket
: Clip
: Pawl
: Metal clip
Removal and ...
 Body side trim
Exploded View
1. Rear body side welt
2. Center pillar upper garnish
3. Front body side welt
4. Front pillar garnish
5. Metal clip
6. Dash side finisher
7. Harness clip
8. Front kicking ...
Other materials:
Precautions on cruise control
• If the cruise control system malfunctions, it will cancel automatically.
The CRUISE indicator light on the meter panel will then blink to warn the driver.
• If the engine coolant temperature becomes excessively high, the cruise control
system will cancel automatically.
• If ...
Unit removal and installation
Engine assembly
Exploded View
1. Engine mounting assembly (RH)
2. Rear engine mounting bracket
3. Rear torque rod
4. Engine mounting bracket (LH)
5. Stud bolt
6. Engine mounting bracket (LH)
7. Engine mounting insulator (LH)
8. Mass damper
: N·m (kg-m, ft-lb)
CAUTION:
Check that ...
B2621 inside antenna
DTC Logic
DTC DETECTION LOGIC
DTC CONFIRMATION PROCEDURE
1.PERFORM DTC CONFIRMATION PROCEDURE
1. Select “INTELLIGENT KEY” of “BCM” using CONSULT-III.
2. Select “INSIDE ANT DIAGNOSIS” in “WORK SUPPORT” mode.
3. Perform inside key antenna (“INSIDE ANT DIAGNOSIS”) on “WORK SUPPORT” of
“INTELL ...
