Nissan Juke Service and Repair Manual : Rear bumper
Exploded View
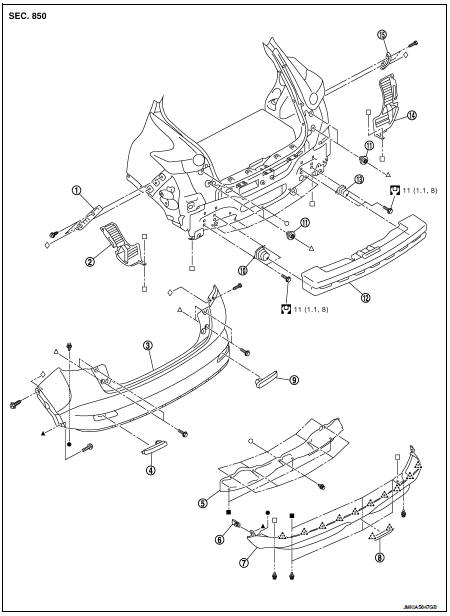
1. Bumper side bracket LH
2. Bumper closing LH
3. Bumper fascia assembly
4. Reflex reflector LH
5. Rear panel lower
6. U nut
7. Bumper fascia lower
8. Reflex reflector RH
9. Bumper stay LH
10. screw grommet
11. Bumper energy absorber
12. Bumper stay RH
13. Bumper closing RH
14. Bumper side bracket RH
 : Pawl
 : Do not reuse
 : N·m (kg-m, ft-lb)
Removal and Installation
CAUTION:
Bumper fascia is made of resin. Never apply strong force to it, and be careful
to prevent contact with
oil.
REMOVAL
1. Fully open back door.
2. Remove bumper fascia mounting screws of rear combination lamp (LH and RH) lower side.
3. Remove rear fillet molding rear side. Refer to EXT-27, "REAR FILLET MOLDING : Removal and Installation".
4. Remove bumper closing.
5. Remove clips of bumper lower side.
6. Remove bumper fascia assembly fixing screws (A) (LH and RH).

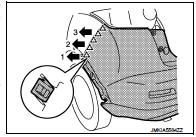
7. Pull bumper fascia side toward the vehicle side to disengage the fitting of bumper side bracket and bumper fascia side as shown by the arrow in the figure.
 : Pawl
CAUTION:
When removing bumper fascia, 2 workers are required so
as to prevent it from dropping.
8. Disconnect rear fog lamp harness connector.
9. Remove bumper fascia assembly.
10. Remove the following parts after removing rear bumper fascia.
• Bumper fascia lower
• Bumper finisher
• Reflex reflector (LH and RH).
11. Remove bumper energy absorber.
12. Remove rear panel lower.
13. Remove bumper stay (LH and RH).
14. Remove bumper side bracket fixing screws, and then remove bumper side bracket (LH and RH).
INSTALLATION
Note the following items, and then install in the reverse order of removal.
NOTE
:
• The following table shows the specified values for checking normal
installation status.
• Fitting adjustment cannot be performed.

 Front bumper
Exploded View
1. Front side grille RH
2. Front side grille LH
3. Bumper side bracket RH
4. Front center grille
5. Emblem
6. Bumper reinforcement
7. Energy absorber
8. Bumper end rubber ...
 Front grille
Exploded View
1. Bumper fascia assembly
2. Front side grille RH
3. Front center grille
4. Emblem
5. Front side grille LH
: Pawl
Removal and Installation
REMOVAL
CAUTION:
When remove fro ...
Other materials:
B1118, B1119 satellite sensor LH
DTC Logic
DTC DETECTION LOGIC
DTC CONFIRMATION PROCEDURE
1.CHECK SELF-DIAG RESULT
With CONSULT-III
1. Turn ignition switch ON.
2. Perform “Self Diagnostic Result” mode of “AIR BAG” using CONSULT-III.
Without CONSULT-III
1. Turn ignition switch ON.
2. Check the air bag warning lamp statu ...
When traveling or registering your vehicle in another country
When planning to travel in another country, you should first find out if the
fuel available is suitable for your vehicle’s engine.
Using fuel with an octane rating that is too low may cause engine damage. All
gasoline vehicles must be operated with unleaded gasoline.
Therefore, avoid taking yo ...
How to read the displayed lines
Guiding lines which indicate the vehicle width and distances to objects with
reference to the bumper lineA are displayed on the monitor.
Distance guide lines:
Indicate distances from the bumper.
• Red line1 : approx. 1.5 ft (0.5 m)
• Yellow line2 : approx. 3 ft (1 m)
• Green line3 : approx. ...
