Nissan Juke Service and Repair Manual : Precautions
Liquid Gasket
REMOVAL OF LIQUID GASKET SEALING
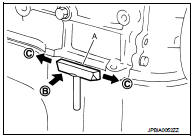
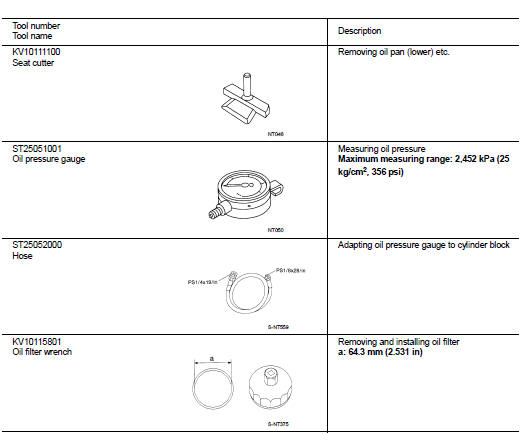
• After removing mounting nuts and bolts, separate the mating surface using the seal cutter [SST: KV10111100 (J-37228)] (A) and remove old liquid gasket sealing.
CAUTION:
Be careful not to damage the mating surfaces.
• Tap the seal cutter [SST: KV10111100 (J-37228)] to insert it (B), and then slide it (C) by tapping on the side as shown in the figure.
• In areas where the seal cutter [SST: KV10111100 (J-37228)] is difficult to use, lightly tap the parts using a plastic hammer to remove it.
CAUTION:
If for some unavoidable reason tool such as a screwdriver is
used, be careful not to damage the mating surfaces.
LIQUID GASKET APPLICATION PROCEDURE
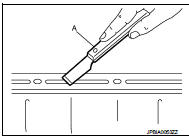
1. Using a scraper (A), remove old liquid gasket adhering to the liquid gasket application surface and the mating surface.
• Remove liquid gasket completely from the groove of the liquid gasket application surface, mounting bolts, and bolt holes.
2. Wipe the liquid gasket application surface and the mating surface with white gasoline (lighting and heating use) to remove adhering moisture, grease and foreign materials.
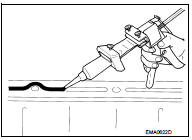
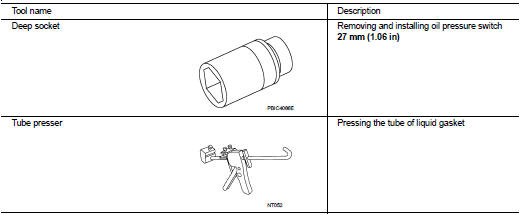
3. Attach liquid gasket tube to the tube presser (commercial service tool).
Use Genuine Liquid Gasket or equivalent.
4. Apply liquid gasket without gaps to the specified location according to the specified dimensions.
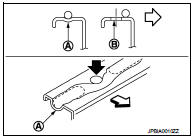
• If there is a groove for liquid gasket application, apply liquid gasket to the groove.
• As for bolt holes (B), normally apply liquid gasket inside the holes. Occasionally, it should be applied outside the holes.
Check to read the text of this manual.
A : Groove
 : Inside
• Within five minutes of liquid gasket application, install the mating component.
• If liquid gasket protrudes, wipe it off immediately.
• Do not retighten mounting bolts or nuts after the installation.
• After 30 minutes or more have passed from the installation, fill engine oil and engine coolant.
CAUTION:
If there are specific instructions in this manual, observe them.
Special Service Tools
Commercial Service Tools
 Description
Engine Lubrication System
Engine Lubrication System Schematic
...

Other materials:
Transaxle assembly
Exploded View
CASE AND HOUSING
1. Differential side oil seal
2. Clutch housing
3. 2 way connector
4. Oil gutter
5. Air breather inner tube
6. Filler plug
7. Gasket
8. Transaxle case
9. O-ring
10. Rear housing
11. Position switch
12. Dowel pin
13. Magnet
14. Drain plug
15. ...
The parking brake release warning continues sounding, or
does not sound
Description
• The parking brake warning buzzer sounds continuously during vehicle travel
though the parking brake is
released.
• The parking brake warning buzzer does not sound at all even though driving the
vehicle with the parking
brake applied.
Diagnosis Procedure
1.CHECK PARKING BRAKE ...
Locking with key
The power door lock system allows you to lock or unlock all doors simultaneously.
• Turning the driver’s door key cylinder to the front of the vehicle1 will
lock all doors and the lift gate.
• Turning the driver’s door key cylinder once to the rear of the vehicle2 will unlock
the drive ...
