Nissan Juke Service and Repair Manual : Outside mirror
Exploded View
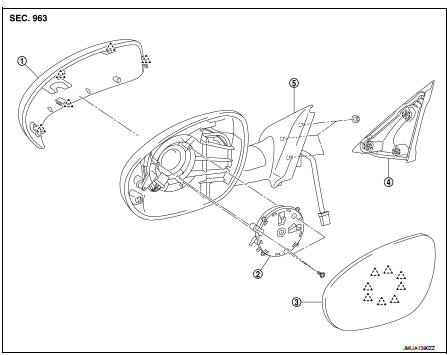
1. Door mirror cover
2. Actuator
3. Glass mirror
4. Door mirror corner cover
5. Door mirror assembly
 : Clip
 : Pawl
Door mirror assembly
DOOR MIRROR ASSEMBLY : Removal and Installation
CAUTION:
When removing, always use a remover tool that is made of plastic.
REMOVAL
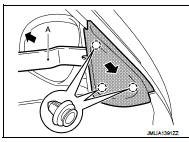
1. Disengage door mirror corner cover fixing clips with a remover tool (A) and then remove door mirror corner cover.
 : Clip
2. Remove front door finisher. Refer to INT-13, "Removal and Installation".
3. Disconnect door mirror harness connector.
4. Remove door mirror mounting nuts, and then remove door mirror assembly.
INSTALLATION
Install in the reverse order of removal.
Glass mirror
GLASS MIRROR : Removal and Installation
REMOVAL
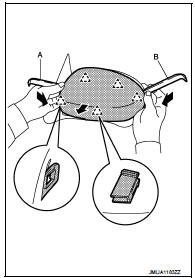
1. Place the glass mirror upward.
2. Put a strip of protective tape (B) on mirror body (1).
3. Insert a small flat-bladed screwdriver (A) into the recess at lower side between glass mirror (2) and actuator, and push up pawls to remove glass mirror lower side.
NOTE
:
Insert a small flat-bladed screwdriver into recesses, and push up
while rotating (twisting) to make work easier.
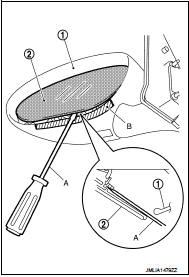
4. Remove glass mirror from mirror body.
INSTALLATION
Note the following item, and then install in the reverse order of removal.
CAUTION:
After installation, visually check that pawls are securely engaged.
Door mirror cover
DOOR MIRROR COVER : Removal and Installation
REMOVAL
1. Remove door mirror assembly from the door panel. Refer to MIR-43, "DOOR MIRROR ASSEMBLY : Removal and Installation".
2. Remove the glass mirror. Refer to MIR-44, "GLASS MIRROR : Removal and Installation".
3. Disengage door mirror cover fixing pawls while pressing the pawls toward the direction of the arrows.
 : Pawl
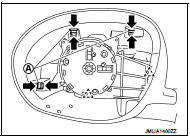
4. Insert two remover tools (A) and (B) between door mirror cover and mirror body to disengage the pawls, and then remove door mirror cover.
 : Pawl
5. Remove actuator fixing screws (A).
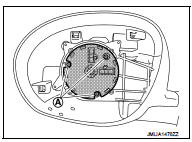
6. Disconnect actuator harness connector and then remove actuator from door mirror.
INSTALLATION
Note the following item and then install in the reverse order of removal.
CAUTION:
After installation, visually check that pawls are securely engaged.
 Inside mirror
Exploded View
Manual anti-dazzling type
1. Windshield glass
2. Mirror base
3. Inside mirror assembly
: Do not reuse
Auto anti-dazzling type
1. Rain sensor bracket
2. Mirror base
3. Ra ...
 Door mirror remote control switch
Exploded View
1. Instrument lower panel
2. Switch bracket
3. Door mirror remote control switch
Removal and Installation
REMOVAL
1. Remove the instrument lower panel. Refer to IP-13, "Re ...
Other materials:
Component parts
Charging system
CHARGING SYSTEM : Component Parts Location
1. Charge warning lamp (On the combination
meter)
2. Alternat
CHARGING SYSTEM : Component Description
Power generation voltage variable control system
POWER GENERATION VOLTAGE VARIABLE CONTROL SYSTEM : Component
Parts Location
N ...
Main line betweeN DLC and MDU circuit
Diagnosis Procedure
1.CHECK HARNESS CONTINUITY (OPEN CIRCUIT)
1. Turn the ignition switch OFF.
2. Disconnect the battery cable from the negative terminal.
3. Disconnect the following harness connectors.
- ECM
- Multi display unit
4. Check the continuity between the data link connector and the ...
When traveling or registering your vehicle in another country
When planning to travel in another country, you should first find out if the
fuel available is suitable for your vehicle’s engine.
Using fuel with an octane rating that is too low may cause engine damage. All
gasoline vehicles must be operated with unleaded gasoline.
Therefore, avoid taking yo ...
