Nissan Juke Service and Repair Manual : Output speed sensor
Exploded View
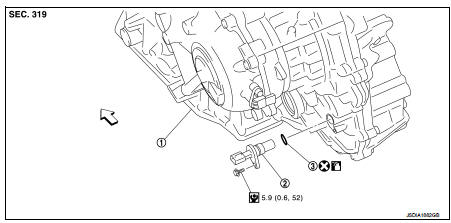
1. Transaxle assembly
2. Output speed sensor
3. O-ring
 : Vehicle front
 : Always replace after every
disassembly.
 : N·m (kg-m, in-lb)
 : Genuine NISSAN CVT Fluid NS-2
Removal and Installation
REMOVAL
1. Disconnect battery cable from negative terminal. Refer to PG-124, "Removal and Installation".
2. Disconnect the output speed sensor connector.
NOTE
:
Lift up the vehicle and perform the work from rear of the unit.
3. Remove the output speed sensor.
4. Remove the O-ring from the output speed sensor.
INSTALLATION
Note the following, and install in the reverse order of removal.
CAUTION:
• Never reuse O-ring.
• Apply Genuine NISSAN CVT Fluid NS-2 to the O-ring.
Inspection and Adjustment
INSPECTION AFTER INSTALLATION
Check for CVT fluid leakage. Refer to TM-480, "Inspection".
ADJUSTMENT AFTER INSTALLATION
Check the CVT fluid level. Refer to TM-379, "Adjustment".
 Secondary speed sensor
Exploded View
1. Transaxle assembly
2. O-ring
3. Secondary speed sensor
: Vehicle front
: Always replace after every
disassembly.
: N·m (kg-m, in-lb)
: Genuine NISSAN CVT Fluid NS-2
Remo ...
 Differential side oil seal
Exploded View
1. Transaxle assembly
2. Differential side oil seal (left side)
3. Differential side oil seal (right side)
: Vehicle front
: Always replace after every
disassembly.
: Genuine N ...
Other materials:
B1234, B1235, B1236, B1237, B1238, B1239 diagnosis sensor unit
DTC Logic
DTC DETECTION LOGIC
DTC CONFIRMATION PROCEDURE
1.CHECK SELF-DIAG RESULT
With CONSULT-III
1. Turn ignition switch ON.
2. Perform “Self Diagnostic Result” mode of “AIR BAG” using CONSULT-III.
Without CONSULT-III
1. Turn ignition switch ON.
2. Check the air bag warning lamp statu ...
Air conditioner filter
Exploded View
LHD models
1. A/C unit assembly
2. Air conditioner filter
3. Filter cover
Removal and Installation (LHD models)
REMOVAL
1. Remove glove box assembly. Refer to IP-13, "Removal and Installation".
2. Remove filter cover (1), and then remove air conditioner filter (2) ...
Automatic air conditioner (with Integrated Control System)
1. AUTO button/Temperature control dial
2. OFF button
3. A/C button
4. CLIMATE button
5. Display screen
6. Air flow control buttons
7. Fan speed control dial
8. Front defroster button
9. Air intake button (Outside air circulation
/Air recirculation
)
10. Rear window defroster button ( ...
