Nissan Juke Owners Manual : Installing top tether strap
WARNING
Child restraint anchorages are designed to withstand only those loads imposed by correctly fitted child restraints.
Under no circumstances are they to be used to attach adult seat belts, or other items or equipment to the vehicle. Doing so could damage the child restraint anchorages. The child restraint will not be properly installed using the damaged anchorage, and a child could be seriously injured or killed in a collision.
First, secure the child restraint with the LATCH lower anchors (rear outboard seat positions only) or the seat belt, as applicable.
1. If necessary, raise or remove the head restraint to position the top tether strap over the top of the seatback. If the head restraint is removed, store it in a secure place. Be sure to reinstall the head restraint when the child restraint is removed.
See “Head restraints/Headrests” for head restraint adjustment, removal and installation information.
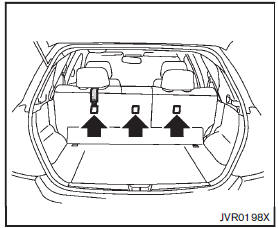
Position the top tether strap over the top of the seatback.
2. Secure the tether strap to the tether anchor point on the rear parcel shelf.
3. Refer to the appropriate child restraint installation procedure steps in this section before tightening the tether strap.
If you have any questions when installing a top tether strap, consult your NISSAN dealer for details.
 Forward-facing child restraint installation using the seat belts
WARNING
The three-point seat belt with Automatic Locking Retractor (ALR) must be used
when installing a child restraint.
Failure to use the ALR mode will result in the child restraint not being pr ...
 Booster seats
Precautions on booster seats
WARNING
If a booster seat and seat belt are not used properly, the risk of a child
being injured in a sudden stop or collision greatly increases:
• Make sure the shou ...
Other materials:
P0606 ECM
DTC Logic
DTC DETECTION LOGIC
Diagnosis Procedure
1.INSPECTION START
1. Turn ignition switch ON.
2. Erase DTC.
3. Turn ignition switch OFF and wait for 20 seconds.
4. Turn ignition switch ON and perform the self-diagnosis.
Is the DTC P0606 displayed again?
YES >> GO TO 2.
NO &g ...
Front door lock
Exploded View
1. Door key cylinder assembly (driver
side)
Outside handle escutcheon (passenger
side)
2. Rear gasket
3. Outside handle bracket
4. TORX bolt
5. Key rod (driver side)
6. Door lock assembly
7. Inside handle
8. Outside handle
9. Front gasket
10. Cable clip
: Pawl
: V ...
Wiring diagram
IPDM E/R
Wiring Diagram
For connector terminal arrangements, harness layouts, and alphabets in a
(option abbreviation; if not
described in wiring diagram), refer to GI-12, "Connector Information/Explanation
of Option Abbreviation".
...
