Nissan Juke Service and Repair Manual : Inside key antenna
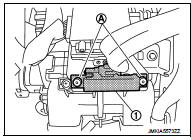
Instrument center
INSTRUMENT CENTER : Removal and Installation
REMOVAL
1. Remove the multi display unit. Refer to AV-125, "Removal and Installation".
2. Remove the inside key antenna (instrument center) (1) mounting clip (A), and then remove inside key antenna (instrument center).
CAUTION:
Be careful not to drop mounting clip (A) into instrument
panel.
INSTALLATION
Install in the reverse order of removal.
Console
CONSOLE : Removal and Installation
REMOVAL
1. Remove the center console assembly. Refer to IP-23, "Removal and Installation".
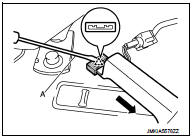
2. Remove the inside key antenna (console) (1) mounting clip (A), and then remove inside key antenna (console).
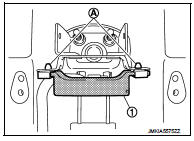
INSTALLATION
Install in the reverse order of remova
Luggage room
LUGGAGE ROOM : Exploded View
1. Inside key antenna (luggage room) 2. Clip
 : Do not reuse
LUGGAGE ROOM : Removal and Installation
REMOVAL
1. Remove the luggage floor finisher. Refer to INT-29, "Exploded View".
2. Remove the inside key antenna (luggage room) (1) mounting clip RH (A).
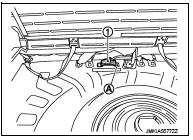
3. Disengage inside key antenna (luggage room) fixing clip using a flat-bladed screwdriver (A), and then pull out forward the inside key antenna (luggage room).
INSTALLATION
Install in the reverse order of removal.
CAUTION:
Visually check the clips for deformation and damage during installation.
Replace with new ones if necessary.
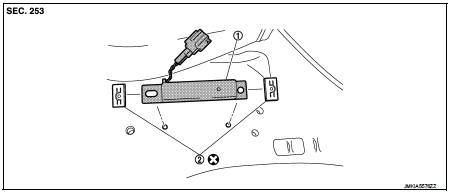
 Door switch
Exploded View
1. Door switch
2. TORX bolt
Removal and Installation
REMOVAL
Remove the TORX bolt (A), and then remove door switch (1).
INSTALLATION
Install in the reverse order of removal. ...
 Outside key antennA
Driver side
DRIVER SIDE : Removal and Installation
REMOVAL
Remove the driver side outside handle. Refer to DLK-339, "OUTSIDE HANDLE :
Removal and Installation".
INSTALLATION
Install ...
Other materials:
Precaution
Precautions for Trouble Diagnosis
CAUTION:
• Never apply 7.0 V or more to the measurement terminal.
• Use a tester with open terminal voltage of 7.0 V or less.
• Turn the ignition switch OFF and disconnect the battery cable from the
negative terminal when
checking the harness.
Precautions fo ...
P183A coupling temperature sensor right
DTC Logic
DTC DETECTION LOGIC
DTC CONFIRMATION PROCEDURE
1.PRECONDITIONING
If “DTC CONFIRMATION PROCEDURE” has been previously conducted, always turn
ignition switch OFF and
wait at least 10 seconds before conducting the next test.
>> GO TO 2.
2.DTC REPRODUCTION PROCEDURE
With ...
Wheel sensor
Front wheel sensor : Exploded View
1. Front LH wheel sensor
2. Front LH wheel sensor harness connector
: Vehicle front
: N·m (kg-m, in-lb)
NOTE:
Front RH wheel sensor is symmetrically opposite of LH.
Front wheel sensor : Removal and Installation
REMOVAL
1. Remove tires.
2. Remove the fe ...
