Nissan Juke Service and Repair Manual : Ignition coil, spark plug and rocker cover
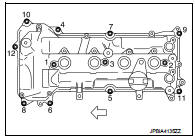
Exploded View
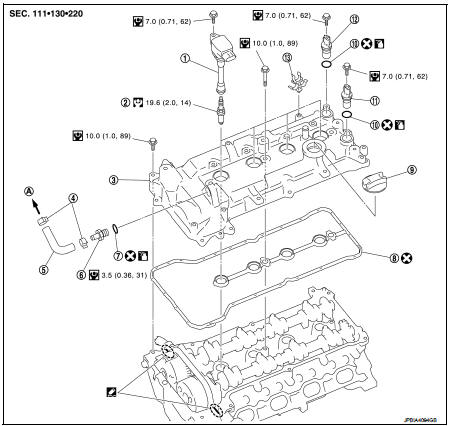
1. Ignition coil
2. Spark plug
3. Rocker cover
4. Hose cramp
5. PCV hose
6. PCV valve
7. O-ring
8. Gasket
9. Oil filler cap
10. O-ring
11. Camshaft position sensor (INT)
12. Camshaft position sensor (EXH)
13. Cramp
A. To intake manifold
 : Always replace after every
disassembly.
 : N·m (kg-m, in-lb)
 : N·m (kg-m, ft-lb)
 : Sealing point
 : Should be lubricated with oil.
Removal and Installation
REMOVAL
1. Remove intake manifold. Refer to EM-163, "Exploded View".
2. Remove ignition coil.
CAUTION:
• Never drop or shock ignition coil.
• Never disassemble ignition coil.
. Remove fuel tube protector. Refer to EM-173, "Exploded View".
4. Remove PCV hose from rocker cover.
5. Remove PCV valve, if necessary.
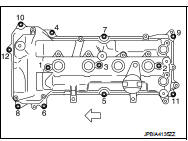
6. Remove rocker cover.
• Loosen bolts in reverse order as shown in the figure.
 : Engine front
7. Remove rocker cover gasket from rocker cover.
8. Use scraper to remove all traces of liquid gasket from cylinder head and front cover.
CAUTION:
Never scratch or damage the mating surface when cleaning off old liquid gasket.
INSTALLATION
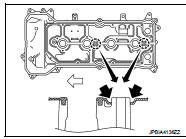
1. Rocker cover with the following procedure: a. Press gasket onto the bosses for the rocker cover bolt holes as shown in the figure to prevent the rocker cover from dropping off.
b. Apply liquid gasket to the position as shown in the figure.
1 : Cylinder head
2 : Front cover
a : φ2.5 - 3.5 mm
Use Genuine Liquid Gasket or equivalent.
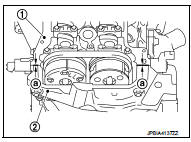
c. Install rocker cover to cylinder head.
CAUTION:
Check the gasket is not dropped.
• Tighten bolts in two steps separately in numerical order as shown in the figure.
: Engine front
2. Install PCV valve.
• Insert PCV valve until the flange of PCV valve contact the grommet absolutely.
3. Install in the reverse order of removal, for the rest of parts.
 Fuel injector and fuel tube
Exploded View
1. Stud bolt
2. O-ring (green)
3. Fuel injector (front)
4. Clip
5. Fuel injector (rear)
6. O-ring (black)
7. Fuel tube protector
8. Fuel tube
9. Fuel feed hose
10. Qui ...
 Timing chain
Exploded View
1. Timing chain slack guide
2. Timing chain tensioner
3. Camshaft sprocket (EXH)
4. Camshaft sprocket (INT)
5. Plug 6. Front oil seal
7. Crankshaft pulley
8. Crankshaft pull ...
Other materials:
Wheelarch Height
2WD
Measure value under unladen* conditions.
*: Fuel, engine coolant and lubricant are full. Spare tire, jack, hand tools and
mats are in designated positions.
4WD
Measure value under unladen* conditions.
*: Fuel, engine coolant and lubricant are full. Spare tire, jack, hand t ...
Diagnosis and repair workflow
Work Flow
OVERALL SEQUENCE
DETAILED FLOW
1.INTERVIEW FOR MALFUNCTION
Interview the symptom to the customer.
>> GO TO 2.
2.SYMPTOM CHECK
Check the symptom from the customer's information.
>> GO TO 3.
3.BASIC INSPECTION
Check the operation of each part. Check that any s ...
Maintenance precautions
When performing any inspection or maintenance work on your vehicle, always take
care to prevent serious accidental injury to yourself or damage to the vehicle.
The following are general precautions which should be closely observed.
WARNING
• Park the vehicle on a level surface, apply the ...
