Nissan Juke Service and Repair Manual : Front wiper arm
Exploded View
RHD models
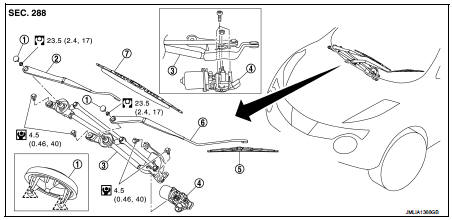
1. Front wiper arm cap
2. Front wiper arm RH
3. Front wiper drive assembly
4. Front wiper motor
5. Front wiper blade LH
6. Front wiper arm LH
7. Front wiper blade RH
 : Pawl
 : N·m (kg-m, in-lb)
 : N·m (kg-m, ft-lb)
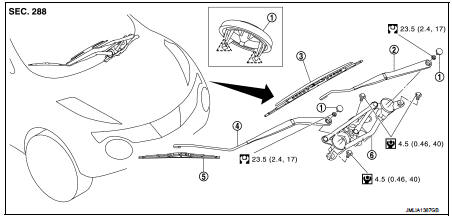
LHD models

1. Front wiper arm cap
2. Front wiper arm LH
3. Front wiper blade LH
4. Front wiper arm RH
5. Front wiper blade RH
6. Front wiper drive assembly
 : Pawl
 : N·m (kg-m, in-lb)
 : N·m (kg-m, ft-lb)
Removal and Installation
REMOVAL
1. Operate front wiper to move it to the auto stop position.
2. Open the hood.
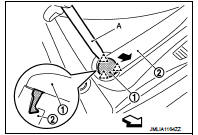
3. Disengage front wiper arm cap (1) fixing pawls with a remover tool (A), and then remove front wiper arm cap from the wiper arm (2).
 : Pawl
 : Vehicle front
4. Remove front wiper arm mounting nuts.
5. Raise front wiper arm, and then remove front wiper arm from the vehicle.
INSTALLATION
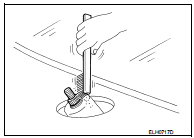
1. Clean wiper arm mount as shown in the figure to prevent nuts from being loosened.
2. Operate front wiper motor to move the front wiper to the auto stop position.
3. Adjust front wiper blade position. Refer to WW-76, "Adjustment".
4. Install front wiper arm by tightening the mounting nuts.
5. Inject the washer fluid.
6. Operate front wiper to move it to the auto stop position.
7. Check that the front wiper blades stop at the specified position.
8. Install front wiper arm caps.
Adjustment
WIPER BLADE POSITION ADJUSTMENT
Clearance between the end of cowl top cover/ front fender protector and the top of wiper blade center NOTE
:
This figure is for RHD models and is symmetric with LHD models
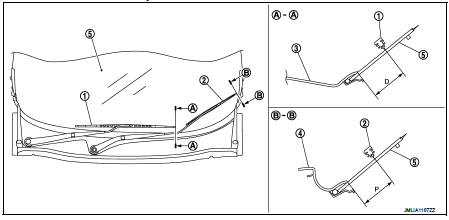
1. Front wiper blade RH
2. Front wiper blade LH
3. Cowl top cover
4. Front fender cover
5. Windshield glass assembly
Standard clearance
D : 37.7 ± 7.5 mm (1.484 ± 0.295 in) P : 46.8 ± 7.5 mm (1.843 ± 0.295 in)
 Front washer nozzle and tube
Exploded View
LHD models
1. Front washer nozzle LH
2. Front washer nozzle RH
3. Cowl top cover
4. Front washer tube (tank side)
5. Front washer tube RH
6. Front washer tube LH
: Vehicle ...
 Front wiper blade
Exploded View
1. Wiper blade
2. Wiper arm
Removal and Installation
REMOVAL
Push up the lever (A) of wiper blade (1), while sliding wiper blade
toward the direction of the arrow to remove it f ...
Other materials:
Back door finisher
Exploded View
1. Rear view camera
2. Back door opener request switch
3. Emblem
4. Back door finisher
: Clip
: Pawl
: Do not reuse
Removal and Installation
REMOVAL
1. Remove back door trim. Refer to INT-35, "BACK DOOR LOWER FINISHER :
Removal and Installation".
2. Remove ba ...
The fuel gauge indicator does not operate
Description
Fuel gauge will not indicate from a certain position.
Diagnosis Procedure
1.CHECK COMBINATION METER OUTPUT SIGNAL
1. Connect CONSULT-III.
2. Select the “Data Monitor” for the “METER/M&A” and compare the “FUEL METER”
monitor value with the
fuel gauge reading on the combination ...
Reverse idler shaft and gear
Exploded View
1. Reverse output gear
2. Snap ring
3. Reverse baulk ring
4. Return spring
5. Needle bearing
6. Seal washer
7. Reverse idler shaft
8. Spacer
9. Reverse input gear
10. Lock washer
11. Spring washer
: Replace the parts as a set.
: Always replace after every
disass ...
