Nissan Juke Service and Repair Manual : Floor trim
Exploded View
LHD models
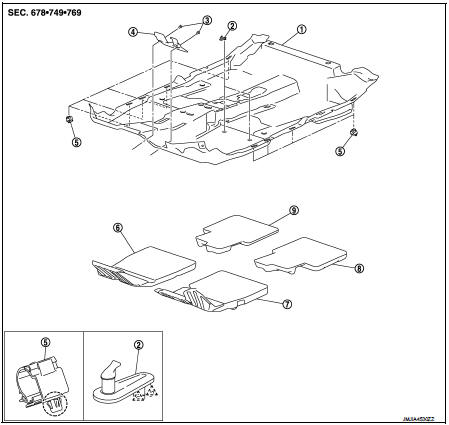
1. Floor carpet
2. Carpet hook
3. Trim clip
4. Column hole cover
5. Harness clip
6. Front floor spacer RH
7. Front floor spacer LH
8. Rear floor spacer LH
9. Rear floor spacer RH
 : Clip
 : Pawl
Removal and Installation
REMOVAL
CAUTION:
• When removing, always use a remover tool that is made of plastic.
• Never damage the body.
1. Remove front seat assembly (LH and RH).
• 2WD models: Refer to SE-19, "Removal and Installation".
• 4WD models: Refer to SE-27, "Removal and Installation".
2. Remove rear seat cushion.
• 2WD models: Refer to SE-33, "SEAT CUSHION : Removal and Installation".
• 4WD models: Refer to SE-42, "SEAT CUSHION : Removal and Installation".
3. Remove center console assembly. Refer to IP-23, "Removal and Installation".
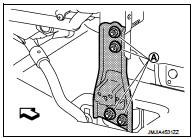
4. Remove instrument stay.
Remove instrument stay mounting nuts (A), and then remove instrument stay.
 : Vehicle front
5. Disconnect drain hose.
• HR16DE: Refer to HA-53, "A/C UNIT ASSEMBLY : Removal and Installation".
• MR16DDT: Refer to HA-113, "A/C UNIT ASSEMBLY : Removal and Installation".
6. Remove foot ducts (LH and RH). VTL-13, "REAR HEATER DUCT 2 : Removal and Installation" (Models with foot ducts).
7. Remove sift selector assembly.
• 5MT models: Refer to TM-25, "Removal and Installation".
• 6MT models: Refer to TM-78, "Removal and Installation".
• CVT models (RE0F10B): Refer to TM-270, "Removal and Installation".
• CVT models (RE0F11A): Refer to TM-481, "Removal and Installation".
8. Remove diagnosis sensor unit. Refer to SR-30, "Removal and Installation".
9. Remove parking brake lever. Refer to PB-5, "Removal and Installation".
10. Remove the inside key antenna (console lower).Refer to DLK-188, "INSTRUMENT CENTER : Removal and Installation" (Models with Intelligent Key system).
11. Remove center pillar lower garnish (LH and RH). Refer to INT-20, "CENTER PILLAR LOWER GARNISH : Removal and Installation".
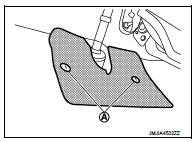
12. Remove column hole cover.
Disengage trim clips (A), and then remove column hole cover.
13. Remove dash side finisher (LH and RH). Refer to INT-20, "DASH SIDE FINISHER : Removal and Installation".
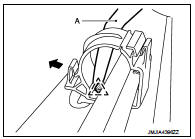
14. Disengage pawl using a remover tool (A) and open the harness clip.
 : Pawl
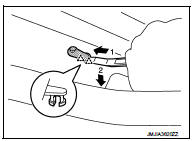
15. Remove floor carpet.
NOTE
:
Disengage pawls using a remover tool and remove carpet hook.
 : Pawl
INSTALLATION
Note the following item, and install in the reverse order of removal.
CAUTION:
Replace diagnosis sensor unit fixing bolts with a new part after removal. Never
reuse diagnosis sensor
unit fixing bolts.
 Body side trim
Exploded View
1. Rear body side welt
2. Center pillar upper garnish
3. Front body side welt
4. Front pillar garnish
5. Metal clip
6. Dash side finisher
7. Harness clip
8. Front kicking ...
 Headlining
Exploded View
LHD models
1. Headlining assembly
2. Assist grip clip
3. Rear assist grip RH
4. Front assist grip RH
5. Sun visor assembly RH
6. Sun visor cover RH
7. Sun visor cover LH
...
Other materials:
B2014 chain of STRG-IMMU
DTC Logic
DTC DETECTION LOGIC
DTC CONFIRMATION PROCEDURE
1.PERFORM DTC CONFIRMATION PROCEDURE
1. Lock steering.
NOTE:
3. Press the push-button ignition switch.
4. Check DTC in “Self Diagnostic Result” mode of “BCM” using CONSULT-III.
Is DTC detected?
YES >> Go to SEC-70, " ...
P0139 HO2S2
DTC Logic
DTC DETECTION LOGIC
The heated oxygen sensor 2 has a much longer switching time
between rich and lean than the air fuel ratio (A/F) sensor 1. The oxygen
storage capacity of the three way catalyst (manifold) causes the
longer switching time. To judge the malfunctions of heated oxygen
...
Back-up lamp switch : Component Inspection
1.CHECK BACK-UP LAMP SWITCH
1. Disconnect position switch connector. Refer to TM-77, "Removal and
Installation".
2. Check continuity between position switch terminals.
Is the inspection result normal?
YES >> INSPECTION END
NO >> Replace position switch. Refer to TM-7 ...
