Nissan Juke Service and Repair Manual : Fillet molding
Exploded View
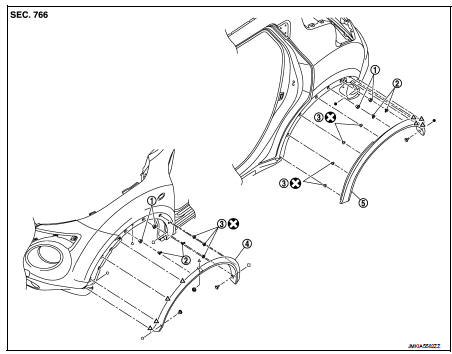
1. Grommet
2. Clip
3. Clip
4. Front fillet molding
5. Rear fillet molding
 : Pawl
 : Do not reuse
Front fillet molding
FRONT FILLET MOLDING : Removal and Installation
REMOVAL
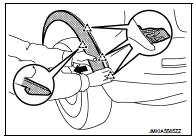
1. Remove front fillet molding fixing clips.
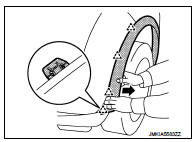
2. Remove front fillet molding front side fixing pawls.
 : Pawl
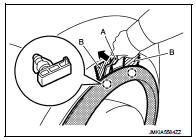
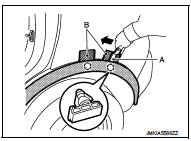
3. Using remover tool (A), disengage the clips from front fillet molding by starting from front side.
 : Clip
CAUTION:
• Apply a protective tape (B) on the body to protect the
painted surface from damage.
• Never pull fillet molding strongly.
INSTALLATION
Note the following items, and then install in the reverse order of removal.
CAUTION:
• Always replace fillet molding fixing clips.
• When installing front fillet molding, check that blind clips and pawls are securely fitted in panel holes on body, and then press them in.
Rear fillet molding
REAR FILLET MOLDING : Removal and Installation
REMOVAL
1. Remove filet molding fixing clip from end of sill cover.
2. Remove rear fillet molding rear side fixing pawls.
 : Pawl
CAUTION:
Never pull the rear fillet molding strongly.
3. Using remover tool (A), disengage the clips from rear fillet molding by starting from rear side.
 : Clip
CAUTION:
• Apply a protective tape (B) on the body to protect the
painted surface from damage.
• Never pull the rear fillet molding strongly.
INSTALLATION
Note the following items, and then install in the reverse order of removal.
CAUTION:
• Always replace fillet molding fixing clips.
• When installing rear fillet molding, check that blind clips and pawls are securely fitted in panel holes on body, and then press them in.
 Floor side fairing
Exploded View
1. Push spring nut
2. Floor under cover RH
3. Floor under cover LH
Removal and Installation
REMOVAL
FLOOR UNDER COVER
Remove floor under cover mounting nut and push spring nut ...
 Roof side molding
Exploded View
1. Roof side molding
2. Roof side molding clip
3. Double-sided tape [t: 2.5 mm (0.098 in)]
4. Body side outer panel
5. Roof panel
: Vehicle front
: Do not reuse
Removal and ...
Other materials:
Does not operate
Description
ABS function and EBD function does not operate.
Diagnosis Procedure
CAUTION:
ABS function and EBD function never operate when the vehicle speed is 10 km/h
(6.2 MPH) or less.
1.CHECK ABS WARNING LAMP
Check that ABS warning lamp and brake warning lamp turn ON and turn OFF
appro ...
P1642 thermoplunger control unit
DTC Logic
DTC DETECTION LOGIC
Diagnosis Procedure
1.CHECK THERMOPLUNGER CONTROL UNIT POWER SUPPLY CIRCUIT
1. Turn ignition switch OFF.
2. Disconnect thermoplunger control unit harness connector.
3. Check the voltage between thermoplunger control unit harness connector and
ground.
Is the ...
Precaution Necessary for Steering Wheel Rotation after Battery Disconnect
NOTE:
• Before removing and installing any control units, first turn the ignition
switch to the LOCK position, then disconnect
both battery cables.
• After finishing work, confirm that all control unit connectors are connected
properly, then re-connect both
battery cables.
• Always use CONS ...
