Nissan Juke Service and Repair Manual : Engine oil
Inspection
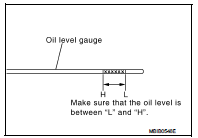
OIL LEVEL AND MUDDINESS
• Before starting the engine, check the oil level placing vehicle horizontally.
If the engine is already started, stop it and allow 10 minutes before checking.
• Make sure the oil level is within the range shown in the figure.
• If it is out of range, adjust it.
ENGINE OIL APPEARANCE
• Check engine oil for white turbidity or heavy contamination.
• If engine oil becomes turbid and white, it is highly probable that it is contaminated with engine coolant.
Repair or replace damaged parts.
OIL LEAKAGE
Check for oil leakage around the following area.
• Oil pan
• Oil pan drain plug
• Oil pressure switch
• Oil filter bracket
• Vacuum pump
• Oil pump housing
• Mating surface between cylinder block and cylinder head
• Mating surface between cylinder head and rocker cover
• Oil cooler
• Crankshaft oil seals
OIL PRESSURE CHECK
WARNING:
• Be careful not to burn yourself, as the engine oil is hot.
• Oil pressure check should be done in Neutral “N” position.
1. Check the oil level. Refer to “OIL LEVEL MUDDINES“.
2. Remove engine undercover.
3. Disconnect harness connector at oil pressure switch (1), and remove oil pressure switch using a deep socket (commercial service tool).
2 : Oil pan : Vehicle front
CAUTION:
Never drop or shock oil pressure switch.
![4. Install oil pressure gauge [SST:KV113E0020 (Mot. 836-05)]](images/books/335/8/index.81.jpg)
4. Install oil pressure gauge [SST:KV113E0020 (Mot. 836-05)] 5. After warming up the engine, make sure oil pressure corresponding to the engine speed is produced.
Engine oil pressure : Refer to LU-39, "Standard and Limit".
6. After checking, install the oil pressure switch as follows.
a. Remove old liquid gasket adhering to the switch and engine.
b. Apply liquid gasket and tighten oil pressure switch to specification.
Use Genuine Liquid Gasket or equivalent.
Tightening torque : Refer to LU-35, "Exploded View".
7. Start engine and check for oil leakage.
Draining
WARNING:
• Be careful not to get burned, as engine oil may be hot.
• Prolonged and repeated contact with used engine oil may cause skin cancer. Try to avoid direct skin contact with used engine oil. If skin contact is made, wash thoroughly with soap or hand cleaner as soon as possible.
1. Warm up the engine, and check for engine oil leakage from engine components. Refer to LU-25, "Inspection".
2. Stop the engine and wait for 10 minutes.
3. Loosen oil filler cap.
4. Remove drain plug and then drain engine oil.
Refilling
1. Refill with new engine oil.
Engine oil specification and viscosity: Refer to MA-13, "Fluids and Lubricants".
Engine oil capacity : Refer to LU-39, "Standard and Limit".
CAUTION:
• The refill capacity depends on the engine oil temperature and drain time. Use
these specifications
for reference only.
• Always use oil level gauge to determine the proper amount of engine oil in the engine.
2. Warm up engine and check area around drain plug and oil filter for engine oil leakage.
3. Stop engine and wait for 10 minutes.
4. Check the engine oil level. Refer to LU-33, "Inspection".

 Oil filter
Exploded View
1. O-ring
2. Oil filter bracket
3. Oil pressure switch
4. Oil filter
5. O-ring
6. Connecting bolt
A. To oil cooler
: N·m (kg-m, ft-lb)
: Always replace after every
disas ...
Other materials:
System
Can communication system
CAN COMMUNICATION SYSTEM : System Description
CAN (Controller Area Network) is a serial communication line for real time
application. It is an on-vehicle multiplex
communication line with high data communication speed and excellent error
detection ability. Many electr ...
System
System Description
Fan speed of blower motor is changed by the combination of fan control dial
(fan switch) operation and blower
fan resistor control.
Door Control
SWITCHES AND THEIR CONTROL FUNCTIONS
1. Intake door
2. Blower motor
3. Air conditioner filter
4. Max. cool door
5. Upper ...
Tightening Torque Table (New Standard Included)
CAUTION:
• The special parts are excluded.
• The bolts/nuts in these tables have a strength (discrimination) number/symbol
assigned to the head
or the like. As to the relation between the strength grade in these tables and
the strength (discrimination)
number/symbol, refer to “DISCRIMINATION ...
