Nissan Juke Service and Repair Manual : Cowl top
Exploded View
LHD models
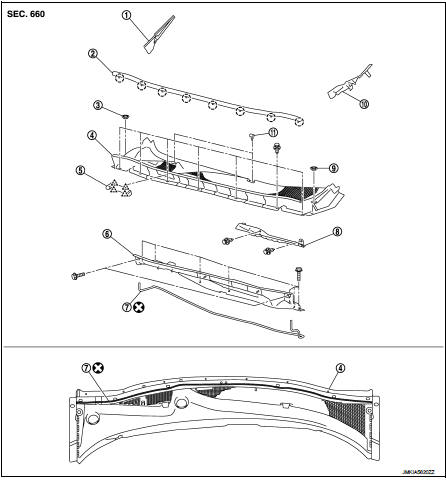
1. Front fender cover RH
2. Cowl top cover seal
3. Blind plug RH
4. Cowl top cover
5. Cowl top cover cap
6. Cowl top extension
7. EPT seal [t: 3.0 mm (0.118 in)]
8. Air intake cover
9. Blind plug LH
10. Front fender cover LH
11. Washer nozzle
 : Clip
 : Pawl
 : Do not reu
Removal and Installation
REMOVAL
1. Fully open hood assembly 2. Remove front wiper arm (LH and RH). Refer to WW-76, "Removal and Installation".
3. Disconnect washer tube joint on cowl top cover RH.
4. Remove front fender cover (LH and RH).
5. Remove cowl top cover fixing clips.
6. Pull forward to release cowl top cover from windshield glass.
CAUTION:
When performing the procedure after removing cowl top
cover, cover the lower end of windshield glass with urethane
etc.
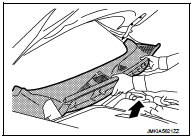
7. Remove cowl top cover.
8. Remove the following parts after removing cowl top cover.
• EPT sealer
• Cowl top seal
• Washer tube
• Washer nozzle (LH and RH). Refer to WW-87, "Removal and Installation".
9. Remove front wiper drive assembly. Refer to WW-80, "Removal and Installation".
10. Remove cowl top extension mounting bolts, and then remove cowl top extension.
INSTALLATION
Note the following items and then, install in the reverse order of removal.
CAUTION:
• Clean the joint between the cowl top cover and the windshield, and then
install them.
• Replace the EPT sealer on the back surface with new EPT sealer when reusing the cowl top cover.
• Remove the EPT sealer remaining on the cowl top cover using a double-faced adhesive tape remove.
• To maintain adhesion, never wash the vehicle within 24 hours after installation.
• Perform the stop position adjustment at the installation of the front wiper arms. Refer to WW-76, "Adjustment".
 Front grille
Exploded View
1. Bumper fascia assembly
2. Front side grille RH
3. Front center grille
4. Emblem
5. Front side grille LH
: Pawl
Removal and Installation
REMOVAL
CAUTION:
When remove fro ...
 Fender protector
Exploded View
1. Hoodledge insurator
2. Fender protector
3. U nut
4. Air guide
5. Screw grommet
A. To hoodledge panel
: Vehicle front
Removal and Installation
REMOVAL
1. Remove front fi ...
Other materials:
Aluminum alloy wheels
Wash regularly with a sponge dampened in a mild soap solution, especially during
winter months in areas where road salt is used. Salt could discolor the wheels if
not removed.
CAUTION
Follow the directions below to avoid staining or discoloring the wheels:
• Do not use a cleaner that uses str ...
Front-seat Active Head Restraints
The Active Head Restraint moves forward utilizing the force that the seatback
receives from the occupant in a rear-end collision. The movement of the head restraint
helps support the occupant’s head by reducing its backward movement and helping
absorb some of the forces that may lead to whip ...
Service data and specifications (SDS)
Wheel Bearing
Drive Shaft
M/T
*: For measuring position, refer to FAX-54, "WHEEL SIDE : Disassembly and
Assembly" (Wheel side), FAX-
56, "TRANSAXLE SIDE : Disassembly and Assembly" (Transaxle side).
CVT
*: For measuring position, refer to FAX-54, "WHEEL SIDE ...
