Nissan Juke Service and Repair Manual : Cooling fan
Exploded View
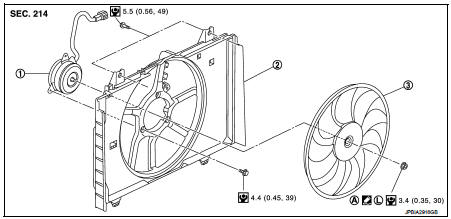
1. Fan motor
2. Fan shroud
3. Cooling fan
A. Apply on fan motor shaft
 : Apply genuine high strength
thread locking sealant or equivalent.
 : N·m (kg-m, in-lb)
Removal and Installation
REMOVAL
1. Drain engine coolant from radiator. Refer to CO-37, "Draining".
CAUTION:
• Perform this step engine is cold.
• Never spill engine coolant on drive belt.
2. Remove air duct (inlet) and resonator assembly. Refer to EM-161, "Removal and Installation".
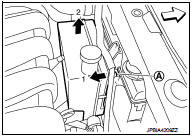
3. Remove reservoir tank as follows: a. Disconnect reservoir tank hose.
b. Release the tab (A) in the direction shown by the arrow (
 ).
).
c. Lift up and remove the reservoir tank with the tab released.
4. Remove radiator hose (upper). Refer to CO-42, "Exploded View".
5. Disconnect harness connector from fan motor, and move harness to aside.
6. Remove cooling fan assembly.
CAUTION:
Be careful not to damage or scratch on radiator core when removing.
INSTALLATION
Note the following, and install in the reverse order of removal.
CAUTION:
Only use genuine parts for fan shroud mounting bolt and observe the specified
torque (to prevent
radiator from being damaged).
NOTE:
Cooling fan is controlled by ECM. For details, Refer to EC-774, "Component Function Check".
Disassembly and Assembly
DISASSEMBLY
1. Remove cooling fan mounting nut, and then remove the cooling fan.
2. Remove fan motor.
ASSEMBLY
Note the following, and assemble in the reverse order of disassembly.
• Apply genuine high strength thread locking sealant on fan motor shaft.
Inspection
Cooling Fan
Inspect cooling fan for crack or unusual bend.
• If anything is found, replace cooling fan.
 Radiator
Exploded View
1. Reservoir tank hose
2. Mounting rubber (upper)
3. Radiator tank cap
4. Radiator
5. Mounting rubber (lower)
6. O-ring
7. Drain plug
8. Clamp
9. Radiator hose (lower)
...
 Water pump
Exploded View
1. Gasket
2. Water pump
3. Water pump pulley
: Always replace after every
disassembly.
: N·m (kg-m, in-lb)
: N·m (kg-m, ft-lb)
Removal and Installation
REMOVAL
1. Drain en ...
Other materials:
Diagnosis system (BCM) (without intelligent key system)
Common item : consult-III Function (BCM - COMMON ITEM)
APPLICATION ITEM
CONSULT-III performs the following functions via CAN communication with BCM.
SYSTEM APPLICATION
BCM can perform the following functions for each system.
NOTE:
It can perform the diagnosis modes except the following for ...
Timing chain
Exploded View
1. Timing chain slack guide
2. Timing chain tensioner
3. Camshaft sprocket (EXH)
4. Camshaft sprocket (INT)
5. Plug 6. Front oil seal
7. Crankshaft pulley
8. Crankshaft pulley bolt
9. Front cover
10. Crankshaft sprocket
11. Crankshaft sprocket key
12. Oil pump sproc ...
Precaution Necessary for Steering Wheel Rotation
after Battery Disconnect
NOTE:
• Before removing and installing any control units, first turn the ignition
switch to the LOCK position, then disconnect
both battery cables.
• After finishing work, confirm that all control unit connectors are connected
properly, then re-connect both
battery cables.
• Always use CONS ...
