Nissan Juke Service and Repair Manual : Back door trim
Exploded View
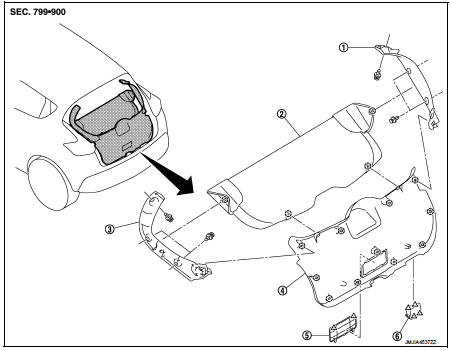
1. Back door side finisher RH
2. Rear parcel shelf finisher
3. Back door side finisher LH
4. Back door lower finisher
5. Emergency lid
6. Back door pull handle
 : Clip
 : Pawl
Back door pull handle : Removal and Installation
REMOVAL
CAUTION:
• When removing, always use a remover tool that is made of plastic.
• Never damage the back door panel.
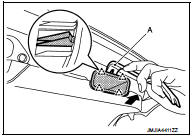
1. Fully open back door.
2. Disengage back door pull handle fixing pawls with a remover tool (A), and then remove back door pull handle.
 : Pawl
INSTALATION
Install in the reverse order of removal.
Back door lower finisher : Removal and Installation
REMOVAL
CAUTION:
• When removing, always use a remover tool that is made of plastic.
• Never damage the back door panel.
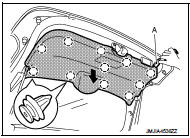
1. Fully open back door.
2. Remove rear parcel shelf finisher. (Models with rear parcel shelf finisher) 3. Disengage back door lower finisher fixing clips with a remover tool (A), and then remove back door lower finisher
 : Clip
INATALLATION
Note the following item, and install in the reverse order of removal.
CAUTION:
When installing back door lower finisher, check that clips are securely in back
door panel holes, and
press them in.
Back door side finisher : Removal and Installation
REMOVAL
CAUTION:
• When removing, always use a remover tool that is made of plastic.
• Never damage the back door panel.
1. Fully open back door.
2. Remove back door lower finisher. Refer to INT-35, "BACK DOOR LOWER FINISHER : Removal and Installation".
3. Disengage back door side finisher fixing clips (A), and then remove back door side finisher.
INSTALATION
Note the following item, and install in the reverse order of removal.
CAUTION:
When installing back door side finisher, check that clips are securely in back
door panel holes, and
press them in
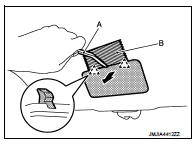
EMERGENCY LID : Removal and Installation
REMOVAL
CAUTION:
When removing, always use a remover tool that is made of plastic.
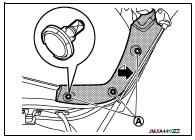
1. Fully open back door.
2. Disengage emergency lid fixing pawls with a remover tool (A), and then remove emergency lid.
 : Pawl
CAUTION:
Apply protective tape (B) on the parts to protect it from
damage.
INSTALLATION
Install in the reverse order of removal.
 Luggage floor trim
Exploded View
2WD models
1. Rear pillar cap RH
2. Luggage side upper finisher RH
3. Luggage side lower finisher RH
4. Luggage floor board
5. Luggage side upper finisher LH
6. Rear pillar c ...
 Instrument Panel
...
Other materials:
When traveling or registering your vehicle in another country
When planning to travel in another country, you should first find out if the
fuel available is suitable for your vehicle’s engine.
Using fuel with an octane rating that is too low may cause engine damage. All
gasoline vehicles must be operated with unleaded gasoline.
Therefore, avoid taking yo ...
Power outlet
The power outlet is located in the instrument panel.
CAUTION
• The outlet and plug may be hot during or immediately after use.
• Do not use with accessories that exceed a 12 volt, 120W (10A) power draw. Do not
use double adapters or more than one electrical accessory.
• Use power outle ...
CVT shift selector
Exploded View
1. Selector lever knob
2. Lock pin
3. Knob cover
4 Position indication panel
5. CVT shift selector assembly
6. CVT shift selector harness assembly
7. Detent switch*
8. Shift lock unit
9. Park position switch
:N·m (kg-m, it-lb)
*: With push engine starter
Removal and ...
