Nissan Juke Service and Repair Manual : Air cleaner and air duct
Exploded View
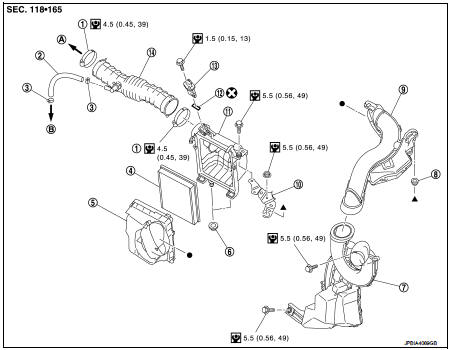
1. Hose clamp
2. PCV hose
3. Hose clamp
4. Air cleaner filter
5. Air cleaner filter case
6. Grommet
7. Inlet air duct (lower)
8. Grommet
9. Inlet air duct (upper)
10. Bracket
11. Air cleaner case
12. O-ring
13. Mass air flow sensor
14. Air duct
A. To electric throttle control actuator B. To rocker cover
 : Always replace after every
disassembly.
 : N·m (kg-m, in-lb)
Removal and Installation
REMOVAL
NOTE
:
Mass air flow sensor is removable under the car-mounted condition.
1. Remove the clip of front fender protector (left) to lift the front fender protector.
2. Remove the front side glille (left) from front bumper.
3. Remove installing bolts from inlet air duct (lower).
4. Disconnect mass air flow sensor harness connector.
5. Loosen the hose clamp of air duct.
6. Remove installing bolts from air cleaner case.
7. Remove inlet air duct (upper) and air cleaner simultaneously 8. Remove inlet air duct (lower) 9. .Disconnect PCV hose.
10. Remove air duct.
11. Remove mass air flow sensor from air cleaner case, if necessary.
CAUTION:
Handle the mass air flow sensor with following cares.
• Never shock the mass air flow sensor.
• Never disassemble the mass air flow sensor.
• Never touch the sensor of the mass air flow sensor.
INSTALLATION
Note the following, and install in the reverse order of removal.
• To install air duct, align the matching marks on both ends with the others.
1. : Electric throttle control actuator
2. : Air cleaner case
A. : Matching mark
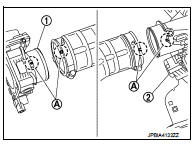
• Align marks. Attach each joint. Screw clamps firmly.
Clamp tightening torque : 4.5 N·m (0.46 kg-m)
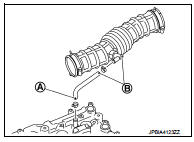
• Install PVC hose with each matching mark positioned as follows:
A : White mark
B : Matching mark
Air duct side : Align the matching mark with that of air duct side.
Rocker cover side : Face the white mark in forward direction of the vehicle.
Inspection
INSPECTION AFTER REMOVAL
Inspect air duct for crack or tear.
• If anything found, replace air duct.
 Drive belt idler pulley
Removal and Installation
REMOVAL
1. Remove drive belt. Refer to EM-155, "Removal and Installation".
2. Remove the lock nut, and then remove the plate (7), idler pulley
(6), and washer (5 ...
 Intake manifold
Exploded View
1. EVAP canister purge volume control
solenoid valve
2. Hose clamp
3. Vacuum hose
4. Intake manifold support
5. Gasket
6. Intake manifold
7. Electric throttle control actua ...
Other materials:
All-Wheel Drive (AWD) (if so equipped)
WARNING
• For AWD equipped vehicles, do not attempt to raise two wheels off
the ground and shift the transmission to any drive or reverse position with the
engine running. Doing so may result in drivetrain damage or unexpected vehicle movement
which could result in serious vehicle damag ...
Back door opener switch
Component Function Check
1.CHECK FUNCTION
1. Select “TRUNK” of “BCM” using CONSULT-III.
2. Select “TRNK OPNR SW” in “DATA MONITOR” mode.
3. Check that the function operates normally according to the following
conditions.
Is the inspection result normal?
YES >> Back door opener switch ...
General maintenance
General Maintenance
General maintenance includes those items which should be checked during the
normal day-to-day operation
of the vehicle. They are essential if the vehicle is to continue operating
properly. The owners can perform
checks and inspections themselves or they can have their NISS ...
