Nissan Juke Service and Repair Manual : Rear combination lamp
Exploded View
REMOVAL
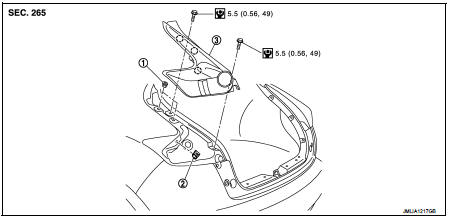
1. Grommet
2. Grommet
3. Rear combination lamp
 : Clip
 : N·m (kg-m, in-lb)
DISASSEMBLY
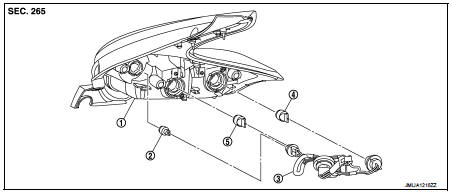
1. Rear combination lamp housing assembly
2. Back-up lamp bulb
3. Harness connector
4. Rear turn signall lamp bulb
5. Stop/tail lamp bulb
Removal and Installation
CAUTION:
• Disconnect the battery negative terminal or the fuse.
• When removing, always use a remover tool that is made of plastic.
REMOVAL
1. Full open back door 2. Remove luggage side lower finisher. Refer to INT-31, "LUGGAGE SIDE LOWER FINISHER : Removal and Installation".
3. Remove rear combination lamp mounting bolts.
4. Insert a remover tool into the rear combination lamp rear fender to disengage the clips.
5. Pull up rear combination lamp, and then remove rear combination lamp.
6. Disconnect rear combination lamp connector.
INSTALLATION
Install in the reverse order of removal.
Replacement
CAUTION:
• Disconnect the battery negative terminal or the fuse.
• Never touch the glass of bulb directly by hand. Keep grease and other oily matters away from it.
• Never touch bulb by hand while it is lit or right after being turned off.
• Never leave bulb out of lamp reflector for a long time because dust, moisture smoke, etc. may affect the performance of lamp. When replacing bulb, be sure to replace it with new one.
STOP/TAIL LAMP BULB
1. Remove rear combination lamp assembly. Refer to EXL-100, "Removal and Installation".
2. Rotate stop/tail lamp bulb socket counterclockwise, and then remove stop/tail lamp bulb socket.
3. Remove stop/tail lamp bulb from stop/tail lamp bulb socket.
REAR TURN SIGNAL LAMP BULB
1. Remove rear combination lamp assembly. Refer to EXL-100, "Removal and Installation".
2. Rotate rear turn signal lamp bulb socket counterclockwise, and then remove rear turn signal lamp bulb socket.
3. Remove rear turn signal lamp bulb from rear turn signal lamp bulb socket.
BACK-UP LAMP BULB
1. Remove rear combination lamp assembly. Refer to EXL-100, "Removal and Installation".
2. Rotate back-up lamp bulb socket counterclockwise, and then remove back-up lamp bulb socket.
3. Remove back-up lamp bulb from back-up lamp bulb socket.
 Headlamp aiming switch
Exploded View
1. Headlamp aiming switch
2. Instrument lower panel assembly LH
: Pawl
Removal and Installation
REMOVAL
1. Remove instrment lower panel (LH/RH). Refer to IP-13, "Removal an ...
 High-mounted stop lamp
Exploded View
1. High-mounted stop lamp
2. Seal packing
: N·m (kg-m, in-lb)
Removal and Installation
CAUTION:
Disconnect battery negative terminal or remove the fuse.
REMOVAL
1. Remove blin ...
Other materials:
S mode indicator
Component Function Check
1.CHECK S MODE INDICATOR FUNCTION
Check S mode indicator turns ON for approx. 2 seconds when ignition switch
turns ON.
Is the inspection results normal?
YES >> INSPECTION END
NO >> Go to TM-469, "Diagnosis Procedure".
Diagnosis Procedure
1.CH ...
Normal operating condition
Description
FUEL CUT CONTROL (AT NO LOAD AND HIGH ENGINE SPEED)
If the engine speed is above 1,800 rpm under no load (for example, the
selector lever position is neutral and
engine speed is over 1,800 rpm) fuel will be cut off after some time. The exact
time when the fuel is cut off varies
b ...
P1830 ABS operation signal
DTC Logic
DTC DETECTION LOGIC
DTC CONFIRMATION PROCEDURE
1.DTC REPRODUCTION PROCEDURE
With CONSULT-III
1. Start the engine and drive at 30 km/h (19 MPH) or more.
2. Perform self-diagnosis for “ALL MODE AWD/4WD”.
Is DTC “P1830” detected?
YES >> Proceed to diagnosis procedure. Refer ...
