Nissan Juke Service and Repair Manual : Power transistor
Exploded View
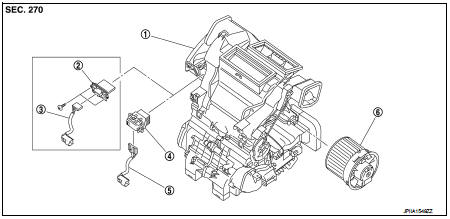
1. A/C unit assembly
2. Blower fan resistor*1
3. Sub harness*1
4. Power transistor*2
5. Sub harness*2
6. Blower motor
• *1: Manual air conditioner • *2: Automatic air conditioner
Removal and Installation
REMOVAL
1. Remove instrument panel assembly. Refer to IP-13, "Removal and
Installation". (LHD models)
2. Remove glove box assembly. Refer to IP-13, "Removal and Installation". (RHD
models)
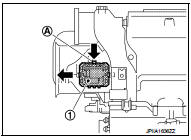
3. Disconnect power transistor connector.
4. Slide power transistor (1) to the left while pressing lever (A), and then remove power transistor.
INSTALLATION
Install in the reverse order of removal.
 Refrigerant pressure sensor
Exploded View
Refer to HA-94, "Exploded View".
Removal and Installation
REMOVAL
Refer to HA-96, "REFRIGERANT PRESSURE SENSOR : Removal and Installation".
INSTALLATION
Insta ...
 Door motor
Exploded View
LEFT SIDE
1. A/C unit assembly
2. Intake door lever
3. Intake door motor
4. Air mix door motor
5. Upper air mix door rod
6. Upper air mix door lever
7. Lower air mix door l ...
Other materials:
4WD branch line circuit
Diagnosis Procedure
1.CHECK CONNECTOR
1. Turn the ignition switch OFF.
2. Disconnect the battery cable from the negative terminal.
3. Check the following terminals and connectors for damage, bend and loose
connection (unit side and connector
side).
- 4WD control module
- Harness connecoto ...
Air cleaner filter
Removal and Installation
REMOVAL
1. Remove air duct assembly (duct side) (1).
2. Unhook the tabs (A) of both ends of the air cleaner cover.
3. Remove the air cleaner filter (1) and air cleaner body (2) from
the air cleaner case.
4. Remove the air cleaner filter from the air cleaner body.
...
Basic inspection
DIAGNOSIS AND REPAIR WORK FLOW
Work Flow
OVERALL SEQUENCE
DETAILED FLOW
NOTE:
If any malfunction is found, immediately disconnect the battery cable from the
negative terminal.
1.CHECK ENGINE START
Crank the engine and check that the engine starts.
Does the engine start?
YES >> ...
