Nissan Juke Service and Repair Manual : Front combination lamp
Exploded View
REMOVAL
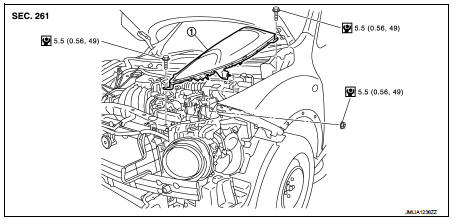
1. Front combination lamp
 : N·m (kg-m, in-lb)
DISASSEMBLY
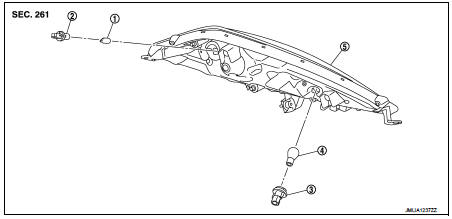
1. Parking lamp bulb 2. Parking lamp bulb socket 3. Front turn signal lamp bulb socket 4. Front turn signal lamp bulb 5. Front combination lamp housing
Removal and Installation
CAUTION:
Disconnect the battery negative terminal or remove the fuse.
REMOVAL
1. Remove front bumper fascia. Refer to EXT-13, "Removal and Installation".
2. Remove front combination lamp mounting bolts and nut.
3. Pull out front combination lamp assembly forward the vehicle, and then disconnect the connector before removing the headlamp assembly.
INSTALLATION
Note the following items, and then install in the reverse order of removal.
CAUTION:
Interference of front combination lamp lens with front fender may cause
intrusion of water into front
combination lamp or rusting of fender due to damage of painted surface. Be
careful to operate without
allowing parts to interfere with each other.
Replacement
CAUTION:
• Disconnect the battery negative terminal or remove the fuse.
• After installing the bulb, install the resin cap and the bulb socket securely for watertightness.
• Never touch the glass of bulb directly by hand. Keep grease and other oily matters away from it.
• Never touch bulb by hand while it is lit or right after being turned off.
• Never leave bulb out of lamp reflector for a long time because dust, moisture smoke, etc. may affect the performance of lamp. When replacing bulb, be sure to replace it with new one.
PARKING LAMP BULB
1. Rotate the parking lamp bulb socket counterclockwise and unlock it.
2. Remove parking lamp bulb from the bulb socket.
FRONT TURN SIGNAL LAMP BULB
1. Rotate the front turn signal lamp bulb socket counterclockwise and unlock it.
2. Remove front turn signal lamp bulb from the front turn signal lamp bulb socket.
Disassembly and Assembly
DISASSEMBLY
1. Rotate the parking lamp bulb socket counterclockwise and unlock it.
2. Remove parking lamp bulb from the bulb socket.
3. Rotate the front turn signal lamp bulb socket counterclockwise and unlock it.
4. Remove front turn signal lamp bulb from the front turn signal lamp bulb socket.
ASSEMBLY
Note the following item and then, install in the reverse order of removal.
CAUTION:
After installing the bulb, install the resin cap and the bulb socket securely
for watertightness.
 Headlamp
Exploded View
REMOVAL
1. Headlamp assembly
2. EPT sealer [2.8 mm (0.110 in)]
: Do not reuse
: N·m (kg-m, in-lb)
DISASSEMBLY
1. Back cover
2. Halogen bulb
3. Headlamp housing assembly
...
 Front fog lamp
Exploded View
1. Front fog lamp assembly
2. Metal clip
3. Front fog lamp bulb
4. Front fog lamp bracket
5. U nut
6. Front bumper fascia lower
: Pawl
: N·m (kg-m, in-lb)
Removal and Inst ...
Other materials:
Security indicator lamp does not turn on or blink
Description
Security indicator lamp does not blink when ignition switch is in a position
other than ON.
NOTE:
• Before performing the diagnosis, check “Work Flow”. Refer to SEC-47, "Work
Flow".
• Check that vehicle is under the condition shown in “CONDITIONS OF VEHICLE
(OPERATI ...
Wiper and washer system
Wiring Diagram - WIPER AND WASHER SYSTEM -
For connector terminal arrangements, harness layouts, and alphabets in a
(option abbreviation; if not
described in wiring diagram), refer to GI-12, "Connector Information/Explanation
of Option Abbreviation".
...
Sealant or/and Lubricant
HFC-134a (R-134a) Service Tool and Equipment
• Never mix HFC-134a (R-134a) refrigerant and/or its specified lubricant with
CFC-12 (R-12) refrigerant and/
or its lubricant.
• Separate and non-interchangeable service equipment must be used for handling
each type of refrigerant/
lubricant.
• R ...
