Nissan Juke Owners Manual : FM-AM-SAT radio with Compact Disc (CD) player (Type B)
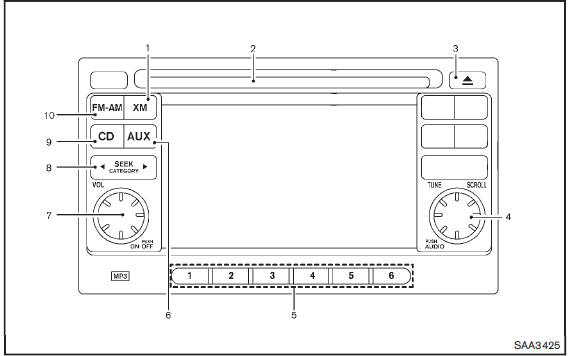
1. XM band select button
2. CD insert slot
3. CD EJECT button
4. TUNE/SCROLL knob and AUDIO control button
5. Radio station preset buttons
6. AUX button
7. ON·OFF button/VOLUME control knob
8. FF (forward)/REW (rewind) or SEEK/CATEGORY button
9. CD button
10. FM·AM band select button
No satellite radio reception is available unless a SiriusXM Satellite Radio subscription is active.
For all operation precautions, see “Audio operation precautions” .
The satellite radio mode requires an active SiriusXM Satellite Radio subscription. The satellite radio is not available in Alaska, Hawaii and Guam.
It may take some time to receive the activation signal after subscribing the SiriusXM Satellite Radio. After receiving the activation signal, an available channel list will be automatically updated in the radio. Place the ignition switch in LOCK to ACC to update the channel list.
Audio main operation
Head unit:
The auto loudness circuit enhances the low and high frequency ranges automatically in both radio reception and CD playback.
ON·OFF/Volume control:
Place the ignition switch in the ACC or ON position, and then push the ON·OFF button while the system is off to turn on the last audio source, which was playing immediately before the system was turned off. While the system is on, pushing the ON·OFF button turns the system off.
Turn the VOL control knob to adjust the volume.
Adjusting tone quality and speaker balance:
To adjust Bass, Treble, Balance and Fade, push the Audio control knob. When the display shows the setting you want to change (Bass, Treble, Balance and Fade), rotate the Audio control knob to set the desired setting. For the other setting methods, see “How to use touch screen” .
This vehicle has some sound effect functions as follows:
• Speed Volume
For more details, see “How to use the setup button” .
Adjusting AUX level:
The volume level of incoming sound can be selected from “Quiet”, “Medium” and “Loud” when an auxiliary device is connected to the system. For more details, see “How to use the setup button” .
Switching the display:
Pushing the AUX button will switch the displays between USB/iPod® and AUX.
FM-AM-SAT radio operation
When the radio band select button is pushed while the ignition switch is in the ACC or ON position, the radio will come on at the channel last played.
The last channel played will also come on when the ON·OFF button is pushed to ON.
If another audio source is playing when the radio band select button is turned to ON, the audio source will automatically be turned off and the last radio channel played will come on.
When the stereo broadcast signal is weak, the radio will automatically change from stereo to monaural reception.
 FM·AM radio band select:
Pushing the FM·AM radio band select button will change the band as follows:
AM → FM1 → FM2 → AM
 SiriusXM Satellite Radio band
select
:
Pushing the XM radio band select button will change the band as follows:
XM1 → XM2 → XM3 → XM1
The satellite radio is not available in Alaska, Hawaii and Guam.
TUNE (Tuning):
• For AM and FM radio Turn the TUNE knob for manual tuning.
• For SiriusXM Satellite Radio Turn the TUNE knob to seek channels from all of the categories when any category is not selected.
 SEEK tuning:
• For AM and FM radio
Push the SEEK/CATEGORY button  or
or
 to tune from low to high or high to
low frequencies and to stop at the next broadcasting station.
• For SiriusXM Satellite Radio
Push the SEEK/CATEGORY button  or
or
 to tune to the first channel of the
next or previous category.
Tuning with the touch screen (AM and FM radio):
When in AM or FM mode, the radio can be tuned using the touch screen. To bring up the visual tuner, touch the “Tune” key on the lower right corner of the screen. A screen appears with a bar running from low frequencies on the left to high frequencies on the right. Touch the screen at the location of the frequency you wish to tune and the station will change to that frequency. To return to the regular radio display screen, touch the “OK” key.
 to
to
 Station memory operations:
12
stations/channels can be set for the FM band (6 each for FM1 and FM2), 18 for SiriusXM
Satellite Radio (6 each for XM1, XM2 and XM3) and 6 stations can be set for the
AM band.
1. Choose the radio band using the radio band select button.
2. Tune to the desired station/channel using the SEEK/CATEGORY button or the TUNE knob.
3. Push and hold the desired station preset button
 to
to
 until the beep sound is heard.
4. The station indicator will then come on and the sound will resume. Memorizing
is now complete.
5. Other buttons can be set in the same manner.
If the battery cable is disconnected, or if the fuse opens, the radio memory will be erased. In that case, reset the desired stations/channels.
Channels (SiriusXM Satellite Radio):
When the SiriusXM Satellite Radio is being played, select “Channels” key to display a list of channels. Select a preferred channel from the list to change to that channel.
Categories (SiriusXM Satellite Radio):
When the SiriusXM Satellite Radio is being played, select “Categories” key to display a list of channels. Select a preferred channel from the list to display options within that category.
Compact Disc (CD) player operation
Place the ignition switch in the ACC or ON position and insert the Compact Disc (CD) into the slot with the label side facing up. The CD will be guided automatically into the slot and start playing.
If the radio is already operating, it will automatically turn off and the CD will play.
If the system has been turned off while the CD was playing, pushing the ON·OFF button will start the CD.
Do not use 3.1 in (8 cm) discs.
 PLAY
PLAY
:
When the CD button is pushed with the system off and the CD loaded, the system will turn on and the CD will start to play.
When the CD button is pushed with the CD loaded and the radio playing, the radio will automatically be turned off and the CD will start to play.
While listening to a CD or an MP3/WMA CD, certain text may be displayed (when a CD encoded with text is being used). Depending on how the CD or MP3/WMA CD is encoded, the text is displayed listing the artist, album and song title.
 Next/Previous Track and Fast
Forward/Rewind:
When the  or
or
 button is pushed for more than 1.5
seconds while the CD is being played, the CD will play while fast forwarding or
rewinding. When the button is released, the CD will return to normal play speed.
When the  or
or
 button is pushed for less than 1.5
seconds while the CD is being played, the next track or the beginning of the current
track on the CD will be played.
When the rewind button is pushed for less than 1.5 seconds within 3 seconds after the current track starts playing, the previous track will be played.
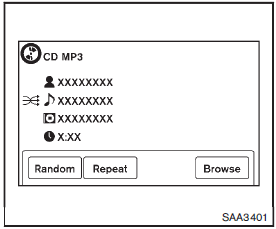
Random
:
Touch the “Random” key to apply a random play pattern to the CD. When the random
mode is active, the  icon will be displayed
to the left of the song title. If an MP3 CD is playing, touching “Random” alternates
between randomly playing songs within the current folder and songs from the CD as
a whole. The  icon is displayed to
the left of the song title or folder name to denote which pattern is applied.
To cancel Random mode, touch the “Random” key until no
 icon is displayed.
Repeat
:
Touch the “Repeat” key to apply a repeat play pattern to the CD. When the repeat
mode is active, the  icon will be displayed
to the left of the song title. If an MP3 CD is playing, touching “Repeat” alternates
between repeating the current song and repeating the current folder. The
 icon is displayed to the left of the
song title or folder name to denote which pattern is applied. To cancel Repeat mode,
touch the “Repeat” key until no  icon
icon
is displayed.
Browse
:
Touch the “Browse” key to display the titles on the CD in list format. Touch the title of a song in the list to begin playing that song. If an MP3 CD is playing, touching the “Browse” key will also list the folders on the disc. Follow the procedure for selecting a song with the touch screen to choose a folder.
 CD EJECT
:
When the CD EJECT button is pushed with the CD loaded, the CD will be ejected.
When this button is pushed while the CD is being played, the CD will be ejected.
If the CD comes out and is not removed, it will be pulled back into the slot to protect it.
AUX (Auxiliary) input
AUX IN jack:
The AUX IN jack is located on the lower center of the instrument panel. The AUX IN audio input jack accepts any standard analog audio input such as from a portable cassette tape/CD player, MP3 player or laptop computer.
NISSAN strongly recommends using a stereo mini plug cable when connecting your music device to the audio system. Music may not play properly when a monaural cable is used.
 AUX (Auxiliary) button:
To switch to the AUX mode, push the AUX button when a compatible audio device is connected into the AUX IN jack.
When the AUX button is pushed with no device plugged into the jack, the audio system does not change to the AUX mode.
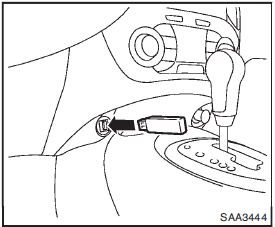
USB memory operation
Audio main operation:
The USB outlet connector is on the lower center of the instrument panel. Connect a USB memory as illustrated, and then switch to the USB memory mode automatically.
If the system has been turned off while the USB memory was playing, pushing the ON·OFF/VOL control knob will start the USB memory.
WARNING
Do not connect, disconnect or operate the USB device while driving. Doing so can be a distraction. If distracted you could lose control of your vehicle and cause an accident or serious injury.
CAUTION
• Do not force the USB device into the USB port. Inserting the USB device tilted or up-side-down into the port may damage the port. Make sure that the USB device is connected correctly into the USB port.
• Do not grab the USB port cover (if so equipped) when pulling the USB device out of the port. This could damage the port and the cover.
• Do not leave the USB cable in a place where it can be pulled unintentionally.
Pulling the cable may damage the port.
Refer to your device manufacturer’s owner information regarding the proper use and care of the device.
 PLAY
PLAY
:
When the AUX button is pushed with the system off and the USB memory inserted, the system will turn on.
If another audio source is playing and a USB memory is inserted, push the AUX button repeatedly until the center display changes to the USB memory mode.
 SEEK/CATEGORY button:
Push the SEEK/CATEGORY button  while
while
an audio file on the USB device is playing to return to the beginning of the current
track. Push the SEEK/CATEGORY button
 several times to skip backward several
tracks.
Push the SEEK/CATEGORY button  while
while
an audio file on the USB device is playing to advance one track. Push the SEEK/CATEGORY
button  several times to skip forward
several tracks. If the last track in a folder on the USB device is skipped, the
first track of the next folder is played.
Push and hold the SEEK/CATEGORY button
 or
or
 for 1.5 seconds while an audio file
on the USB device is playing to reverse or fast forward the track being played.
The track plays at an increased speed while reversing or fast forwarding. When the
button is released, the audio file returns to normal play speed.
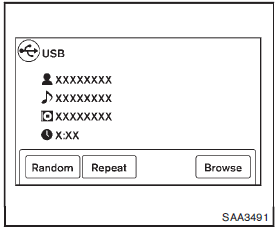
Random and repeat play mode:
While files on a USB device are playing, the play pattern can be altered so that songs are repeated or played randomly.
Random
:
Touch the “Random” key to apply a random play pattern to the USB device. When
the random mode is active, the  icon
icon
is displayed to the left of the song title or album name to denote which random
pattern is applied. To cancel Random mode, touch the “Random” key until no
 icon is displayed.
Repeat
:
Touch the “Repeat” key to apply a repeat play pattern to the USB device. When
the repeat mode is active, the  icon
icon
is displayed to the left of the song title or album name to denote which repeat
pattern is applied. To cancel Repeat mode, touch the “Repeat” key until no
 icon is displayed.
iPod® player operation
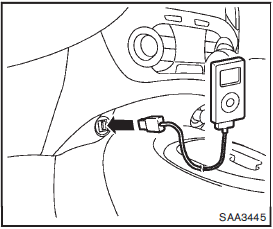
Connecting iPod®:
Connect the iPod® cable to the USB connector.
If the iPod® supports charging via USB, the battery of the iPod® will be charged while connected to the vehicle.
Depending on the version of the iPod®, the display on the iPod® shows a NISSAN or Accessory Attached screen when the connection is completed. When the iPod® is connected to the vehicle, the iPod® music library can only be operated by the vehicle audio controls.
iPod® is a trademark of Apple Inc., registered in the U.S. and other countries.
WARNING
Do not connect, disconnect or operate the USB device while driving. Doing so can be a distraction. If distracted you could lose control of your vehicle and cause an accident or serious injury.
CAUTION
• Do not force the USB device into the USB port. Inserting the USB device tilted or up-side-down into the port may damage the port. Make sure that the USB device is connected correctly into the USB port.
• Do not grab the USB port cover (if so equipped) when pulling the USB device out of the port. This could damage the port and the cover.
• Do not leave the USB cable in a place where it can be pulled unintentionally.
Pulling the cable may damage the port.
Refer to your device manufacturer’s owner information regarding the proper use and care of the device.
Compatibility
:
The following models are available:
• Fifth generation iPod® (version 1.2.3 or later) • iPod Classic® (version 1.1.1 or later) • First generation iPod touch® (version 2.0.0 or later) • Second generation iPod touch® (version 1.2.3 or later) • First generation iPod nano® (version 1.3.1 or later) • Second generation iPod nano® (version 1.1.3 or later) • Third generation iPod nano® (version 1.1 or later) • Fourth generation iPod nano® (version 1.0.2 or later)
This unit may not control/operate correctly when connected to some iPod® versions/firmware and iPhone®.
Make sure that the iPod® version is updated.
Audio main operation:
Place the ignition switch in the ACC or ON position. Then, push the button repeatedly to switch to the iPod® mode.
If the system has been turned off while the iPod® was playing, pushing the ON·OFF button will start the iPod®.
•  PLAY:
PLAY:
When the button is pushed with the system off and the iPod® connected, the system
will turn on. If another audio source is playing and the iPod® is connected, push
the  button repeatedly to switch to
the iPod® mode.
• Interface:
The interface for iPod® operation shown on the vehicle display is similar to the iPod® interface. Use the touch screen, BACK button or the TUNE/SCROLL knob to navigate the menus on the screen.
The following items can be chosen from the menu list screen. For further information about each item, see the iPod® Owner’s Manual.
— Playlists
— Artists
— Songs
— Composers
— Audiobooks
— Podcasts
The following touch-panel buttons shown on the screen are also available:
—  : returns to the previous screen.
—  : plays/pauses the music selected.
•  SEEK/CATEGORY button:
When the  or
or
 button is pushed for more than 1.5
seconds while the iPod® is playing, the iPod® will play while fast forwarding or
rewinding. When the button is released, the iPod® will return to the normal play
speed.
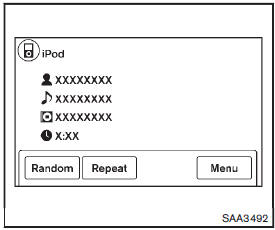
• Random and repeat play mode
: While files on a USB device are playing, the play pattern can be altered so that songs are repeated or played randomly.
• Random:
Touch the “Random” key to apply a random play pattern to the iPod®. When the
random mode is active, the icon
icon
is displayed to the left of the song title or album name to denote which random
pattern is applied. To cancel Random mode, touch the “Random” key until no
 icon is displayed.
• Repeat:
Touch the “Repeat” key to apply a repeat play pattern to the iPod®. When the
repeat mode is active, the  icon is
displayed to the left of the song title or album name to denote which repeat pattern
is applied. To cancel Repeat mode, touch the “Repeat” key until no
 icon is displayed.
 FM-AM-SAT radio with Compact Disc (CD) player (Type A)
1. MUTE button
2. DISP (display)/TEXT button
3. FM·AM radio band select button
4. CD PLAY button
5. Radio station preset buttons
6. iPod® button
7. AUX (auxiliary)/SAT band select button
8. A ...
 CD/USB memory care and cleaning
CD
• Handle a CD by its edges. Never touch the surface of the disc. Do not bend
the disc.
• Always place the discs in the storage case when they are not being used.
• To clean a disc, wip ...
Other materials:
Door outside molding
Exploded View
1. Front door panel
2. Front door outside molding
3. Rear door panel
4. Rear door outside molding
5. Door glass
: Pawl
Front door outside molding
FRONT DOOR OUTSIDE MOLDING : Removal and Installation
REMOVAL
1. Fully open front door glass.
2. Twist door outside molding ...
Camshaft valve clearance
Inspection and Adjustment
INSPECTION
Perform inspection as follows after removal, installation or replacement of
camshaft or valve-related parts, or if
there is unusual engine conditions regarding valve clearance.
1. Remove rocker cover. Refer to EM-178, "Removal and Installation".
...
Sill cover
Exploded View
1. Screw grommet
2. Screw grommet
3. Sill cover
4. Wind defle
Removal and Installation
REMOVAL
1. Remove sill cover front end fixing screw (A).
2. Remove sill cover rear end fixing screw (A).
3. Remove sill cover lower side fixing screws.
4. Fully open front door and ...
