Nissan Juke Service and Repair Manual : Disposal of air bag module
Driver air bag module : Deployment
CHECKING DEPLOYMENT TOOL
Connecting to Battery
CAUTION:
The battery must show voltage of 9.6 V or more.
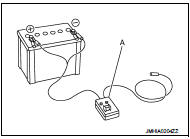
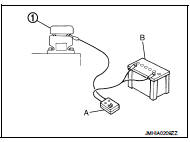
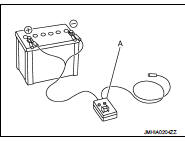
Remove the battery from the vehicle and place it on dry wood blocks approximately 5.0 m (16.4 ft) away from the vehicle.
• Wait 3 minutes after the vehicle battery is disconnected before proceeding.
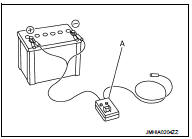
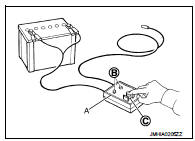
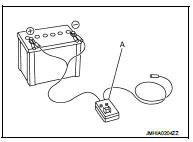
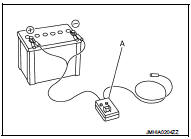
• Connect red clip of deployment tool (A) to battery positive terminal and black clip to negative terminal.
Check that the polarity is correct. The right side lamp in the tool, marked “deployment tool power”, should illuminate with a green light. If the right side lamp illuminates red, reverse the connections to the battery.
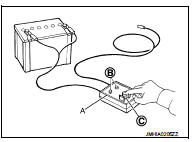
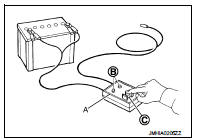
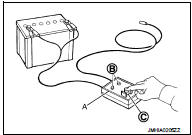
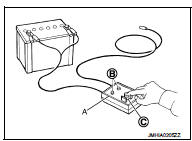
Deployment Tool Check Press the deployment tool switch (C) to the ON position. The left side lamp in the tool, marked “air bag connector voltage” should illuminate (B). If it does not illuminate, replace the deployment tool (A).
Air Bag Deployment Tool Lamp Illumination Chart (Battery Connected)

*: If this lamp illuminates red, the tool is connected to the battery incorrectly. Reverse the connections and check that the lamp illuminates green.
DEPLOYMENT OF DRIVER AIR BAG MODULE (OUTSIDE OF VEHICLE)
1. Unless the vehicle is being scrapped, deploying the air bag in the vehicle is not recommended. This may cause damage to the vehicle interior.
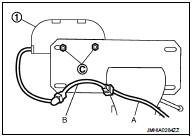
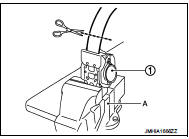
Anchor air bag module bracket (SST: KV99105300) (A) in a vice secured to a firm foundation deployment.
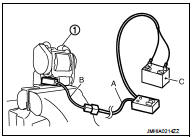
2. Using wire (D), secure driver air bag module (1) to air bag module bracket (SST: KV99105300) (A) at two places.
CAUTION:
Use wire of at least 1.0 mm (0.039 in) diameter.
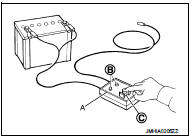
3. Firmly secure air bag module bracket (SST: KV99105300) with driver air bag module attached, in a vise.
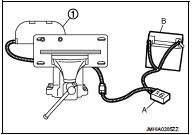
4. Connect deployment tool adapter (SST: KV99110500) (C) to driver air bag module and deployment tool connector (SST: KV99106400) (B).
5. Connect red clip of deployment tool (A) to battery positive terminal and black clip to negative terminal (B).
6. The lamp on the right side of the tool, marked “deployment tool power”, should illuminate green, not red.
7. Press the button on the deployment tool. The left side lamp on the tool, marked “air bag connector voltage”, illuminates and the air bag module (1) deploys.
CAUTION:
When deploying the driver air bag module, stand at least 5.0
m (16.4 ft) away from the air bag module.
Driver air bag module : Disposal
DISPOSING OF AIR BAG MODULE AND SEAT BELT PRE-TENSIONER
Deployed air bag module, seat belt pre-tensioner, and lap pre-tensioner are very hot. Before disposing of air bag module and seat belt pre-tensioner, wait at least 30 minutes, and 10 minutes, respectively. Seal them in a plastic bag before disposal.
CAUTION:
• Never apply water to a deployed air bag module or seat belt
pre-tensioner or lap pre-tensioner.
• Wear gloves when handling a deployed air bag module or seat belt pre-tensioner or lap pre-tensioner.
• No poisonous gas is produced upon air bag module deployment.
However, be careful not to inhale gas since it irritates the throat and can cause choking.
• Never disassemble air bag module, seat belt pre-tensioner and lap pre-tensioner.
• Air bag module, seat belt pre-tensioner and lap pre-tensioner cannot be reused.
• Wash your hands clean after the work is complete.
Front passenger air bag module : Deploy
CHECKING DEPLOYMENT TOOL
Connecting to Battery CAUTION
:
The battery must show voltage of 9.6 V or more.
Remove the battery from the vehicle and place it on dry wood blocks approximately 5.0 m (16.4 ft) away from the vehicle.
• Wait 3 minutes after the vehicle battery is disconnected before proceeding.
• Connect red clip of deployment tool (A) to battery positive terminal and black clip to negative terminal.
Check that the polarity is correct. The right side lamp in the tool, marked “deployment tool power”, should illuminate with a green light. If the right side lamp illuminates red, reverse the connections to the battery.
Deployment Tool Check Press the deployment tool switch (C) to the ON position. The left side lamp in the tool, marked “air bag connector voltage” should illuminate (B). If it does not illuminate, replace the deployment tool (A
Air Bag Deployment Tool Lamp Illumination Chart (Battery Connected)

*: If this lamp illuminates red, the tool is connected to the battery incorrectly. Reverse the connections and check that the lamp illuminates green.
DEPLOYMENT OF FRONT PASSENGER AIR BAG MODULE (OUTSIDE OF VEHICLE)
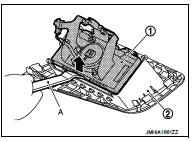
1. Remove the front passenger air bag module (1) from lid (2) with remover tool (A).
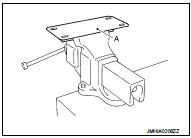
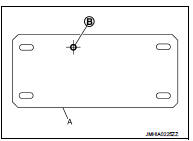
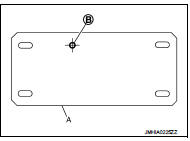
2. Make 8.5 mm (0.335 in) diameter hole (B) in air bag module bracket (SST: KV99105300) (A) at the position shown in figure.
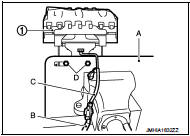
3. Firmly secure air bag module bracket (SST: KV99105300) (A) in a vise.
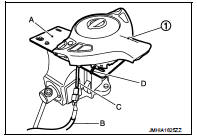
4. Insert two bolts (D) through air bag module bracket and front passenger air bag module (1) lower side holes, and fix then with two nuts.
5. Connect deployment tool (SST: KV99106400) (B) and deployment tool adapter (SST: KV99110500) (C) to front passenger air bag module.
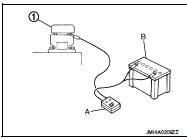
6. Connect red clip of deployment tool (A) to battery positive terminal and black clip to negative terminal (B).
7. The lamp on the right side of the tool, marked “deployment tool power”, should illuminate green, not red.
8. Press the button on the deployment tool (A). The left side lamp on the tool, marked “air bag connector voltage”, illuminates and the front passenger air bag module (1) deploys.
CAUTION:
• When deploying the front passenger air bag module,
never stand on the deploying side.
• Stand at least 5.0 m (16.4 ft) away from the front passenger air bag module.
Front passenger air bag module : Disp
DISPOSING OF AIR BAG MODULE AND SEAT BELT PRE-TENSIONER
Deployed air bag module, seat belt pre-tensioner, and lap pre-tensioner are very hot. Before disposing of air bag module and seat belt pre-tensioner, wait at least 30 minutes, and 10 minutes, respectively. Seal them in a plastic bag before disposal.
CAUTION:
• Never apply water to a deployed air bag module or seat belt
pre-tensioner or lap pre-tensioner.
• Wear gloves when handling a deployed air bag module or seat belt pre-tensioner or lap pre-tensioner.
• No poisonous gas is produced upon air bag module deployment.
However, be careful not to inhale gas since it irritates the throat and can cause choking.
• Never disassemble air bag module, seat belt pre-tensioner and lap pre-tensioner.
• Air bag module, seat belt pre-tensioner and lap pre-tensioner cannot be reused.
• Wash your hands clean after the work is complete.
Front side air bag module : Deployment
CHECKING DEPLOYMENT TOOL
Connecting to Battery CAUTION
:
The battery must show voltage of 9.6 V or more.
Remove the battery from the vehicle and place it on dry wood blocks approximately 5.0 m (16.4 ft) away from the vehicle.
• Wait 3 minutes after the vehicle battery is disconnected before proceeding.
• Connect red clip of deployment tool (A) to battery positive terminal and black clip to negative terminal.
Check that the polarity is correct. The right side lamp in the tool, marked “deployment tool power”, should illuminate with a green light. If the right side lamp illuminates red, reverse the connections to the battery.

Deployment Tool Check Press the deployment tool switch (C) to the ON position. The left side lamp in the tool, marked “air bag connector voltage” should illuminate (B). If it does not illuminate, replace the deployment tool (A).
Air Bag Deployment Tool Lamp Illumination Chart (Battery Connected)

*: If this lamp illuminates red, the tool is connected to the battery incorrectly. Reverse the connections and check that the lamp illuminates green.
DEPLOYMENT OF FRONT SIDE AIR BAG MODULE (OUTSIDE OF VEHICLE)
1. Make 6.5 mm (0.256 in) diameter hole (B) in air bag module bracket (SST: KV99105300) (A) at the position shown in figure.
2. Firmly secure air bag module bracket (SST: KV99105300) in a vise.
3. Insert two bolts through air bag module bracket and front side air bag module (1) upper side holes, and fix them with two nuts (C).
4. Connect deployment tool (SST: KV99106400) (A) and deployment tool adapter (SST: KV99108300) (B) to front side air bag module connector.
5. Connect red clip of deployment tool (SST: KV99106400) (A) to battery positive terminal and black clip to negative terminal (B).
6. The lamp on the right side of the tool, marked “deployment tool power”, should illuminate green, not red.
7. Press the button on the deployment tool. The left side lamp on the tool, marked “air bag connector voltage”, illuminates and the air bag module (1) deploys.
CAUTION:
When deploying the front side air bag module, stand at
least 5.0 m (16.4 ft) away from the front side air bag module.
Front side air bag module : Disposal
DISPOSING OF AIR BAG MODULE AND SEAT BELT PRE-TENSIONER
Deployed air bag module, seat belt pre-tensioner, and lap pre-tensioner are very hot. Before disposing of air bag module and seat belt pre-tensioner, wait at least 30 minutes, and 10 minutes, respectively. Seal them in a plastic bag before disposal.
CAUTION:
• Never apply water to a deployed air bag module or seat belt
pre-tensioner or lap pre-tensioner.
• Wear gloves when handling a deployed air bag module or seat belt pre-tensioner or lap pre-tensioner.
• No poisonous gas is produced upon air bag module deployment.
However, be careful not to inhale gas since it irritates the throat and can cause choking.
• Never disassemble air bag module, seat belt pre-tensioner and lap pre-tensioner.
• Air bag module, seat belt pre-tensioner and lap pre-tensioner cannot be reused.
• Wash your hands clean after the work is complete.
Side curtain air bag module : Deployment
CHECKING DEPLOYMENT TOOL
Connecting to Battery
CAUTION:
The battery must show voltage of 9.6 V or more.
Remove the battery from the vehicle and place it on dry wood blocks approximately 5.0 m (16.4 ft) away from the vehicle.
• Wait 3 minutes after the vehicle battery is disconnected before proceeding.
• Connect red clip of deployment tool (A) to battery positive terminal and black clip to negative terminal.
Check that the polarity is correct. The right side lamp in the tool, marked “deployment tool power”, should illuminate with a green light. If the right side lamp illuminates red, reverse the connections to the battery.
Deployment Tool Check Press the deployment tool switch (C) to the ON position. The left side lamp in the tool, marked “air bag connector voltage” should illuminate (B). If it does not illuminate, replace the deployment tool (A).
Air Bag Deployment Tool Lamp Illumination Chart (Battery Connected)

*: If this lamp illuminates red, the tool is connected to the battery incorrectly. Reverse the connections and check that the lamp illuminates green.
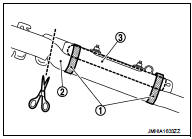
DEPLOYMENT OF SIDE CURTAIN AIR BAG MODULE (OUTSIDE OF VEHICLE)
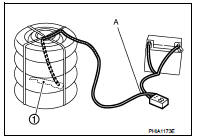
1. Cut off the bands (1).
2. Cut the inflator (3) from side curtain air bag module (2).
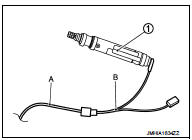
3. Connect deployment tool (SST: KV99106400) (A) and deployment tool adapter (SST: KV99110500) (B) to the inflator (1).
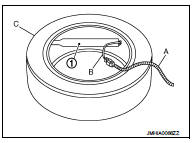
4. Put the inflator (1) connected with the deployment tool (A) (SST: KV99106400) and deployment tool adapter (B) (SST: KV99110500) into a tire without a wheel (C).
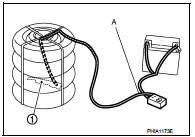
5. Put the tire with the inflator (1) onto another tire without a wheel.
Add an additional tire without a wheel and then a tire mounted on a wheel on top.
CAUTION:
Tie all tires together with a strap in order keep them standing.
6. Connect red clip of deployment tool (A) to battery positive terminal and black clip to negative terminal.
7. The lamp on the right side of the tool, marked “deployment tool power”, should illuminate green, not red.
8. Press the button on the deployment tool. The left side lamp on the tool, marked “air bag connector voltage”, illuminates and the air bag module inflator deploys.
CAUTION:
When deploying the side curtain air bag module, stand at least 5.0 m (16.4 ft)
away from the side
curtain air bag module.
Side curtain air bag module : Disposal
DISPOSING OF AIR BAG MODULE AND SEAT BELT PRE-TENSIONER
Deployed air bag module, seat belt pre-tensioner, and lap pre-tensioner are very hot. Before disposing of air bag module and seat belt pre-tensioner, wait at least 30 minutes, and 10 minutes, respectively. Seal them in a plastic bag before disposal.
CAUTION:
• Never apply water to a deployed air bag module or seat belt
pre-tensioner or lap pre-tensioner.
• Wear gloves when handling a deployed air bag module or seat belt pre-tensioner or lap pre-tensioner.
• No poisonous gas is produced upon air bag module deployment.
However, be careful not to inhale gas since it irritates the throat and can cause choking.
• Never disassemble air bag module, seat belt pre-tensioner and lap pre-tensioner.
• Air bag module, seat belt pre-tensioner and lap pre-tensioner cannot be reused.
• Wash your hands clean after the work is complete.
Seat belt pre-tensioner : Deplo
CHECKING DEPLOYMENT TOOL
Connecting to Battery
CAUTION:
The battery must show voltage of 9.6 V or more.
Remove the battery from the vehicle and place it on dry wood blocks approximately 5.0 m (16.4 ft) away from the vehicle.
• Wait 3 minutes after the vehicle battery is disconnected before proceeding.
• Connect red clip of deployment tool (A) to battery positive terminal and black clip to negative terminal.
Check that the polarity is correct. The right side lamp in the tool, marked “deployment tool power”, should illuminate with a green light. If the right side lamp illuminates red, reverse the connections to the battery.
Deployment Tool Check Press the deployment tool switch (C) to the ON position. The left side lamp in the tool, marked “air bag connector voltage” should illuminate (B). If it does not illuminate, replace the deployment tool (A).
Air Bag Deployment Tool Lamp Illumination Chart (Battery Connected)

*: If this lamp illuminates red, the tool is connected to the battery incorrectly. Reverse the connections and check that the lamp illuminates green.
DEPLOYMENT OF FRONT SEAT BELT PRE-TENSIONER (OUTSIDE OF VEHICLE)
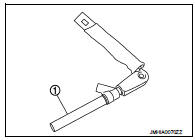
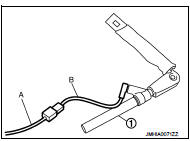
1. Firmly grip pre-tensioner (1) in a vise (A) and cut off the webbing.
2. Connect deployment tool (SST: KV99106400) (A) and deployment tool adapter (SST: KV99110500) (B) yellow connector to front seat belt pre-tensioner (1).
3. Connect red clip of deployment tool to battery positive terminal and black clip to negative terminal (C).
4. The lamp on the right side of the tool, marked “deployment tool power”, should illuminate green, not red.
5. Press the button on the deployment tool. The left side lamp on the tool, marked “seat belt pre-tensioner connector voltage”, illuminates and the front seat belt pre-tensioner deploys.
CAUTION:
When deploying the front seat belt pre-tensioner, stand at
least 5.0 m(16.4 ft) away from the front seat belt pre-tensioner.
Seat belt pre-tensioner : Disposal
DISPOSING OF AIR BAG MODULE AND SEAT BELT PRE-TENSIONER
Deployed air bag module, seat belt pre-tensioner, and lap pre-tensioner are very hot. Before disposing of air bag module and seat belt pre-tensioner, wait at least 30 minutes, and 10 minutes, respectively. Seal them in a plastic bag before disposal.
CAUTION
:
• Never apply water to a deployed air bag module or seat belt
pre-tensioner or lap pre-tensioner.
• Wear gloves when handling a deployed air bag module or seat belt pre-tensioner or lap pre-tensioner.
• No poisonous gas is produced upon air bag module deployment.
However, be careful not to inhale gas since it irritates the throat and can cause choking.
• Never disassemble air bag module, seat belt pre-tensioner and lap pre-tensioner.
• Air bag module, seat belt pre-tensioner and lap pre-tensioner cannot be reused.
• Wash your hands clean after the work is complete.
Lap pre-tensioner : Deployment
CHECKING DEPLOYMENT TOOL
Connecting to Battery
CAUTION:
The battery must show voltage of 9.6 V or more.
Remove the battery from the vehicle and place it on dry wood blocks approximately 5.0 m (16.4 ft) away from the vehicle.
• Wait 3 minutes after the vehicle battery is disconnected before proceeding.
• Connect red clip of deployment tool (A) to battery positive terminal and black clip to negative terminal.
Check that the polarity is correct. The right side lamp in the tool, marked “deployment tool power”, should illuminate with a green light. If the right side lamp illuminates red, reverse the connections to the battery.
Deployment Tool Check Press the deployment tool switch (C) to the ON position. The left side lamp in the tool, marked “air bag connector voltage” should illuminate (B). If it does not illuminate, replace the deployment tool (A).
Air Bag Deployment Tool Lamp Illumination Chart (Battery Connected)

*: If this lamp illuminates red, the tool is connected to the battery incorrectly. Reverse the connections and check that the lamp illuminates green.
DEPLOYMENT OF LAP PRE-TENSIONER (OUTSIDE OF VEHICLE)
1. Remove lap pre-tensioner (1). Refer to SB-5, "SEAT BELT RETRACTOR : Removal and Installation".
2. Connect deployment tool (SST: KV99106400) (A) and deployment tool adapter (SST: KV99110500) (B) orange connector to lap pre-tensioner (1).
3. Put the lap pre-tensioner (1) connected with the deployment tool into a tire without a wheel.
4. Connect red clip of deployment tool (A) to battery positive terminal and black clip to negative terminal.
5. The lamp on the right side of the tool, marked “deployment tool power”, should glow green, not red.
6. Press the button on the deployment tool. The left side lamp on the tool, marked “lap pre-tensioner connector voltage”, will illuminate and the lap pre-tensioner (1) will deploy.
CAUTION:
When deploying the lap pre-tensioner, stand at least 5.0 m
(16.4 ft) away from the lap pre-tensioner.
Lap pre-tensioner : Disposal
DISPOSING OF AIR BAG MODULE AND SEAT BELT PRE-TENSIONER
Deployed air bag module, seat belt pre-tensioner, and lap pre-tensioner are very hot. Before disposing of air bag module and seat belt pre-tensioner, wait at least 30 minutes, and 10 minutes, respectively. Seal them in a plastic bag before disposal.
CAUTION
:
• Never apply water to a deployed air bag module or seat belt
pre-tensioner or lap pre-tensioner.
• Wear gloves when handling a deployed air bag module or seat belt pre-tensioner or lap pre-tensioner.
• No poisonous gas is produced upon air bag module deployment.
However, be careful not to inhale gas since it irritates the throat and can cause choking.
• Never disassemble air bag module, seat belt pre-tensioner and lap pre-tensioner.
• Air bag module, seat belt pre-tensioner and lap pre-tensioner cannot be reused.
• Wash your hands clean after the work is complete.
 Lap pre-tensioner
Exploded View
Refer to SB-4, "Exploded View".
Removal and Installation
For removal and installation procedures, refer to SB-5, "SEAT BELT RETRACTOR
: Removal and Installation" ...

Other materials:
Main line betweeN DLC and MDU circuit
Diagnosis Procedure
1.CHECK HARNESS CONTINUITY (OPEN CIRCUIT)
1. Turn the ignition switch OFF.
2. Disconnect the battery cable from the negative terminal.
3. Disconnect the following harness connectors.
- ECM
- Multi display unit
4. Check the continuity between the data link connector and the ...
P range interlock door lock/unlock function does not operate
Diagnosis Procedure
1.CHECK “AUTOMATIC LOCK/UNLOCK SELECT” SETTING IN “WORK SUPPORT”
1. Select “DOOR LOCK” of “BCM” using CONSULT-III.
2. Select “AUTOMATIC LOCK/UNLOCK SELECT” in “WORK SUPPORT” mode.
3. Check “AUTOMATIC LOCK/UNLOCK SELECT” in “WORK SUPPORT”.
Refer to DLK-41, "DOOR LOCK : ...
P0713 transmission fluid temperature sensor A
DTC Logic
DTC CONFIRMATION PROCEDURE
1.PREPARATION BEFORE WORK
If another "DTC CONFIRMATION PROCEDURE" occurs just before, turn ignition
switch OFF and wait for at
least 10 seconds, then perform the next test.
>> GO TO 2.
2.PERFORM DTC CONFIRMATION PROCEDURE
1. Start the ...
