Nissan Juke Service and Repair Manual : Battery inspection
How to Handle Battery
CAUTION:
• If it becomes necessary to start the engine with a booster battery and jumper
cables, use a 12-volt
booster battery.
• After connecting battery cables, ensure that they are tightly clamped to battery terminals for good contact.
• Never add distilled water through the hole used to check specific gravity
.
METHODS OF PREVENTING OVER-DISCHARGE
The following precautions must be taken to prevent over-discharging a battery.
• The battery surface (particularly its top) should always be kept clean and dry.
• The terminal connections should be clean and tight.
• At every routine maintenance, check the electrolyte level.
This also applies to batteries designated as “low maintenance” and “maintenance-free”.
• When the vehicle is not going to be used over a long period of time, disconnect the battery cable from the negative terminal. (If the vehicle has an extended storage switch, turn it off.)
• Check the charge condition of the battery.
Periodically check the specific gravity of the electrolyte. Keep a close check on charge condition to prevent over-discharge.
CHECKING ELECTROLYTE LEVEL
WARNING
:
Never allow battery fluid to come in contact with skin, eyes, fabrics, or
painted surfaces. After touching
a battery, never touch or rub your eyes until you have thoroughly washed your
hands. If acid contacts
eyes, skin or clothing, immediately flush with water for 15 minutes and seek
medical attention.
• Remove the cell plug using a suitable tool.
• Add distilled water up to the MAX level.

Sulphation
A battery will be completely discharged if it is left unattended
for a long time and the specific gravity will become less than
1.100. This may result in sulphation on the cell plates.
To determine if a battery has been “sulphated”, note its voltage and current when charging it. As shown in the figure, less current and higher voltage are observed in the initial stage of charging sulphated batteries.
A sulphated battery may sometimes be brought back into service by means of a long, slow charge, 12 hours or more, followed by a battery capacity test.

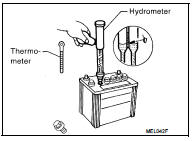
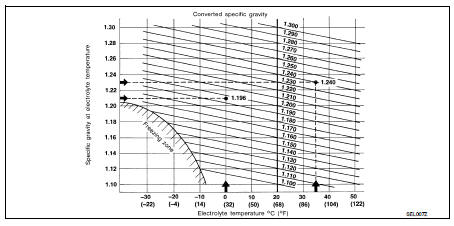
SPECIFIC GRAVITY CHECK
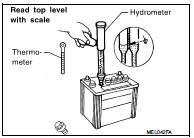
1. Read hydrometer and thermometer indications at eye level.
2. Convert into specific gravity at 20°C (68°F).
Example:
• When electrolyte temperature is 35°C (95°F) and specific gravity of
electrolyte is 1.230, converted specific gravity at 20°C (68°F) is
1.240.
• When electrolyte temperature is 0°C (32°F) and specific gravity of electrolyte is 1.210, converted specific gravity at 20°C (68°F) is 1.196.
Work Flow
OVERALL SEQ
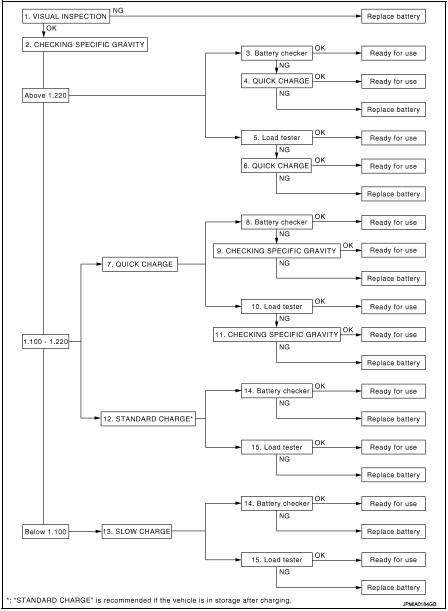
DETAILED FLOW
1.VISUAL INSPECTION
1. Check battery case for cracks or bends.
2. Check battery terminals for damage.
3. If the difference between the max. and min. electrolyte level in cells is within 10 mm (0.39 in), it is OK.
Are these inspection results normal? YES >> GO TO 2.
NO >> Replace battery.
2.CHECKING SPECIFIC GRAVITY
Check specific gravity. Refer to PG-111, "How to Handle Battery".
Inspection results Above 1.220 (Test using battery checker)>>GO TO 3.
Above 1.220 (Test using load tester)>>GO TO 5.
1.100 - 1.220 (When performing quick charge)>>GO TO 7.
1.100 - 1.220 (When performing standard charge)>>GO TO 12.
Below 1.100>>GO TO 13.
3.CAPACITY TEST
Test using battery checker.
Is the battery usable, according to the manufacturer’s instructions? YES >> Ready for use. Mount battery again and check loose terminals. Also check other related circuits.
NO >> GO TO 4.
4.QUICK CHARGE
1. Perform quick charge. Time required: 45 min. Refer to PG-122, "Quick Charge".
2. Test using battery checker.
Is the battery usable, according to the manufacturer’s instructions? YES >> Ready for use.
NO >> Replace battery.
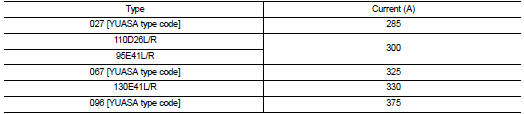
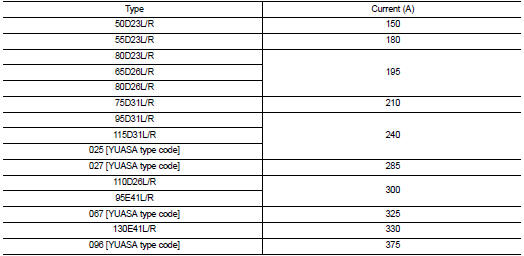
5.CAPACITY TEST
1. Test using load tester.
2. Check battery type and determine the specified current using the table.
Discharging Current (Load Tester)
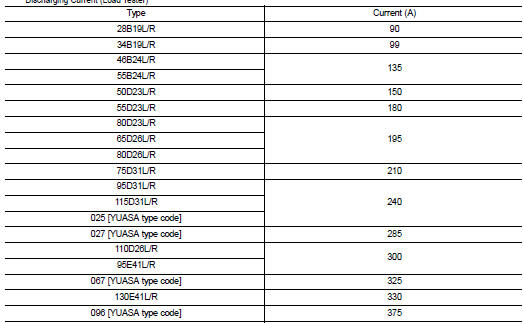
3. Read load tester voltage when specified discharging current flows through battery for 15 seconds.
Is the voltage 9.6 V or more? YES >> Ready for use.
NO >> GO TO 6.
6.QUICK CHARGE
1. Perform quick charge. Time required: 45 min. Refer to PG-122, "Quick Charge".
2. Test using load tester.
Is the voltage 9.6 V or more? YES >> Ready for use.
NO >> Replace battery.
7. QUICK CHARGE
1. Perform quick charge. Refer to PG-122, "Quick Charge".
2. Perform capacity test.
Test using battery checker.>>GO TO 8.
Test using load tester.>>GO TO 10.
8.CAPACITY TEST
Test using battery checker.
Is the battery usable, according to the manufacturer’s instructions? YES >> Ready for use.
NO >> GO TO 9.
9.CHECKING SPECIFIC GRAVITY
1. Check specific gravity. Refer to PG-111, "How to Handle Battery".
2. Perform recharge. Refer to PG-122, "Quick Charge".
NOTE
:
If battery temperature rises above 55°C (131°F), stop charging. Always charge
battery when its temperature
is below 55°C (131°F).
3. Test using battery checker.
Is the battery usable, according to the manufacturer’s instructions? YES >> Ready for use.
NO >> Replace battery.
10.CAPACITY TEST
1. Test using load tester.
2. Check battery type and determine the specified current using the table.
Discharging Current (Load Tester)
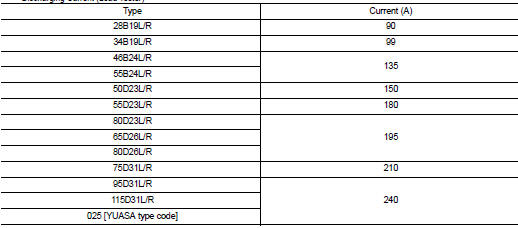
3. Read load tester voltage when specified discharging current flows through battery for 15 seconds.
Is the voltage 9.6 V or more? YES >> Ready for use.
NO >> GO TO 11.
11.CHECKING SPECIFIC GRAVITY
1. Check specific gravity. Refer to PG-111, "How to Handle Battery".
2. Perform recharge. Refer to PG-122, "Quick Charge".
NOTE
:
If battery temperature rises above 55°C (131°F), stop charging. Always charge
battery when its temperature
is below 55°C (131°F).
3. Test using load tester.
Is the voltage 9.6 V or more? YES >> Ready for use.
NO >> Replace battery.
12. STANDARD CHARGE
NOTE
:
“STANDARD CHARGE” is recommended if the vehicle is in storage after charging.
1. Perform standard charge. Refer to PG-121, "Standard Charge".
2. Perform capacity test.
Test using battery checker.>>GO TO 14.
Test using load tester.>>GO TO 15.
13. SLOW CHARGE
1. Perform slow charge. Refer to PG-120, "Slow Charge".
2. Perform capacity test.
Test using battery checker.>>GO TO 14.
Test using load tester.>>GO TO 15.
14.CAPACITY TEST
Test using battery checker.
Is the battery usable, according to the manufacturer’s instructions? YES >> Ready for use.
NO >> Replace battery.
15.CAPACITY TEST
1. Test using load tester.
2. Check battery type and determine the specified current using the table.
Discharging Current (Load Tester)

3. Read load tester voltage when specified discharging current flows through battery for 15 seconds.
Is the voltage 9.6 V or more? YES >> Ready for use.
NO >> Replace battery.
 Basic inspection
...
 Fuse inspection
How To Check
• If fuse is blown, be sure to eliminate cause of malfunction before
installing new fuse.
• Use fuse of specified rating. Never use fuse of more than specified
rating.
• Do not parti ...
Other materials:
Removal and Installation
CAUTION:
• Be sure to use genuine exhaust system parts or equivalents which are specially
designed for heat
resistance, corrosion resistance and shape.
• Perform the operation with the exhaust system fully cooled down because the
system is still hot just
after the engine stops.
• Be careful ...
Precaution
Precaution for Supplemental Restraint System (SRS) "AIR BAG" and "SEAT
BELT
PRE-TENSIONER"
The Supplemental Restraint System such as “AIR BAG” and “SEAT BELT PRE-TENSIONER”,
used along
with a front seat belt, helps to reduce the risk or severity of injury to the
driver a ...
Door lock actuator
Driver side
DRIVER SIDE : Component Function Check
1.CHECK FUNCTION
1. Select “DOOR LOCK” of “BCM” using CONSULT-III.
2. Select “DOOR LOCK” in “ACTIVE TEST” mode.
3. Check that the function operates normally according to the following
conditions.
Is the inspection result normal?
YES >& ...
