Nissan Juke Service and Repair Manual : Battery charging chart
Slow Charge
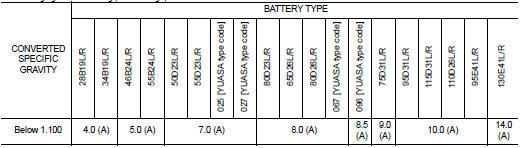
1.DETERMINE INITIAL CHARGING CURRENT
1. Determine initial charging current from specific gravity.
2. Check battery type and determine the specified current using the table.
NOTE
:
After starting charging, adjustment of charging current is not necessary.
Initial Charging Current Setting (Slow Charge)
>> GO TO 2.
2.CHARGE BATTERY
1. Charge battery.
2. Check charge voltage 30 minutes after starting the battery charge.
Is the voltage between 12 V and 15 V? YES >> GO TO 3.
NO >> Replace battery.
3.CHARGE BATTERY
Continue to charge for 12 hours.
>> GO TO 4.
4.CHECKING SPECIFIC GRAVITY
Check specific gravity. Refer to PG-111, "How to Handle Battery".
Is the specific gravity 1.240 or more? YES >> Complete slow charge. Perform “CAPACITY TEST”. Refer to PG-113, "Work Flow".
NO >> GO TO 5.
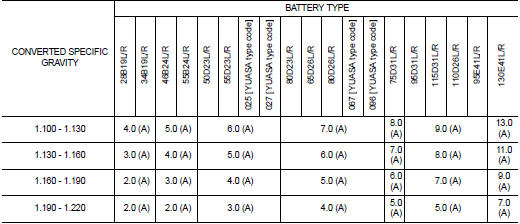
5.CONDUCT ADDITIONAL CHARGE
Add charging time depending on specific gravity.
Additional Charge (Slow Charge)

>> Complete slow charge. Perform “CAPACITY TEST”. Refer to PG-113, "Work Flow".
CAUTION:
• Set charging current to value specified in “Initial Charging Current Setting
(Slow Charge)”. If charger
is not capable of producing specified current value, set its charging current as
close to that value as
possible.
• Keep battery away from open flame while it is being charged.
• When connecting charger, connect leads first, then turn on charger. Never turn on charger first, as this may cause a spark.
• If battery temperature rises above 55°C (131°F), stop charging. Always charge battery when its temperature is below 55°C (131°F).
Standard Charge
1.DETERMINE INITIAL CHARGING CURRENT
1. Determine initial charging current from specific gravity.
2. Check battery type and determine the specified current using the table.
NOTE
:
After starting charging, adjustment of charging current is not necessary.
Initial Charging Current Setting (Standard Charge)
>> GO TO 2.
2.CHARGE BATTERY
Charge battery for 8 hours.
>> GO TO 3.
3.CHECKING SPECIFIC GRAVITY
Check specific gravity. Refer to PG-111, "How to Handle Battery".
Is the specific gravity 1.240 or more? YES >> Complete standard charge. Perform “CAPACITY TEST”. Refer to PG-113, "Work Flow".
NO >> GO TO 4.
4.CONDUCT ADDITIONAL CHARGE
Add charging time depending on specific gravity.
Additional Charge (Standard Charge)

>> Complete standard charge. Perform “CAPACITY TEST”. Refer to PG-113, "Work Flow".
CAUTION
:
• Never use standard charge method on a battery whose specific gravity is less
than 1.100.
• Set charging current to value specified in “Initial Charging Current Setting (Standard Charge)”. If charger is not capable of producing specified current value, set its charging current as close to that value as possible.
• Keep battery away from open flame while it is being charged.
• When connecting charger, connect leads first, then turn on charger. Never turn on charger first, as this may cause a spark.
• If battery temperature rises above 55°C (131°F), stop charging. Always charge battery when its temperature is below 55°C (131°F).
Quick Charge
1.DETERMINE INITIAL CHARGING CURRENT
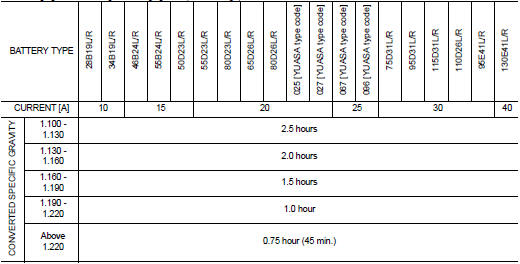
1. Determine initial charging current setting and charging time from specific gravity.
2. Check battery type and determine the specified current using the table.
NOTE
:
After starting charging, adjustment of charging current is not necessary.
Initial Charging Current Setting and Charging Time (Quick Charge)
CAUTION:
• Never use quick charge method on a battery whose specific gravity is less than
1.100.
• Set initial charging current to value specified in “Initial Charging Current Setting and Charging Time (Quick Charge)”. If charger is not capable of producing specified current value, set its charging current as close to that value as possible.
• Keep battery away from open flame while it is being charged.
• When connecting charger, connect leads first, then turn on charger. Never turn on charger first, as this may cause a spark.
• Be careful of a rise in battery temperature because a large current flow is required during quickcharge operation.
If battery temperature rises above 55°C (131°F), stop charging. Always charge battery when its temperature is below 55°C (131°F).
• Never exceed the charging time specified in “Initial Charging Current Setting and Charging Time (Quick Charge)”, because charging battery over the charging time can cause deterioration of the battery.
>> GO TO 2.
2.CHARGE BATTERY
Charge battery.
>> Complete quick charge. Perform “CAPACITY TEST”. Refer to PG-113, "Work Flow".
 Fusible link inspection
How To Check
A melted fusible link can be detected either by visual inspection or by
feeling with finger tip. If its condition is questionable, use circuit
tester or test lamp.
1 :Fusible link
CA ...

Other materials:
Headlining
Exploded View
LHD models
1. Headlining assembly
2. Assist grip clip
3. Rear assist grip RH
4. Front assist grip RH
5. Sun visor assembly RH
6. Sun visor cover RH
7. Sun visor cover LH
8. Sun visor assembly LH
9. Rear assist grip LH
10. Headlining clip
11. Sun visor holder RH
1 ...
Power generation voltage variable control system operation
inspection
Inspection Procedure
CAUTION:
When performing this inspection, always use a charged battery that has completed
the battery inspection.
(When the charging rate of the battery is low, the response speed of the voltage
change will
become slow. This can cause an incorrect inspection.)
1.CHECK ...
U1010 control unit (can)
Description
Initial diagnosis of A/C auto amp.
DTC Logic
DTC DETECTION LOGIC
DTC CONFIRMATION PROCEDURE
1.PERFORM SELF-DIAGNOSIS
With CONSULT-III
1. Turn ignition switch ON.
2. Select “Self Diagnostic Result” mode of “HVAC” using CONSULT-.III
3. Check DTC.
Is DTC detected?
YES >> ...
